The Magsafe connector (introduced by Apple in 2006) is very convenient. It snaps on magnetically and disconnects if you pull on it. In addition it is symmetrical so you don't need to worry about what side is up. A small LED on the connector changes color to indicate the charging status.
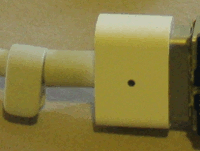
The picture below shows the newer Magsafe 2 connector, which is slimmer. Note how the pins are arranged symmetrically; this allows the connector to be plugged in with either side on top. The charger and computer communicate through the adapter sense pin (also called the charge control pin), which this article will explain in detail below. The two ground pins are slightly longer than the others so they make contact first when you plug in the connector (the same as USB).

Magsafe connector teardown
I had a Magsafe cable that malfunctioned, burning the power pins as you can see in the photo below, so I figured I'd tear it down and see what's inside. The connector below is an older Magsafe; notice the slightly different shape compared to the Magsafe 2 above. Also note that the middle adapter sense pin is much smaller than the pins, unlike the Magsafe 2.


Cutting through the soft plastic block reveals a circuit board, protected by a thin clear plastic coating. The charger wires are soldered onto the back of this board. Only two wires - power and ground - go to the charger unit. There is no data communication via the adapter sense pin with the charger unit itself.


The circuit board inside the Magsafe connector is very small, as you can see below. In the middle are two LEDs, orange/red and green. Two identical LEDs are on the other side. The tiny chip on the left is a DS2413 1-Wire Dual Channel Addressable Switch. This chip has two functions. It switches the status LEDs on and off (that's the "dual channel switch" part). It also provides the ID value to the Mac indicating the charger specifications and serial number.

The chip uses the 1-Wire protocol, which is a clever system for connecting low-speed devices through a single wire (plus ground). The 1-Wire system is convenient here since the Mac can communicate with the Magsafe through the single adapter sense pin.
Understanding the charger's ID code
You can easily pull up the charger information on a Mac (Go to "About this Mac", "More Info...", "System Report...", "Power"), but much of the information is puzzling. The wattage and serial number make sense, but what about the ID, Revision, and Family? It turns out that these are part of the 1-Wire protocol used by the chip inside the connector.Every chip in the 1-Wire family has a unique 64-bit ID that is individually laser-programmed into the chip. In the 1-Wire standard, the 64-bit ID consists of an 8-bit family code identifying the type of 1-Wire device, a 48-bit unique serial number, and an 8-bit non-cryptographic CRC checksum that verifies the ID number is correct. Companies (such as Apple) can customize the ID numbers: the top 12 bits of the serial number are used as a customer ID, the next 12 bits are data specified by the customer, and the remaining 24 bits are the serial number.
With this information, the Mac's AC charger information now makes sense and the diagram below shows how the 64-bit ID maps onto the charger information. The ID field 100 is the customer ID indicating Apple. The wattage and revision are in the 12 bits of customer data (hex 3C is 60 decimal, indicating 60 watts). The Family code BA is the 1-Wire family code for the DS2413 chip. Thus, much of the AC charger information presented by the Mac is actually low-level information about the 1-Wire chip.

There are a few complications as the diagram below shows. Later chargers use the family code 85 for some reason. This doesn't indicate an 85 watt charger. It also doesn't indicate the family of the 1-Wire device, so it may be an arbitrary number. For Magsafe 2 chargers, the customer ID is 7A1 for a 45 watt charger, 921 for a 60 watt charger, and AA1 for an 85 watt charger. It's strange to use separate customer IDs for the different models. Even stranger, for an 85 watt charger the wattage field in the ID contains 60 (3C hex) not 85, even though 85 watts shows up on the info screen. The Revision is also dropped from the info screen for later chargers.

How to read the ID number
It's very easy to read the ID number from a Magsafe connector using an Arduino board and a single 2K pullup resistor, along with Paul Stoffregen's Arduino 1-Wire library and a simple Arduino program.

Touching the ground wire to an outer ground pin of the Magsafe connector and the data wire to the inner adapter sense pin will let the Arduino immediately read and display the 64-bit ID number. The charger does not need to be plugged in to the wall - and in fact I recommend not plugging it in - since one interesting feature of the 1-Wire protocol is the device can power itself parasitically off the data wire, without a separate power source.

To make things more convenient, the serial number can be displayed on an LCD display. The circuit looks complicated, but it's just a tangle of wires connecting the LCD display. Using a simple program, the 64-bit ID number is displayed on the bottom line of the display. The top line is a legend indicating the components of the code: "cc" CRC check, "id." customer id, "ww" wattage, "r" revision, "serial" serial number, and "ff" family. The number below corresponds to an 85 watt charger (55 hex = 85 decimal).

Controlling the Magsafe status light
The Mac controls the status light in the Magsafe connector by sending commands through the adapter sense pin to the 1-Wire DS2413 switch IC to turn the two pairs of LEDs on or off. By sending the appropriate commands to the IC through the adapter sense pin, an Arduino can control the LEDs as desired.
The picture below demonstrates the setup. The same simple resistor circuit as before is used to communicate with the chip, along with a simple Arduino program that sends commands via the 1-Wire protocol. These commands are described in the DS2413 datasheet but should be obvious from the program code.
I used a cable removed from a dead charger for simplicity. The LEDs are normally powered by the charger's voltage, which I simulated with two 9-volt batteries. To hook the Arduino to the connector, this time I used a Mac DC input board that I got on eBay; this is the board in a Mac that the Magsafe connector plugs into. The only purpose of the board here is to give me a safer way to attach the wires than poking at the pins.
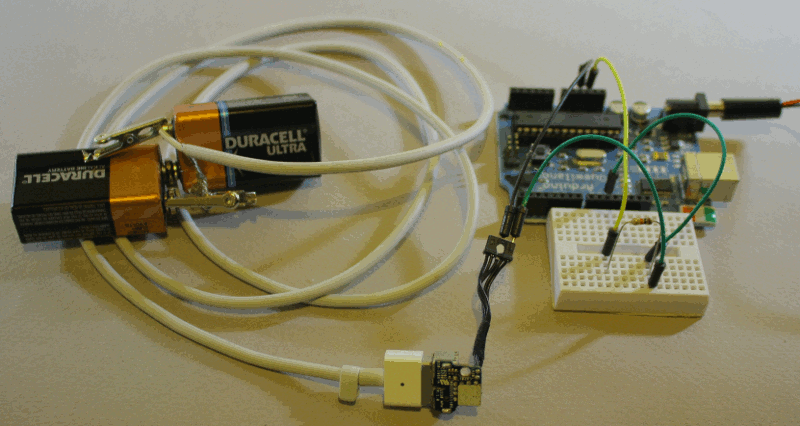
The connector contains a pair of orange/red LEDs and a pair of green LEDs, which can be switched on and off independently. When both pairs are lit, the resulting color is yellow. Thus, the connector can display three colors. The Arduino program cycles through the three colors and off, as you can see from the pictures above.
The charger startup process
When the Magsafe connector is plugged into a Mac, a lot more happens than you might expect. I believe the following steps take place:- The charger provides a very low current (about 100 µA) 6 volt signal on the power pins (3 volts for Magsafe 2).
- When the Magsafe connector is plugged into the Mac, the Mac applies a resistive load (e.g. 39.41KΩ), pulling the power input low to about 1.7 volts.
- The charger detects the power input has been pulled low, but not too low. (A short or a significant load will not enable the charger.) After exactly one second, the charger switches to full voltage (14.85 to 20 volts depending on model and wattage). There's a 16-bit microprocessor inside the charger to control this and other charger functions.
- The Mac detects the full voltage on the power input and reads the charger ID using the 1-Wire protocol.
- If the Mac is happy with the charger ID, it switches the power input to the internal power conversion circuit and starts using the input power. The Mac switches on the appropriate LED on the connector using the 1-Wire protocol.
This process explains why there is a delay of a second after you connect the charger before the light turns on and the computer indicates the battery is charging. It also explains why if you measure the charger output with a voltmeter, you don't find much voltage.
The complex sequence of steps provides more safety than a typical charger. Because the charger is providing extremeley low current at first, there is less risk of shorting something out while attaching the connector. Since the charger waits a full second before powering up, the Magsafe connector is likely to be firmly attached by the time full power is applied. The safety feature are not foolproof, though, as the burnt-up connector I tore apart shows.
Don't try this at home
Warning: I recommend you don't try any of these experiments. 85 watts is enough to do lots of damage: blow out your Mac's DC input board, send flames out of a component, blow fuses, or vaporize PC traces, and that's just the things I've had happen to me. The Mac and charger both have various protection mechanisms, but they won't take care of everything. Poking at your charger while it's plugged in is a high-risk activity.Reading your charger's ID by probing the pins while it's not plugged in is considerably safer, but I can't guarantee it. If you mess up your charger, computer or Arduino you're on your own.
hi! great post.
ReplyDeleteI've got curious and explored for a while that wattage difference, and for now i got the idea that the chargers id's are hardcoded per model, so when IOPSCopyExternalPowerAdapterDetails is called, the key kIOPSPowerAdapterWattsKey haves the right value.
Will look further with more time
Great information, thanks! I had been looking for information on the MagSage connector for a while because I could never get an external/portable battery charging my Mac.
ReplyDeleteVery Intresting! Thank you!
ReplyDeleteHow did you identify the chip? I don't see DS2413 printed on it anywhere.
ReplyDeleteHi Musashi! Identifying the chip was hard. I assumed it was a custom 1-wire protocol chip, so I sent it random 1-wire commands to see if I could figure it out, without success.
ReplyDeleteThen I looked at the datasheets for some existing 1-wire chips to figure out what style of commands they used. When I looked at the DS2413 chip, I thought Doh! that's the obvious chip to use to control 2 LEDs, since it has two switches. When I sent the DS2413 commands to the chip, it responded just like a DS2413, which makes it pretty clear that the chip is a DS2413.
Then, I found that chips with custom IDs add hex 80 to the family code, so the charger's family code of BF is really hex 3F, which you can look up on the 1-wire family code list, and 3F is the DS2413's family code. If I realized that originally, I could have saved myself a lot of originally.
Interesting article, I didn't know what MagSafe means until now!
ReplyDeletevery neat investigation.
ReplyDeletenow I wonder those who sell hyperjuice stuff - are they aware of this complex magsafe protocol when offering car adapters?
By the way, if I take the magsafe cord from the busted power brick and attach it to the 18V/4A car adaper - will it be working?
Your post is most illuminating. Thanks. You show the complexity I supposed. I had the odd problem that my original power unit had a weak pin and so was getting very very hot. I got a new one which suddenly refused to light or charge. The old one saved me from complete discharge. But your article indicated the possibility of serial number registration. yup. Rebooted the machine and it sees the new one again.
ReplyDeleteI didn't get, have you reverse-engineered the plug board?
ReplyDeleteShould there be a direct connection between the spring-loaded pins and the two wires that go to the brick?
I have two broken adapters - 60W and 85W and trying to undertand if it is a bad soldering joint, a dead cable, or a dead power brick...
all this means that apple can just block the old chargers at any time via simple software update?
ReplyDelete@Big Guy
ReplyDeleteOther way around: Apple has provided firmware updates so that older model MacBooks and MacBook Pros would functions with newer adapters. SMC Firmware Update 1.4 is the most relevant example.
Hi, I was wondering if you have documented what happens when the MagSafe is disconnected from the laptop. I notice that the LED (which is powered from the charger's voltage) goes out immediately, so I'd assume the charger actively detects if the plug has been disconnected?
ReplyDeleteI ask because I recently bought a MagSafe charger online (it's identical to the original one physically), and noticed that the LED remains on for a couple of seconds after disconnecting - something that never happens with genuine chargers - leading me to believe it is probably a knockoff.
Fantastic work! Very impressed... Thank you for sharing!
ReplyDeleteHi Great information thanks! Here is a guy who looked into the communication signal (info in Japanese).
ReplyDeletehttp://hirakawa-jp.sblo.jp/category/2083226-1.html
How did you identify the resistive load (39.41KΩ)? How is it applied?
My macbook has a problem and the Magsafe LED goes green but every 0.5 sec goes off for a very short time and the machine does not start.
It would be extremely helpful for "repair" peoples, if you could provide much detailed technology on the Magsafe-logicboard communication.
Thanks for this info. I'm on a power adaptor crash course at the moment....
ReplyDeleteI know this is not a support forum but this might also be of interest to "Big Guy' in tracking down the issues in his faulty units. Any advice appreciated :)
My macbook 13" T-adaptor plug has been dying for about a year. Often there is no LED (or very dim), even when it is charging OK.
But increasingly it has either not registered as plugged in at all, switching my mac to battery power...... or has registered as plugged in but given me the status of "Not charging, power source : power adaptor".
Previous to this the cable wore out next to the brick, which I repaired. So I assumed the cable had now also worn out next to the LED plug (due to pulling it out of my macbook). Wiggling the cable in this area certainly helped to get the power flowing again (although only temporarily).
But after cutting out 5" segment of cable (which looked fine) the problem persisted, so cleaned the pins on plug and macbook. They weren't dirty, anyway, and it made no difference.
So I then dissected the plug thinking the wires must have come loose from the mini circuit board. Again all looked well, with no obvious heat damage, and they look tightly soldered on. So I didn't touch them.
But I noticed the circuit board moves very slightly allowing a slight gap to appear between it and where the 'pogo pins' connect to it.
One of the pins also fell out (is that supposed to happen?) .... so I put a tiny bit of solder onto the pin and pushed it down its hole again, pushing it with the tip of the soldering iron so it would heat up and (hopefully) solder itself to the circuit board to make a solid connection and stop the wiggling.
It seemed to work OK with the adaptor and LEDs functioning normally too. But when running CPU hungry apps (ones that get the cooling fan running constantly) the plug reverts back to its old problems, cutting out, dim/ blinking LED's and "Battery is not charging" status.
Very annoying!
Pushing the plug firmly into the macbook does help a bit, which supports the theory that it is the pins not connecting to the board properly....
Some questions (any thoughts appreciated!)
1. Is it possible the connection is so weak that the extra current drawn to run hungry apps (and the mac's fan) would cause it to malfunction?
2. How could I improve the connections? My soldering skills are not great and I'm afraid of shorting the board with lots of solder.
3. Should I try putting more solder onto the pins (if I can get them out again) and pushing them down with heat to make them stick?
Any other suggestions welcome. It's driving me crazy! As soon as I run any CPU hungry software the power adaptor quits on me.
PS system profiler says battery is OK, although it's obviously not getting any younger (2008).
I will check back.. thanks.
Great review.
ReplyDeleteThank you :)
I am building a charger for my macbook pro. Does this mean I can't power my mac without a magsafe plug? I am designing a charging system that won't infringe on their patents, but it needs to be useable, will it be useable?
ReplyDeleteGreat job! I have been working hard with my son (13) to figure out why the Macbook of my other son (11) does not charge the battery.
ReplyDeleteWith your information and the circuit diagram of the Macbook we will keep on working.
Now we are confident that the problem is the missing communication between the Macbook and this tiny Maxim IC: no green LED, no orange LED and no charging, no information about the charger visible at the Macbook.
Do you have a clue what could cause such a "communication breakdown" between the charger and the Macbook?
The charger itself works just fine (in fact right now at our other Macbook).
Thanks!
Hello Ken!
ReplyDeleteI recently read this article on wired:
http://www.wired.com/gadgetlab/2013/09/laptop-battery/?cid=12494134
It says to not leave your computer charged to 100% all the time. On the other hand if you are working at home often with your portable, you are using up load cycles of your battery for no good reason.
Apple recommends to store your battery for long time storage charged at 50% for maximum live span:
http://www.apple.com/batteries/notebooks.html
So would it be possible to extend your battery life when working at home by charging it to 50% and then stopping the process by blocking the middle pin on the magsafe with for example an electric isolation tape?
i tried to do it and it worked, the computer got power from the adaptor but the battery level stayed the same. i dont know if it is healthy for the machine as there might be an error in my logic?
i would be curious to hear your opinion.
Hello, btw Nice Post, i wonder why this didnt come before when i goggled it.. and thank you for such wonderful detailed reverse engineering, because, i knew this was a hidden fact not just a reverse polarity lighting to color charging port LED stating what its doing.
ReplyDeletemy reply here is regards to a Anonymous on soldering :)
soldering have several type of solder and rasin core mixture... materials you use also relates to type of quality soldering gun in hand plus the ambient room temerature effects your soldering results.. ( i mention this part is by experience, realizing i was having a hell of a time with small sodering tool & softer solder material...so if you try to do this in a garage vs not doing it in door room then add this ambient temp as factor of your failed attempts... ie...cold-solder )
avoid preheating with lighter fluid of the sonder tool tip to cheat time
in between soldering cycles, refresh tip of the soldering tool with proper material provided by the package of your soldering gun
hands-on skill instruction on soldering:
0. tools neede, stonger solder
material will be recommended if wire tends to flex alot for application this will harden and lasts longer.
1. at all possible time AVOID contact with fresh cut of the wiring conductor
2. if #1 failed, cut off, repeat until you succeed
3. preheat wire-conductor with soldering tool just for a few sec immediately add solder in 3-way position where contact of wire conductor meets your soldering tool tip heated ready which will transfer the conductor heat into solder , instant bonding of solder will submerge together
4. apply circuit board trace conductor same approach as you succeeded in pre-solder the wire-conductor
5. applied the beautiful soldered wire-conductor tip you just made final step to circuit board surace where both will become a perfection in bonding
Thanks Ken, very helpful. Between this and rlanceread's equally thorough You Tube tutorial I had no trouble taking apart my defunct Magsafe 1 head.
ReplyDeleteThe problem having been, as so many other people have found, that some of the pogo-pin springs were no longer strong enough to push all 5 pins out through that thin white plastic block. So, with the block removed, I VERY carefully applied silicone adhesive to the base of all 5 pins (about 1/16" deep) using a magnifying glass and a toothpick; silicone being an excellent insulator when cured, I should add! I then reinstalled the block, and used small needle nosed pliers to make sure that all 5 pins were pulled-out as far as they would go. Finally, I gently cleaned the pins and the block with some Q tips, one end dry, the other damp with soapy water.
After waiting the recommended 24 hrs for the silicone to cure, I reassembled the head, and -- TA-DA!! -- on came that reassuring little green...then amber... light. No way of knowing how long it will hold up, but at least long enough, to get a back-up head, I'm hoping. Though I plan to splice it onto the existing cord rather than going through the hassle of prying open the power supply and soldering the 2 contacts (also on You Tube).
Let's just hope that Apple manage to finally resolve this ongoing and extremely frustrating problem with Magsafe 3!
For what it is worth the data pin does not seem necessary to power the laptop.
ReplyDeleteThe magsafe jack on a couple of my chargers had failed in the last couple of months and it seemed in both cases that there was no longer a faithful connection between the pogos and the circuit board. Compression and more solder didn't help.
So I stripped off the circuit board and soldered to the contacts of the two V+ and GND pins of the magsafe jack. Then epoxyd it to a breadboard and broke out the pins to the charger itself (wires stripped to the shield and positive wore) with a 47kOhm resistor.
The laptop won't charge but is happily being powered which is enough for now.
In retrospect I wonder whether the pull-down resistor is necessary as I assume the macbook will apply the load anyway. But the bodge has gone back to the client for the next couple of weeks until a new cable arrives and I have time to assemble it.
Is it possible to use an old Magsafe 1 power brick and replace the broken cable with a Magsafe 2 connector/cord?
ReplyDeleteOr does the first low voltage (3/6 volts) make a difference in the brick and connector and "confuses" the computer/chargeport?
I have a power brick with magsafe 1 and a replacement cord only cost 10 bucks so i figure to save some money and still have to chargers.
Is there a way to bypass the 1wire communication to SMC, so I can power on a Macbook without entering power safe mode?
ReplyDeletegot curious of whats inside this 5 pins mac adapter, thats why im here. your blog showed on my google search. my sister's nasty mac is now having a hard time charging. i just removed the plastic cover of the 5 pins which was somewhat a bit melted. i also checked the pins one by one and i noticed that some of them loses the springy thing when pressed. i had one to be pulled by a long nose pliers because it got stuck when i pushed it in. and now whenever i try to connect it to the laptop it is just gonna need some pushing and just trying to get the green light indicator then orange. so yeah, the 5 pins are just the culprit. this is just my fix for the mac book pro. in youtube theres this two other fix that i might do if ever the situation got worse. opening the square charger (whis is hard btw), i was trying to open it because the wire near there are broken. but good thing though that i was still able to connect the wires there without opening (nice luck). the other fix is the one that you need to resolder the wires inside the 5 pins. i didnt go that far because i fixed my problem right at the 5 pins area. and the fact that it was hard also to pull the thing out(managed to pull the one with magnet but i broke the one connector plus i dont have tools). the youtube guy uses vice grip while i used nose pliers. using cutter(blade) to trace the connection also helped in loosening abit of the tightness of the magnet. and also the inside plastic (the one that holds the inside part was somewhat beginning to be destroyed if i continued getting it out so i just stopped. tested the laptop then it worked, after the pressing and nudging. well i didnt actually thought that the inside part was really needed to be resolder because it was located in a safe hard place. the tutorials says that overtime the wires loses the solder because of heat but i thought otherwise. IT WAS THE 5 PINS
ReplyDeleteHi Sir
ReplyDeleteThank you for your post.
I'm a DIYer come from Taiwan.
Would you please help me something about my powerbank project?
https://drive.google.com/file/d/0B1D07XqlLVzcRlV3Q2JUN0JVV1k/edit?usp=sharing
Thank you very much
My email address is
[email protected]
Chunyan
2014.06.21
Hi,
ReplyDeleteI replaced the magsafe connector board on my macbook and the battery at the same time. Now it seems as if there is only a very weak connection to the battery.
If I pull the power connector from the computer while in use it shuts down.
If I pull the power connector from the computer while it is in sleep I can press the power button to wake it and it retains its state, as if waking from a deep sleep.
The battery is seen by the computer.
When I put in the new battery it took 8 hours to charge.
Re-installing the old battery shows the same symptoms.
So I'm thinking that The magsafe board is not telling the computer to switch to battery power. Is there any way to fix without switching logic board?
Hi Ken
ReplyDelete1344 charger IC134 reads T.Inst 3421.
It burned from dumb out-put short.
Any idea what the real part number is? I guessing it's a op amp.
Also IC102
rect. chip? S676303
and
IC108 driver 6679GM
Any idea what real part # those are too?
Dave: Maybe a TI TPS3421 pushbutton reset timer? Your other part may be a AP6679GM power mosfet.
ReplyDeleteWhat sized magnet at a minimum would be needed to make it work?
ReplyDeleteI imagine the one on the laptop are large, but could you make it small enough to work with current mobile phones and not hinder the size of the handset?
I cant figure out the smallest strongest magnet would be used to make it work :/
I did find it interesting =)
ReplyDeleteNow... I got a question. What happens when you cut off the magsafe cable from a 45 W adapter. Lets call that cable A.
ReplyDeleteNow then cut off another magsafe cable from a 85 W adapter and call that cable B.
What happens when you now swap the two cables and have cable B soldered onto the 45 W adapater and cable A soldered onto the 85 W adapter.
Would it work like normal? Or would the ID confuse the Macbook into thinking that it's connected to a different watt-rated adapter and draw more power and cause problems?
PS: I have a Gogal Zero Sherpa 50 external batter and I am thinking of soldering a Magsafe connector to the 19V output port on the Sherpa. Anyonebody have information about this plesae please email me at markwienands(at) gmail (dot)com
Wonderful information.
ReplyDeleteHaving 3 Mag Safe power supplies of various models fail, I'm wondering if the problem could be the pins are not extending all the way to charge the Mac?
There is no obvious problems -- nothing scorched, discolored, disfigured. The cords are all intact -- no stretch, rips, tears or kinks marks. Every thing looks like new.
I'm wondering if it's possible to test if the problem lies with the pins not extending fully (e.g. not engaging) or the circuitry doesn't engage.
Any suggestions?
What is the 60W MagSafe output voltage when it is disconnected from the computer?
ReplyDeleteThis comment has been removed by the author.
ReplyDeleteI had a torn wire. I took my charger apart at the connector and re-soldered the wires to the chip. I thought I was good to go but it wont sinc with the laptop! I tested the wires and I am getting 6 volts. I found this blog and it gave me hope. The question I have now is how do I get the computer to recognize it and up the voltage? How does that work anyway? Does the chip in the connector talk to the inverter? It is showing 6 even not being connected to the chip.
ReplyDeleteThanks!
Ken-
ReplyDeleteThank you for the great article!
I'm confused: if the DS2413 chip is responsible for holding the 64-bit serial ID, then how do you explain the following?
I have been using a 45W Chinese knockoff charger with my 2011 Macbook Pro for some months. In System Report/Power the AC Charger Information had zeros for all fields.
However, my OEM 45W (2008MBA) charger WILL work with the 2011MBP if I unplug it, restart, then plug it back in... and the System Report fields get populated with similar data to what you posted.
The 2011MBP will attempt to block this 45W adapter (as you suggest) and will retain the charger's info. and continue to display it after I've switched it with the Chinese knockoff.
I didn't mention that the OEM charger has a replaced magsafe plug/cable that I bought off eBay - it is a Chinese knockoff - it should not have the DS2413 chip with the encoding (should it?)
And at present, I am still running my 2011MBP off both 45W adapters that both have generic/knockoff magsafe plugs/cables.
Are you sure that 'encoding' is not in the charger itself? I realize everyone claims there is no communication between the plug and charger, but how else does this explain how my 45W chargers with knockoff plugs work on a 2011MBP..?
If anything, it inspires me that an external battery source should be possible for MB's - us road warriors need access to extra battery, regardless of what Apple thinks.
Thanks again. I look forward to some insight!
J
J: apparently there's a business in reusing Magsafe connectors/cables from dead chargers, so your knockoff plug could be a recycled genuine plug. Another possibility is counterfeit DS2413 chips - I would not be surprised if someone makes them. A third possibility is replacing the DS2413 with a generic microcontroller chip programmed to act like a DS2413.
ReplyDeleteGreat post, Ken!
ReplyDeleteJ: I've seen online replacement cords for all wattage types and I guess they are all the same. I have a generic 45W adapter but is detected as 85W.
I'm in the position of having a 60watt charger with a destroyed MagSafe cable. I've seen the adds for replacement cables, and yes they all claim to replace for 45, 60, and 85 watt chargers. What kinds of grief could using a knockoff cable on my charger cause? I certainly don't want to risk a MacBook to save ~$50.
ReplyDeleteHi, what is the 16-bit microprocessor who is intside the mac charger?
ReplyDeleteAnonymous: the microprocessor inside the charger depends on the model. My 85W charger has a 16-bit Texas Instruments mixed-signal microcontroller: MSP430F2003TN, while my 60W charger has the MSP430V125DTPWR, which is a customized MSP430 variant.
ReplyDeleteAnd whats great! You only need 3 to 6 MagSafe adapter during one Macbook lifespan .... The idiotic connection between the wire and adapter will not last than a year! Some times only 6 months.... Costs you only 80€ LMAO and they called it Apple Quality !
ReplyDeleteHi, Ken the green cable is in the power pin in the conector and go to the pin 10 in arduino, and the black and yelow go to ground ?
ReplyDeletemake this only need to upload them program to arduino?
I wish all articles out there were as well explained as this. Very good!
ReplyDeleteIt's simple enough for me: no iStuff at all. I'm happy with my X86-AMD64 solution, it's more than reliable and dependable.
ReplyDeleteA weird question perhaps, but would it be possible to use a generic laptop-charger connected to a magsafe cord? I've several old chargers laying around and a magsafe-cable is a lot cheaper than a complete powersupply. I really don't want to buy a dangerous Chinese knock-off charger when i have several A-brand chargers in the house :)
ReplyDeleteHi,
ReplyDeleteI've successfully repaired a 60W MagSafe power unit using some of your precious informations!
Very good job!
Thank you for this wonderful site, i learned a lot for my problematic magsafe. My magsafe doesn't charge my macbook. I checked with different magsafe adaptors and indeed my macbook charges. However new magsafe adapter i bought from e-bay doesn't charge any of my macbook i own. I wanted to check my middle pin information using Arduino and dumped the information. You can see the serial number i dumped
ReplyDeleteFFFFFFFFFFF08FF9
FFFFFFFFFFC63FF3
FFFF83FFFFFFBFCF
FFFFFFFFE0FF07FE
FFFFFFFFFFFFFFF8
FFFFFE1FC3FF87FE
FFFFFFFFFFFFF877
FF7F7D740000001F
FFFFFFFFFFFFFFFC
FFFFFFFFF83F07FE
FFFFFFFFE07F07FE
FFFFFFFFFFFFFF7F
FFFFFFFF83F87FE1
FFFFFFFFFFFFFFFC
FFFFFFFFFFFFFFF0
FFFFFFFFC3F87FE1
FFFFFFFFFFFFFE7F
FFFFFFFFFFFFFF80
FFFFFFFFFFFFFFC0
FFFFFFFFFFE03FF8
FFFFFFFFFFFFFFCF
FFFFFFFFF83F07FE
FFFFFFFFFFFC07FE
FFFFFFFF87FFFFCF
FFFFFFFFFEFFFFBF
FFFFFFFFFFFC07FE
FFFFE0FFFFFFFFFC
FFF83F87FF5FFFF8
FFFFFFFFFFE187FE
FFFFFFFFE7FFFFCF
FFFFFFFFFFFCFC7F
FFFFFFFFFFFC0FF9
FFFFFFFFFFFF1FF9
FFFFFFFFFFFFFF07
FFFFFFFFFFFFFF0F
FFFFFFFF83F87FE1
As you can see it randomly dumps numbers. I also checked a working unit and it looks ok. At least it gives the same serial number all the time. However the serial numbers pasted above seems like there is a problem in the chip. I wonder if you could comment on this, and is it possible to reprogram these chips using onewire protocol maybe with Arduino? Thanks
http://www.thexlab.com/faqs/resetpmchip.html - contains interesting info about power management chips
ReplyDeleteHi all! I'm in the same boat as DrewMH—my cable snapped on the laptop end and I had to split and reconnect it extremely close to the circuit board (though I simply mended the cable, no soldering on the board). Everything was straightforward and I've got juice going to my pins, but my laptop doesn't like it! No light, and no charging. Any idea what could be wrong?
ReplyDeletehave you tried another charger? once I did such sort of repair, it took me two weeks to get it assembled. Because of that pause, I was lucky to mix up the two contacts. As a result - a disgusting smell and replaced power control board in the laptop...
ReplyDeleteVery grateful for your post , As i was in a hurry to find out if three mac-book's worked i hard wired to the batt first with gsm charger on one cell . Then even more impatient i changed to 12v (not lith-ion ) and hooked it series ... Well 10 sec later i felt one of the cells start to swell and fast ....Ops un hooked it and rushed it out side ,,Still determined i thought of wiring to the board for the batt and , Then was trying to find the pin-out for mac side and didn't understand the the data sense ( center ) if it was neg or pos pulsing or needed a resistor........SO THANK YOU FOR SAVING ME A LOT OF MONEY AND TIME I WONT BE BUYING THE CHARGERS FROM EBAY NOR ANY MORE SOUTHERN WIRING ...SINCERELY EMBARRASSED
ReplyDeleteDoes anyone know the model/discription of the 8 pin chip inside the 65W apple power unit?
ReplyDeleteI was careless when I soldered a connector spice in the 18v Magsafe line; the ground shield had one tiny wire strand shorting the output when I powered it back up.
Tips & Info: I successfully replaced my stock apple 18v 65 watt supply with a old Toshiba laptop supply.
So, magsafe/circa 2010 macbook does not care what the power supply is if it keeps up with load.
Then the gold spring pins wore out causing poor power input and the salvaged replacement i bought for about 12 bucks works just fine.
One must do perfect cut and spice and be really careful with every 40 gauge shield/negative strands and strain relief with new magsafe cable and get the right one too. Seems there are at least 3 kinds now.
It's not good to un/plug magsafe while it's powered up because the pins will spark/arc. And wipe clean all contacts often because dust fouls the tiny springs inside!
Anyway, I could fix my apple supply if I replace that mystery chip I just mentioned. It must be a current sense, mos-driver or dual op amp, I hope some reader has more expertise than i do with these COOL running supplys. But,hey forgot a current limit feature. It has most control circuitry I've seen. I'verepaired about 200 kinds of these switching supplys.
Most the time I'm running my mac from a small dc-dc booster from solar battery bank.
The macbook likes 16 to 20 volts on the input otherwise it won't accept charge or power input. It has a tiny shottky diode across the + and _ power input inside and I saw it flash inside through the white plactic case and I replace it yet. It protects the mac from a power reversal but now it's open and fried. Opps again.
best wishes,
dgm
Hi ken, great article. I have little knowledge of such things but have been looking for the answer to something for a long time. Not directly related but maybe you could help. My magsafe 1 cable was fraid on my macbook pro 15' psu. Decided to cut off and re-solder. About to do this i was interupted by a phone call and when returned to the job forgot i hadn't checked the polarity and basically wired + and - the wrong way around. Suprise suprise, my laptop no longer charges the battery. Trying to work out what has physically happened. I swopped the DC in board as it was fairly easy, no difference. It's a 2011 macbook with a removeable battery. New battery still no charging. Any thoughts? Thanks in advance.
ReplyDeleteGood information and hard work!
ReplyDeleteThanks for all this!
ReplyDeleteNow another question : can you charge a Macbook directly from a 12-14 Volt car battery, using a magsafe simply connected to the car electrics ?
Hi Ken,
ReplyDeleteThanks for the teardown. Just wondering what the main associated risks with using a knock off charger such as this one would be? I have heard about the general safety features missing and 'overcharging' risks, but would there be any dangers for short term use?
TIA.
Thanks for all the valuable info - just one thing missing for me, how does the charger detect and respond to disconnect? Obviously it must shut down and return to the waiting state when the plug comes off the laptop in order to remain safe. I'm contemplating a low-current detection system for this.
ReplyDeleteI'm attempting to design a charger to run from a 24 volt off-grid system because only 12-volt types are available which is a step-up instead of step-down...
That is very interesting, am wondering do you have an example of doing something similar with the Macbook's battery? For example am I've got an old battery out of an Macbook Pro Mid 2008. Still in working condition and want to utilize its built in microprocessor readings. Temperature charge/discharge status and current cycle etc. I figured once you've removed the casing and have the flat cells in a stack, its quite smallish and would be good for a robot project. And ofc somehow be able to recharge it.
ReplyDeleteKen, great post. I wonder if you could help with a technical question I have.
ReplyDeleteI'd like to be able to use Mac chargers to charge up a Boosted skateboard. I have voltage conversion and the physical connections handled. Getting the full power is the trick. Do you think if I can just put a 40kOhm load on for a second that the power supply will bump up the power, or is there more to it than that?
Zachary: the tricky part is you have to wait a second before applying the load, since the load will pull the line too low. So you need to apply the resistance, then wait and switch in the load. I've only done this by hand, and it works may 1/3 of the time, probably because I don't have the timing right. Personally, I'd use a non-Mac charger that provides a steady voltage to avoid the startup sequence.
ReplyDeleteJames, sorry but I haven't looked at batteries.
Excellent post Ken. Very informative and most helpful...
ReplyDeleteThank you very much!
Hi , simply , supposedly origional charger from eBay
ReplyDelete1 MacBook a1181. Charger works .
MacBook a1342. Nothing , no lights , just. Working on power but (not charging)
I interchanged the MagSafe from the working a1181 to the a1342 but same thing .
...?....
Can I bypass the whole lot ?
The a1324 I do not know what state was in its a refurbish, new battery hd.
Any help would be great
On the a1181 it does have info on the charger in about but not on the a1243 only. Yes. Xoooooo. No ect
Hi Ken, very interesting post and discussion. I am a bit of an impostor here, as I am typing on a laptop (PC), - an HP 625 to be exact. So here's the thing, this is my son's laptop, he is severely autistic and as such puts things through a heavy duty cycle - I have replaced the screen 5 times, the chassis twice, now on an ssd hard-drive, several dvd drives leter etc. So the power jack has been broken and I soldered a new one onto the motherboard. Done it several times now. Realized, that this was not the solution, so I looked at the build your own magsafe at hackaday. Looked a bit complicated. Then I thought, could I get a mac power jack and build it into the laptop taking out the 56.6k modem (never used). Well, £5 bought me a jack and I bought the magsafe cable intending to spice it onto the HP625 power supply. checking the voltages and wattage I realized a mac power supply was essentially the same as the HP. I put it all together, but for some reason the little LED on the magsafe connector wasn't lighting up, and the battery wasn't charging - v. frustrating! Reading your teardown and the feedback from the good people here I was tempted to try mucking about with that middle pin. Then I tried taking the battery out of the laptop, pluggging in the magsafe and switching on. Well, it all powered up, running through the magsafe and apple PSU. Great! I powered it down, put the battery back in (with the magsafe and apple PSU), powered up - hey presto battery now charging. Problem all solved.
ReplyDeleteThank you so much everyone who contributed to this page - giving me the inspiration I needed - and good luck with all your projects!
Hi,
ReplyDeletelet's say I have an old mac power supply I think it's a 86W magsafe2, and I want to use for another purpose maybe as a simple AC power supply is there a way to hack it to access the full output and not only the initial ~6v?
thanks
Hector, unfortunately I couldn't figure out a way to get the power supply to always output full power. The microcontroller inside the power supply doesn't enable full power until the proper load resistance has been applied, and I don't see an easy way around that. You'd be better off using a different power supply that's not as "smart".
ReplyDeleteVery useful, thanks! I'm repairing a MacBook power adapter. The crappy wire attachment to the circuit board broke, and now I need to figure out which solder pad is + and -. Checking with a voltmeter, I found a perplexingly low voltage (.35 or so). Your article explains why.
ReplyDeleteOscar, does it? From my understanding, the .35V output speaks of some broken part inside the schematics. People say, in this case the probable problems are with the U3 chip - which is TLV3402 comparator, or the next possible problem - with synchronous rectifier TEA1791 (this refers to 60W charger)
ReplyDeleteKen:
ReplyDeleteI was wondering... do you think it might be possible to turn a magsafe-2 brick into magsafe-1 by changing the cable? Do you think if I connected a magsafe-2 brick to a 17-inch mac, it would know to give 18.5 instead of 20V?
Many thanks in advance!
Thanks for a very interesting disassembly and debugging session!
ReplyDeleteGreat work.
It saved me from buying parts at ebay that probably wont fix my problem. This was more complicated than I thought. I started to test the charger on an other mac where it worked fine (leds shining bright) and suspected the small magsafe board inside the mac.
It seems to me that this is a very very weak design as so many people have trouble charging their macs including the one I'm trying to fix. I have never had any battery charging issue with a pc of any brand and I have had quite a few, only dead batteries so far.
In my case I bought a new mac battery and realized the magsafe should light during charging. In fact it does charge but very slowly (?) and can be monitored by the 8 led battery status indicator on the side (good Apple feature) and the green led is shining very faint if I take it all to a dark room. The screen tells me that it is not charging at all. Measuring the voltage at the small magsafe board inside the mac gives 17.04V and battery voltage 12.57V fully charged with charger connected (10.95V nominal).
Thanks again!
Bo in Finland
Wow! Thank you for sharing this mind blowing ideas.
ReplyDeleteHey ken - its absolutely astonished work u did , i appreciate
ReplyDeletei would like to get a program code for arduino
it would be help us alot to find and diagnose charger issue with our customer
guys,
ReplyDeleteconnector is fine but my MBP 2015 has developed an issue: it is not holding so tight to the socket anymore like it was at the beginning
so the connection is loosen from time to time and cable just gets disconnected
I looked at the socket - it is ok
it seems it is the plug issue on the cable - it became a bit rounded on the corners etc and not holding so tight as at the beginning
is there any solution to this except changing the cable?
and now, seeing your article: should one go for DC cable replacement only or the whole charger? there is a lot of offers on amazon/ebay with "compatible" DC cables but are they really knowing what is inside?
thanks
Dear Mr. Shirriff,
ReplyDeleteThank you so much for posting this! Very helpful!!
One question: Do you foresee any danger in using an old Magsafe cord that I removed from a broken Apple charger and connected to another 18.5v DC power source to charge my 17" MacBook Pro?
(The reason is: I want to use a 12v car adapter to power my MacBook Pro and I don't trust the ones they sell on Amazon...)
Thanks again!!
Scott
Lots of in-depth info here, but haven't been able to apply it successfully. What I'm wanting to do is use my (original) Macbook charger to charge an external battery. I've got hold of the female connector so I can connect easily to the Magsafe2 on the charger. I've measured the voltage coming out of the charger and it's 3.1v as expected. I connected to the input terminal on my battery and it drops the voltage to 1.7v. However, I can't get it to raise the voltage to 20v no matter what I try. If I use a knockoff charger everything works as expected (probably due to there being no 'protection' circuit in the charger). Anyone have an insight on how to do this? TIA
ReplyDeleteI've been on a journey to get the mega safe light to turn of on my mac charger. I tried covering the middle 'adaptor sense' pin with a sticky piece of paper (post-it note clip) the light has actually gone out it's a miracle. the mac still reads as "fully charged" the light is out and the mac is plugged in and charged as i wanted. yet now i wonder if my mac not receiving information from the charger could effect how it is charged. my dad was worried about 'over charging'. old power cords of the past weren't as intelligent as current ones and you had to unplug them after a while or else they would over charge your computer. originally i was more concerned that it might just not charge.
ReplyDeleteOne Question. Is it possible, to use the Charger for another device (with same specs, obviously) by cutting the Magsafe? The charger checks, if the mac is connected, or just checks if something is attached?
ReplyDeleteThanks!
pse: the charger checks for an attached Macbook by looking for a changing resistance. If you attach something else, the resistance won't change in the right way, so the charger won't switch on. You could apply the right resistance with, say, a relay but that would be a bit of effort.
ReplyDelete@Ken: Thanks for the answer. I just tried it without a resistence and it worked fine! That´s great. I will use as power supply for a small Bluetooth amplifier (12-24V). The original power supply causes noises from the speakers. I tried with a battery and there was no noise. Now with the Apple charger still no noise. It is perfect! :-)
ReplyDelete@Ken Are you saying the adapter has some intelligence in the actual brick as well? I would be curious on how the brick functions. I am trying to modify this to work with a Raspberry Pi and put everything into a sleek form factor which i have chosen to be a mac. I have many other challenges that may or may not work out well but for now I want to get the power worked out first.
ReplyDeleteBlu: yes, the brick has intelligence. The microcontroller in the brick monitors the output voltage and current to detect when the charger has been plugged into the laptop. At that point it enables the full output voltage. This microcontroller also shuts down the charger if it detects a short circuit or overload.
ReplyDeleteThanks for an insightful post!
ReplyDeleteMaybe you could expand a bit on two points:
1) Is there any connection between the serial number shown in System Report > AC Adapter and the number physically printed on the charger, under the AC cable connection point? In other words, given the serial numbers from the System Report and from the charger block, is there way to identify whether the original MagSage connector is used?
2) What, if any, are the possible practical risks of using a counterfeit Magsafe connector paired with Apple's genuine charger?
Denis: those are interesting questions. 1) I don't know if the Magsafe chip serial number is related to the charger serial number. My guess is they are unrelated. 2) It shouldn't be too risky. One issue is if the connector says the charger is a different wattage from the actual charger, it might charge slowly. There's also the possibility of bad soldering or something that shorts out. But on the whole, it should be a lot better than a counterfeit charger.
ReplyDeleteThanks so much for such a detailed reply!
ReplyDelete" The complex sequence of steps provides more safety than a typical charger. "
ReplyDeleteI just thought I'd point out that this "added safety" is only necessary because the MagSafe connector is fundamentally unsafe, what with the power pins being directly exposed and adjacent to ground. I'd always assumed they used induction to transfer power, but seeing they just use flush-mounted pogo pins kind of scares me. Justifiably, if all that scorching is any indication.
A barrel connector like most laptop chargers use is far safer mechanically, and doesn't NEED connector-side logic to keep it from arcing and spitting or shorting voltage to ground and starting a fire. They were designed to be safe without the use of logic, even if they don't pop away cleanly when you trip on the cable(which was the "safe" that Apple marketed MagSafe as being).
would it possible to show us how to troubleshoot a 2011 MacBook DC I/O board (which converts AC to DC)?
ReplyDeleteMy MacBook air 13" got water spill and could not power on, so removed the battery and DC I/O board and connect it without connecting to the circuit board. The charger cable does not show green light. Is the DC I/O board bad? Don't want to spend the money to buy unless it is broken.
Hello. I've a new 60w MagSafe I got from the guy who fixes my laptop. He says that it's an original one but I noticed that the MagSafe light turns on immediately once it connects to the charging port. I checked out the AC charger information from the system report and the result I got is the same as some other people posted. Would you know if this is fake?
ReplyDeleteAC Charger Information:
Connected: Yes
ID: 0x0100
Wattage (W): 60
Revision: 0x0000
Family: 0x0085
Serial Number: 0x00947f53
Charging: Yes
Hi Ken, Extremely worked hard for the post. So, congratulations and thanks for sharing.
ReplyDeleteI have Macbook Pro with 60w Magsafe power adapter.
When I plug in and switch on power adapter the green LED turns on normally and as well the amber LED.
But the Amber LED goes off after 20 Seconds.
I would be thankful for any help on the issue.
With Best Regards
Rajneesh Tyagi
Ken, thanks for the detailed teardown of the MagSafe2 connector. As an avid DIYer, I appreciate contributions of this caliber and it definitely helped me survive the panic I fell into while hacking at a way to extend my Mac Book Air 2013 usable battery supply. I travel a lot and often find it difficult to keep me laptop charged. I've replaced the internal battery several times now through the years but 55Wh still only gives me about 2hrs of usage. So I bought this power bank and figured I'd rig a MagSafe2 cable to it:
ReplyDeletehttps://www.amazon.com/gp/product/B011BGPUSI/ref=oh_aui_detailpage_o05_s02?ie=UTF8&psc=1
Here's a shot of the cable I made by chopping up the one that came with the power bank and reusing an old MagSafe2 cable I had from a previous fix.
https://cloud.githubusercontent.com/assets/876837/25307523/48018dd0-2770-11e7-8694-d18a3c65111c.JPG
Without giving it much thought I just plugged the cable into the DC out of the power bank and into the Mac Book Air.... and, nothing happened. No LEDs, no indication from the Mac that power was being delivered. I then plugged in my formal Apple power adapter and nothing either!! That was the cause of my panic. I figured I somehow fried the internal power jack i/o board so immediately searched and ordered one online. While waiting for that to arrive, I continued to wonder what happened.
First thing I realized was the power bank can deliver different DC OUT voltages and defaults to 5V from the factory. It's hard to believe that would have damaged something so I reset the SMC and PRAM on the Mac to see if that would help:
https://discussions.apple.com/docs/DOC-3604
Still nothing. So then I set the power bank to 16V to match the Apple power adapter output and tried that (what the heck). It worked!! LEDs and the Mac started charging. Phew! something is working. Then I checked to see if the Apple power adapter would work and disappointingly, it didn't. That was weird. Perhaps the state of the charger was persisting the failed condition so I
unplugged it from the wall and waited some time for the caps to drain. Plugged it in again and indeed it worked! So now the Mac is charging both on the original Apple power adapter and my rigged power bank setup.
I'll return the repair stuff I ordered and hopefully be good to go from here on out.
Hi all,
ReplyDeleteDoes anyone know what the cable is "adapter sense" in the Usb type C 3.1 connector?
Because I would like to convert from a my old magsafe in new usb c.
Thank you
Bummer - looks impossible to get the MagSafe on an old Apple LED display to power a new USB-C MacBook due to the communication going on. So irritating!
ReplyDeleteI find the output voltage of a working Magsafe to be 0.65 volts. I think it is erroneously reported at several places as 6 volts.
ReplyDeleteWow ! Great work - was quite curious (and suspected they were using SWD); keep up the awesome posts !
ReplyDeletePS: blocking the Sense Pin will make the mac not charge the battery - perfect for when you want to keep it at a storage charge level
Can the magnet pull things in to short out the computer?
ReplyDeleteAS you documented, the MAGSAFE has a delay before powering up as safety measure, notice the delay in the LED.
I am on my 5th Magsafe charger, bad cords all go gooey at a year+_.
I am not sure if the counterfeit Magsafe cords that lack the chip are safe in terms of this short protection.. Thnx good promo of a good item
I could just use non sheilded wire, you dont mention the value of the Coax, but I know it can be important from other teardowns that measure leakage
I continue to appreciate the teardown you did of the Counterfeit charger I sent you and was interested if you had any experience with the chinese universal (45wat, 60 watt, 80watt) cords to use as replacement. I saw your comment that implied they were better, but , that can be relative, as you know. thanks again
Nice work! Thanks for posting this. Interesting to see 1-Wire in a large commercial application. I'm curious the "safe" DC input voltage range for a MacBook Pro, if it can accept 18-20V as commonly used with other notebooks such as Lenovo. I'll keep googling around for the answer to that one. I know the Apple adapter puts out 16.5 VDC.
ReplyDeleteThe Apple 60W adapter outputs 16.5 volt. The 85W one is about 19 volt. Up to 20 volt is safe to feed into the MacBook.
ReplyDeleteOnly the Apple adapters detect the load and only come on once they see the load (provided by a 68k resistor in the MacBook).
All fake adapters I have seen are always on.
I am building a device to test all this.
Hi all!
ReplyDeleteDoes anyone know where can I find Apple Adapter schematics (..60W,85W etc..)? I have been in Apple Adapters repair for some time now but it always seems like I have to start from the start. Schematics would be nice a nice addon on my wall :)
Thanks.
Wow. This connector is crazy. When I first tested my broken one, I found that all five pins were connected together. I bought a replacement on eBay and it showed the same. You can't have positive and negative all connected together ... or so I thought.
ReplyDeleteHere's my question: my replacement cable identifies itself (and therefore identifies to the computer) that it is a 60w supply. It is, however, now attached to my 45w supply.
Can this become an issue? (the computer will think, "my, what a wimpy 60w power supply".
When the ds2513 is broken off due to clumsy taking apart the l connector. Will it still be able to power a macbook? Its a magsafe 1 20v
ReplyDeleteMy cable appears to be frayed internally at the computer end. Can I just purchase a new cable and splice it to the end of the old cable further down the cable. Effectively I'm proposing to just replace the magnetic connector. Just wondering given all the electronics and coding that this fine article describes, but that I am too lazy to fully read and understand. I am a capable splicer of these things.
ReplyDeleteI have one genuine charger where the green LED just flashes on and off at about 2 cycles per second.
ReplyDeleteCan't find anything that explains what this might mean.
That charger with the flashing green doesn't charge the MacBook pro at all; if I connect a different charger I get the normal first orange and finally green indications.
Does anyone know what a green flashing LED means and better yet how to fix the problem?
The Mac chargers I have that quit working are just dead - no LED at all.
I assume the flashing green (not grenn and orange) has some meaning.
Does a working Magsafe output any voltage with no load connected? (Not plugged in)
ReplyDeleteI have two and both do not output any measurable voltage between the positive and negative pins.
Someone posted above that it might be 0.65 volts which I probably cant measure with my multi meter.
I opened the cases to check the cable and the cables are fine but no measurable voltage output at the PCB in the case.
Thanks

I'm curious as to the voltage that genuine MacBooks use for the 1-wire comms. The DS2413 is specified between 2.8 and 5.25V. Using an MSP430 running at 3.3V, I've had great success toggling the LEDs on original adapters, but not a single aftermarket replacement works: the LEDs won't come on.
ReplyDeleteA teardown reveals that the circuit inside is entirely different. Probably, they are using a cheap microcontroller to bit-bang the 1-wire bus on a GPIO pin. I haven't checked the voltage on the zener yet. (With apologies for my terrible drawing:)
https://imgur.com/a/qRUy1Rg
Could someone with a multimeter and a nearby macbook check the DC reading between ground and the middle (1-wire) pin on their laptop's power socket?
Can you make a Power supply from a mac charger?
ReplyDeleteHi Ken, very impressive this article.
ReplyDeleteI Would like a little help from you about my 85W Magsafe 2 charger, if you can. :)
Recently I replaced the power cord (cable + magsafe 2 connector) from my charger, first because the cable was in a bad shape and the led stopped working.
After this the new magsafe stopped to became so hot as the original but is taking to long to charge the batery.
Can you tell me what is the voltages I should see between the Ground and Power pins?
I'm seeing about 3V and I am not sure about that, in other hand if I understood correctly, without load the charger don't give the full power.
Thanks a lot!
clap, clap, clap, clap!
ReplyDeletesimply the best info I found on this, and have been searching long time. congrats and thank you.
Hi Ken,
ReplyDeletethank you for an amazingly detailed article. I found it because I needed a replacement power adapter/cable for my 2009 Macbook Pro.
I've ordered one online and got a cheap one off Ebay, thinking it'll work perfectly, but the magnetic plug is just a bit too wide for the Macbook Pro 2009 socket. :(
Slightly brute-force question that I had and hoped to find an answer for in your blog is - could one take a metal file and basically "saw off" the sides/edges of the magnetic power plug (obviously keeping the pins intact) so it fits into the older socket?
I'd love a response to this and will check back in.
Thanks so much again
They make/made an adapter for the Magsafe 1 to 2
ReplyDeleteit would keep the iron filings at a distance
Had a Magsafe2 power supply fail and decided to poke around a bit and found your post. The failed one didn't work, seemed to have an internal short, but the replacement has a family 0x0085 and serial 0x001691df for a OneWire ID of 639213C61691DF85
ReplyDeleteTrying to reproduce the reading of the OneWire ID/Serial Number from the Magsafe2 and ran into strange problems, data seemed wrong on every read, but not quite garbage:
BBF2FFFDEABAEFAA 1101110101001111111111111011111101010111010111011111011101010101
BBEAFFFBAB75DF55 1101110101010111111111111101111111010101101011101111101110101010
BBEAFFFBD575DF55 1101110101010111111111111101111110101011101011101111101110101010
BBEAFFFBD575DF55 1101110101010111111111111101111110101011101011101111101110101010
BBEAFFFDD575DFA5 1101110101010111111111111011111110101011101011101111101110100101
3BF5FFFEEABAEFAA 1101110010101111111111110111111101010111010111011111011101010101
BBEAFFFBABEBDE55 1101110101010111111111111101111111010101110101110111101110101010
BBEAFFFBD575DF55 1101110101010111111111111101111110101011101011101111101110101010
BBEAFFFBD575DF55 1101110101010111111111111101111110101011101011101111101110101010
BBF4FFFDD575DF55 1101110100101111111111111011111110101011101011101111101110101010
3BF5FFFEEABAEFAA 1101110010101111111111110111111101010111010111011111011101010101
BBEAFFFBABEBBE2B 1101110101010111111111111101111111010101110101110111110111010100
BBEAFFFDD575DF55 1101110101010111111111111011111110101011101011101111101110101010
BBF2FFFDEABAEFAA 1101110101001111111111111011111101010111010111011111011101010101
BBEAFFFBAB75DF55 1101110101010111111111111101111111010101101011101111101110101010
5BF5FFFDD575EFAA 1101101010101111111111111011111110101011101011101111011101010101
Thought something was off with the timing, and even before confirming with the oscilloscope, on a whim doubled the values in the OneWire library as follows and the read started to work:
@@ uint8_t OneWire::read_bit(void)
noInterrupts();
DIRECT_MODE_OUTPUT(reg, mask);
DIRECT_WRITE_LOW(reg, mask);
- delayMicroseconds(3);
+ delayMicroseconds(6); // orig: 3
DIRECT_MODE_INPUT(reg, mask); // let pin float, pull up will raise
- delayMicroseconds(10);
+ delayMicroseconds(20); // orig: 10
r = DIRECT_READ(reg, mask);
interrupts();
- delayMicroseconds(53);
+ delayMicroseconds(106); // orig: 53
return r;
}
Confirming with oscilloscope, image:
https://imgur.com/a/dY5LR5e
CSV: https://pastebin.com/VMkQRpr4
The other issue I noticed that reset would sometimes work and sometimes fail. DS2314 data sheet https://datasheets.maximintegrated.com/en/ds/DS2413.pdf listed the min Trstl as 600us. The following change seems to make the reset() work all the time:
@@ uint8_t OneWire::reset(void)
noInterrupts();
DIRECT_WRITE_LOW(reg, mask);
DIRECT_MODE_OUTPUT(reg, mask); // drive output low
interrupts();
- delayMicroseconds(480);
+ delayMicroseconds(600); // orig: 480
noInterrupts();
DIRECT_MODE_INPUT(reg, mask); // allow it to float
delayMicroseconds(70);
r = !DIRECT_READ(reg, mask);
interrupts();
delayMicroseconds(410);
return r;
}
Item 5: "If the Mac is happy with the charger ID, it switches the power input to the internal power conversion circuit and starts using the input power."
ReplyDeleteIt’s not quite right, it’s right: If Mac does not like the charger ID, it disconnects the battery charge circuits inside, but if the voltage at the input suits it, it works from an external adapter. "
This can be easily checked if you disconnect (stick tape) the third pin - there is no charge, but the Mac works from an AC adapter.
@cave-canem0 Is there any way to force Mac to charge if the chip inside the cable is broken?
ReplyDeleteI've got a magsafe 2 tip that split from cable. trying to figure out how to open it to solder the wire back. seems impenetrable though. any thoughts?
ReplyDeleteHi Ken and thanks for the very informative article. I am just learning to do component level repairs of Macbooks. It is not possible to buy 85W magsafe cables on Ebay, they are all 60W even if advertised as 85W. this is annoying because if you have a genuine 85W charger and the Magsafe cable is damaged you cannot replace it with one of these cables. It will not charge the Macbooks that require the 85W charger, typically the 15"Macbook Pro. Would it be possible to reprogram the one wire chip so that it identifies as an 85W Magsafe cable at all ? This would be very useful. Thanks if you find time to reply to my question and thanks again for your experimentation on this. Pedro147 (Peter Newman)
ReplyDeleteUnknown: I believe that the chip that identifies the charger is programmed by the chip manufacturer and can't be reprogrammed.
ReplyDeleteHi Ken,
ReplyDeleteWant to know if I can use the Magsafe2 connector connector to a 14.85v switched power input to charge my Macbook air, as I believe Apple has over priced its adapters. Even OEM chargers are not worth at their advertised prices. It is a great blog with tons of information.
Kumar, Apple's stuff is annoying and expensive and imperfect. That said, what you're proposing is not very wise. As Ken has so beautifully demonstrated there is a lot of serious garbage out there, and counterfeits which are probably better than what you are proposing. Sometimes it's just better to pay the man. Just be aware that if it doesn't come in an Apple box from Apple, you didn't really save any money, you just got screwed by an amateur rather than a pro. It may be flawed, but the Apple is seriously better.
ReplyDeleteThank you so much for this information! My son and I replaced frayed cables on 85W chargers, and they are both flaky charging sometimes, not others. This gives us some idea of what might be happening.
ReplyDeleteThanks for your information!
ReplyDeleteI have a question that I've been trying to solve. Maybe you could help me.
My Macbook pro 13" 2011's charger is not working properly (apparently). It will not charge when turned on (it works fine rarely), and therefore I'm able to use the Mac only until the battery drains out. But when I turn the Mac off or put to sleep it will charge my battery, turning on all the lights properly (the one's from the charger connector, i meant). My battery is old and won't allow me to use the computer for long periods of time. Specially when using Google Chrome, or watching a movie.
I've changed the DC in board connector hoping that was the issue,but the problem was not solved.
Could the charger be the problem or something related to the motherboard?
Here some interesting facts:
*The charger makes a sound when charging.
*The charger sometime charges the battery when the Mac is on, but as soon as I scroll down a page, or open an app, it suddenly stops charging (lights turns off)
*I've been using the charger without the proper cable to the wall, I've been using a 2 pin cable from another device that would not discharge the ground.
Thanks!
Hi Ken nice article, do you have an idea of why does the connector gets so high temperatures? and do you think that there might be some kind of workarround for this?
ReplyDeleteI wish that all cables could be like MagSafe 2 (thunderbolt, usb, etc)
ReplyDeleteHi Ken and thanks for the very informative article. Wonder if anybody has found magsafe pigtails that ID as 85W not 60W?
ReplyDeleteThx for highly enlightening explanation.
ReplyDeleteMy A1343 appears to have failed. By cutting into the wire and applying a voltmeter, I found that it is supplying just 15V when the indicator goes to orange and the battery is simply won't charge.
So, I riffled through my box of old PSUs and found an HP one that says 18.5V (19.6V according to Voltmeter).
I wired it to the magsafe lead (it dropped to 19.5V) and the MacBook is charging fine - now up to 48%.
Clearly, it won't have any of the clever detection characteristics of the A1343.
Do we think that will be alright - esp. when it gets to "fully charged"?
Is 19.5V close enough or might I damage something else?
Thx in anticipation.
Wonderful post, THANK you for the information! I'm curious if you plan on doing this type of analysis for magsafe 3? (I mean, presumably it's approximately the same, but...)
ReplyDeleteWhat would be really cool is if someone would design a USB-C negotiator board that attempts to negotiate (from high to low) 85W: PD-20V4.25A, 65W: PPS-16.5V@4A, 45W: PD-15V@3A, then send the appropriate 1-wire data back to the laptop, which would allow one cable to be used with almost any USB-C charger.
ReplyDeleteThanks for the write up, this was super interesting. And you actually saved me - for 2 years now I thought that my Macbook did have some kind of defect DC in board, but I always shied away from the complicated repair, since I was still able to charge it via a USB-C to Magsafe 2 adapter.
ReplyDeleteNow I took the time to test my 2 original Apple chargers and turns out - 1 of them is dead completely (0V at the Magsafe adapter) and on the other one I replaced the cable, but the replacement cable is apparently a cheap one and doesn't have the chip or something else is dodgey. I didn't get the ~3V, but only 1.9V.
So I now moved the original Apple cable of the 1 charger over to the working other one. And there we go - 1 fully working adapter.
One thing I am wondering about though: reading out the chip with the Arduino only works for me with the 2 original Apple Magsafe 2 plugs. All replacement ones I have, including the working USB-C / Magsafe 2 adapters, do not provide any data. However - once I plug them in (adapters via USB-C charger, the fake cables via lab power supply), they actually charge, the LEDs work correctly and in System Profiler I can even see (different) serial numbers for them. How does that work?
Do you think they have a custom logic implemented to provide correct data if it is requested? And if yes, why can't I read it via the Arduino?
So thanks again. I have back now 1 working proper 100% Apple charger. And I know that I can use the cheap components to build a 3rd party charger, if I ever have a constant 20V power supply available. :-)
Hi Ken, interesting writeup. I had a 3rd party magsafe 2 charger for my 2015 retina MacBook pro 13 inch that had a form factor I liked and worked for a couple years. It just crapped out and I decided to take it apart (because I could!) and poke around. I see it is a switching supply and quite standard in design, I even found a circuit design online that pretty much matched what I saw, component-for-component. The output is 0 volts and the LEDs don't turn on anymore = crap out symptoms. I saw that downstream from the transformer was where volts went to zero, but didn't poke further nor did I hook up my very old oscilloscope, figuring that even if I could isolate a failing component it would be non-trivial to get a replacement part. But I still have everything in case I decide to dig more, and then stumbled across your article to learn more about the plug itself, as well as learning that the cable and plug are worth saving - assuming the plug isn't bad! I also have some old but brand-name, higher voltage supplies that I could splice in like other commenters have mentioned. Anyway, thanks for the work and publishing your learnings, as it is encouraging and supportive to the rest of us weekend fiddlers!
ReplyDeleteI made a little Youtube movie explaining the rest of the MagSafe magic going on.
ReplyDeleteThe chip in the plug is used to tell the Mac what is going on, but there is a resistor in the Mac that tells the charger what is going on.
https://www.youtube.com/watch?v=bc5ttwMPWbw
ReplyDeleteGood video thanks CMIzapper Harald :)
Pedro147 from Paul Daniels YouTube streams. Love your diagnostic tools too
Excellent...
ReplyDeleteHi Ken,
ReplyDeleteHi all,
Great article!
Here are my 2 cents: I was in a remote place (2012 MBP Magsafe 1 A1222 85W Charger) and my charger pops and blows up. I had kept an old MacMini 110W charger (18,5 V A1188), then I took the cable from the blown charger and soldered it to the 110W plug (external wire Negative, Internal Positive).
Everything works fine, the Mac powers up and charges the battery!
This teardown bloddy fantastic, well thought through and great detail, as we'd expect from the best oc the engineering profession - Well Done !
ReplyDeleteGreat useful info at the core, well done, all good, cheers
Mike Massen,
Perth, Western Australia