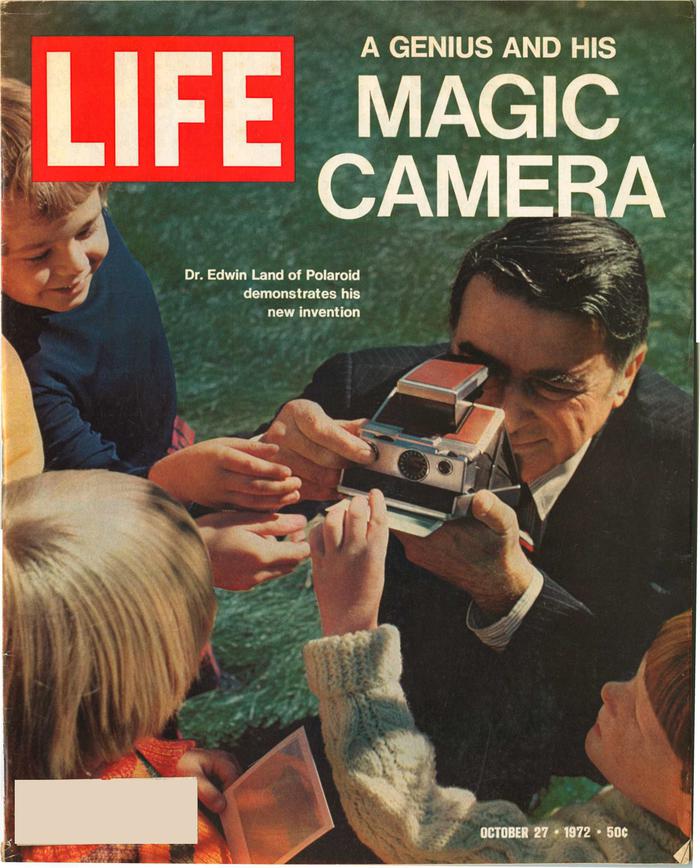
The revolutionary Polaroid SX-701 camera (1972) was a marvel of engineering: the world's first instant SLR camera. This iconic camera was the brainchild of Dr. Edwin Land, a genius who co-founded Polaroid, invented polarized sunglasses, helped design the optics for the U-2 spy plane, and created a theory of color vision. The camera used self-developing film2 with square photos that came into view over a few minutes.3 The film was a complex sandwich of 11 layers of chemicals to develop a negative image and then form the visible color image. But the film was just one of the camera's innovations.
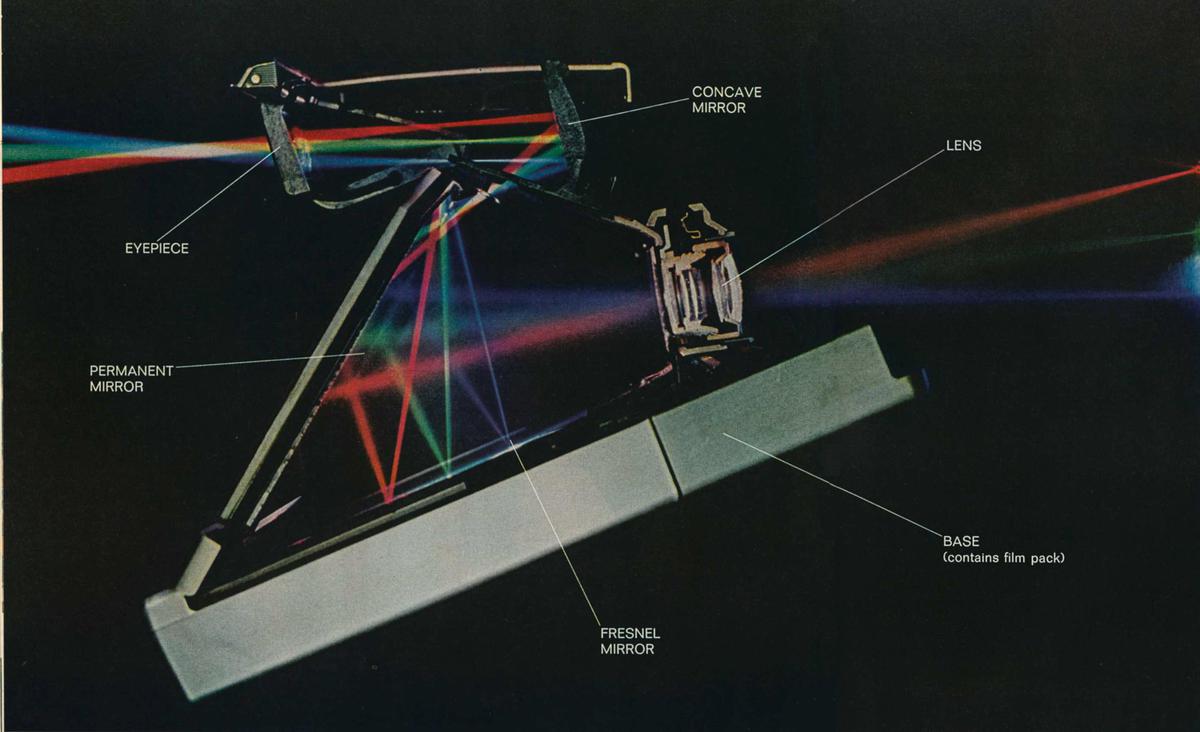
The camera required complex new optics to support the intricate light path shown below. The components included a flat Fresnel mirror, aspherical lenses, and a moving mirror. These optics could focus from infinity down to a closeup of 10 inches. The optics are even more amazing when you consider that the camera folded flat, 3 cm thick and able to fit in a jacket pocket.
But I'm going to focus on the camera's electronics, powered by a custom flat battery pack. When the shutter button is pressed, the camera carried out several tasks with precision timing. First, a solenoid closes the shutter, blocking the entry of light into the camera. Next, the motor is turned on, causing the camera's internal mirror to flip up to uncover the film. The solenoid is then de-energized, causing the shutter to open. The film exposure time depends on the light level; at the appropriate time, the solenoid closes the shutter again to stop exposure. Finally, the motor runs again to eject the film and reset the mirror.
I'm helping the openSX70 project by reverse-engineering the chips on the exposure control board. This board contains three surface-mount ICs: a chip to read the light intensity from a photodiode, a timer chip to control how long the shutter blades are open, and a power control IC to drive the motor and solenoids.4
The development of this board was contentious, with Fairchild and Texas Instruments battling to supply the electronics for millions of cameras.5 The exposure control board went through three designs as Fairchild and Texas Instruments struggled to meet Polaroid's price target of just $5.75. First, Texas Instruments built a control board from a ceramic substrate with laser-trimmed resistors. The expensive components put the board way over budget at $100 so Polaroid used these boards only in prototype cameras. Fairchild's design was accepted by Polaroid even though its cost of $20 still exceeded the target. Fairchild's board was used from 1972 to 1973, but Texas Instruments fought back with an all-new design that cost only $4.10. This TI board was the long-term winner, and is the one I am examining in this post.
The optical chip
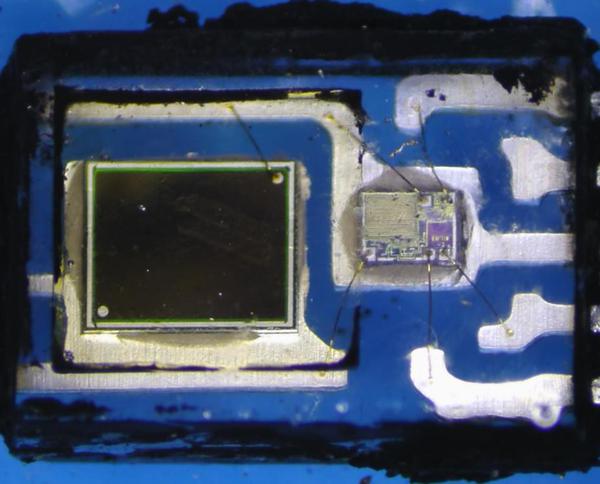
The exposure control board automatically adjusts the exposure time based on the amount of ambient light. Ambient light is measured by the optical chip, a package that combines a photodiode and a silicon die in one small package. The silicon die is protected by epoxy, but the larger photodiode is exposed so external light can fall on it.
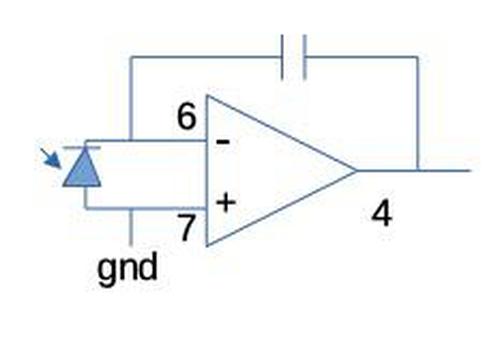
To measure the ambient light, the chip implements the integrator circuit below. The photodiode generates a small current that depends on the light level. This current is integrated over time using a capacitor until a threshold is reached. By opening the shutter during this interval, the film is exposed for the desired amount of time. (The film's exposure depends on the total amount of light received, which is the same value that the integration calculates.) The op-amp die outputs the voltage across the capacitor without draining the capacitor in the process.
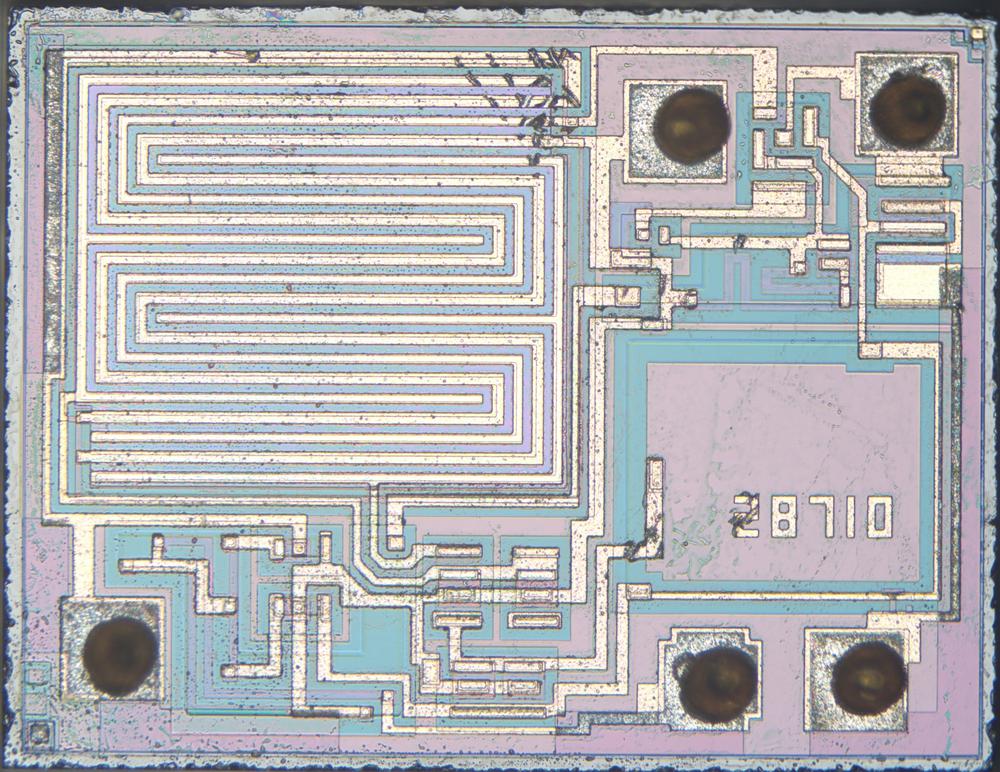
The photo below shows the silicon die under a microscope. The chip, made by Texas Instruments, is dominated by the zig-zags forming two interlocking JFET transistors. A JFET is a special type of transistor, used before MOSFETs became popular. These transistors have very low input currents, so they won't drain the capacitor as it charges. The interlocking layout ensures that both transistors are at the same temperature, so the circuit will stay accurate even if the chip heats up unevenly. The chip also contains NPN and PNP transistors, resistors, and a capacitor (the large pink square labeled 28710).
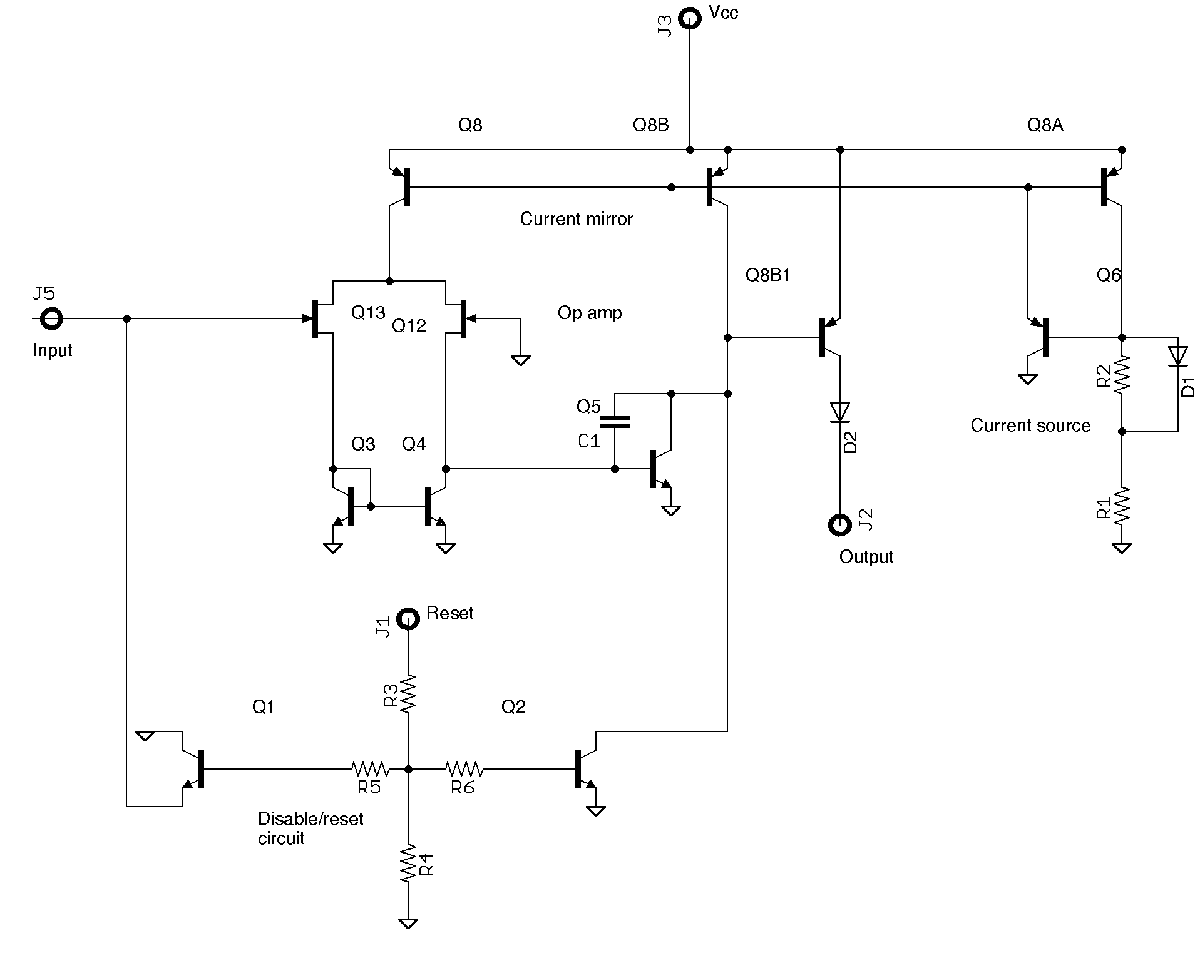
By reverse-engineering the die, I created the schematic below. It is an op-amp, measuring the difference between two inputs (one tied to ground). The two JFET (Q12/Q13) transistors are configured as a standard differential pair circuit. A fixed current (from the current mirror Q8/Q6) is fed into the transistors, and whichever transistor has the higher input will pass almost all the current. The result is amplified by Q5 for the output. In addition to the op-amp circuitry, the chip contains a reset circuit to discharge the capacitor before use (Q1/Q2). (The internal capacitor C1 stabilizes the op-amp; the integration capacitor is external.)
The power driver chip
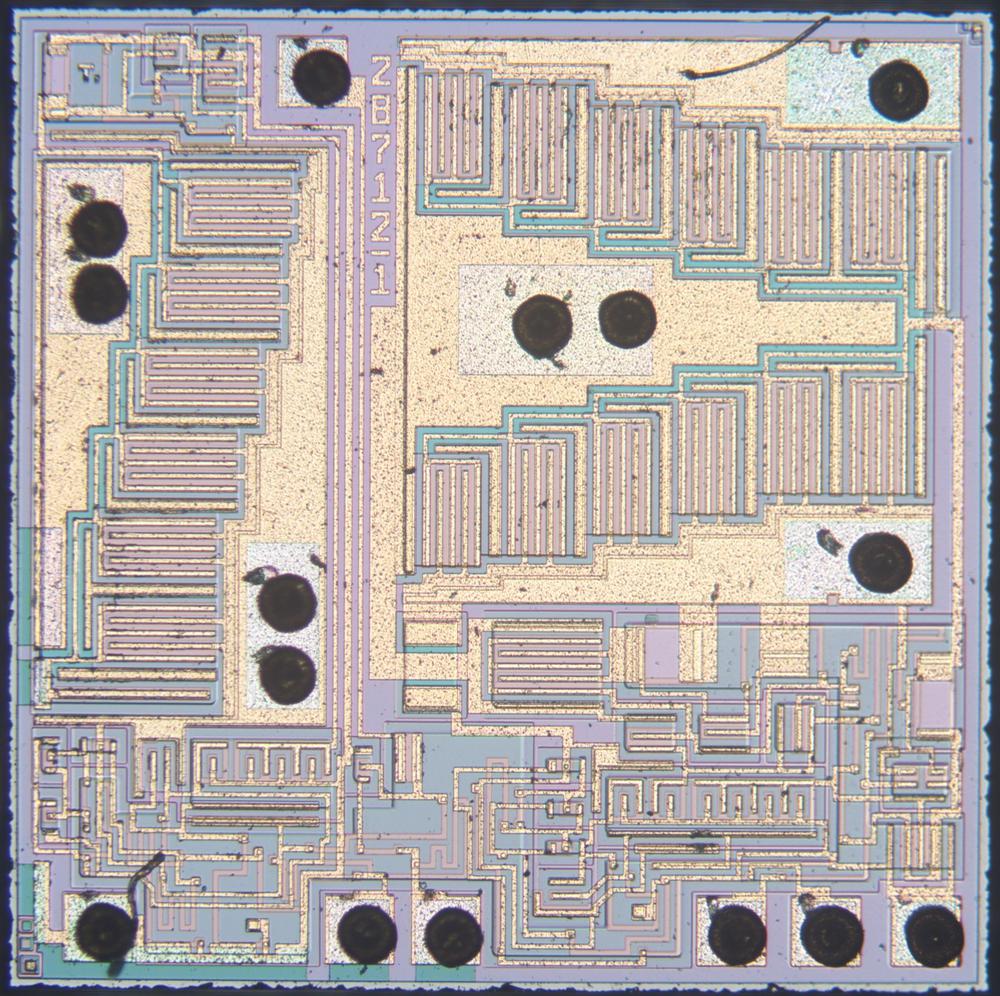
Next, the power chip drives solenoids and the motor to activate the camera's mechanisms. The high-current power transistors (the golden triangular shapes) take up most of this chip. Smaller transistors below form the control circuitry.
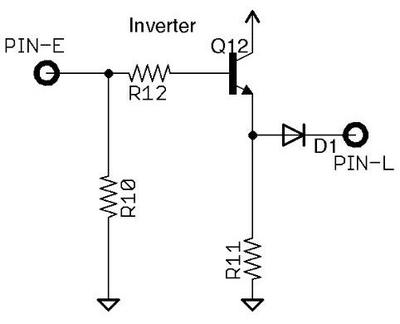
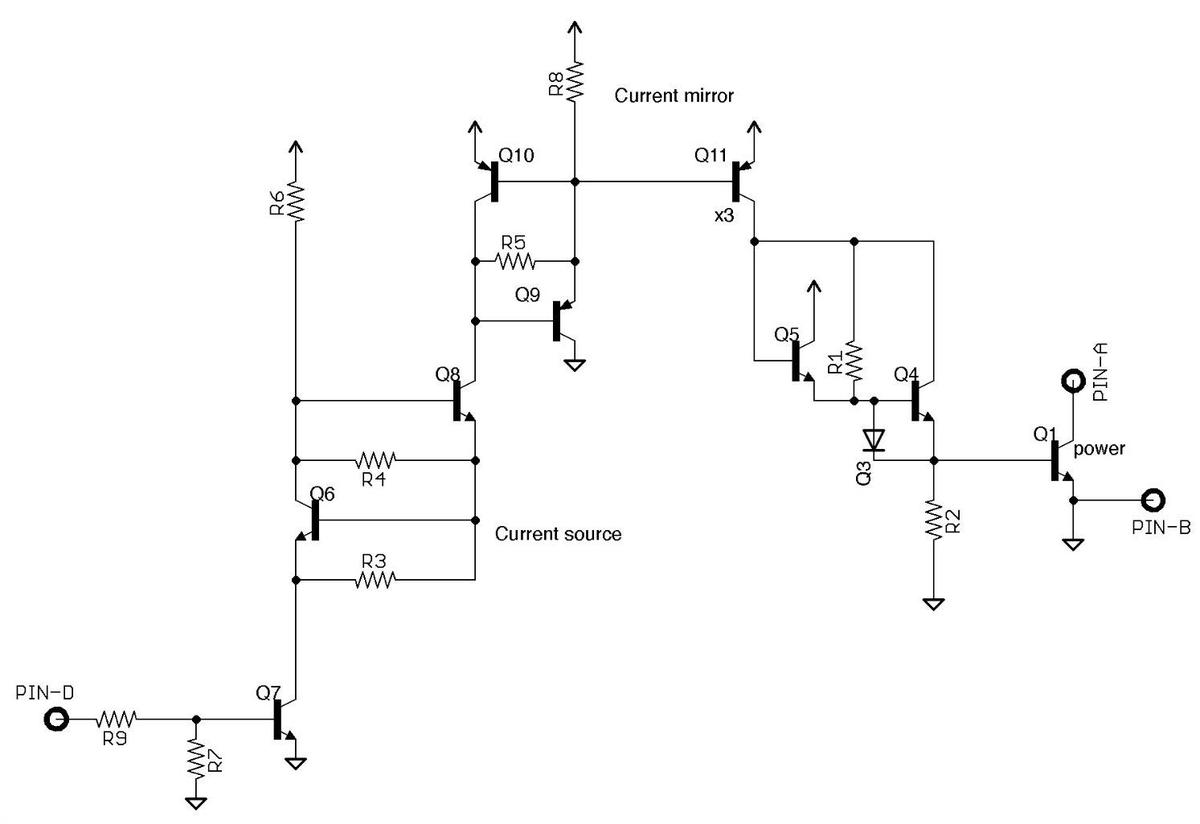
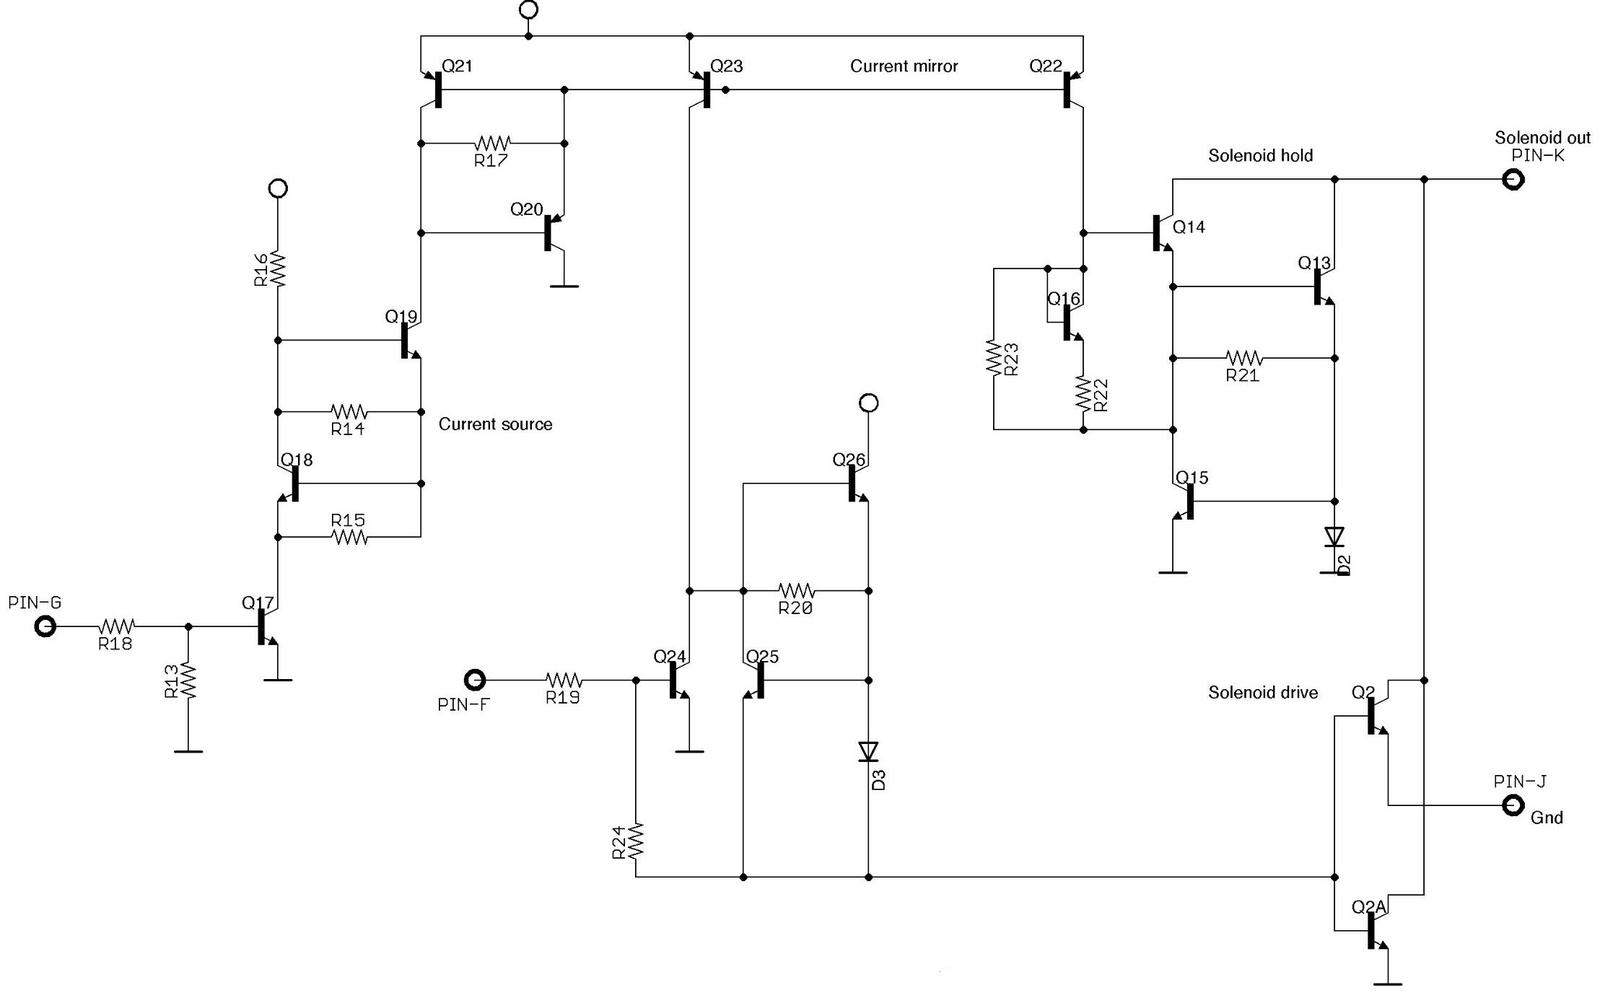
My reverse-engineered schematic shows that the chip has three parts. First, a simple inverter. This probably interfaces the logic chip to the motor control board.
Second, a high-current driver. This uses the large power transistor at the left of the die. This probably drives a solenoid.
Finally, a high-current driver with a separate circuit for the solenoid hold current. (That is, the solenoid is pulled into position with a high current, and then held in that position with a lower current.) This uses the large power transistors at the right of the die. There's a single large transistor underneath the main "triangle" of transistors; that transistor is for the hold current. This circuit uses separate power and ground pads from the rest of the chip.
The driver circuits are more complex than I'd expect, using current sources and current mirrors. Maybe this design minimizes standby current use.
The logic chip
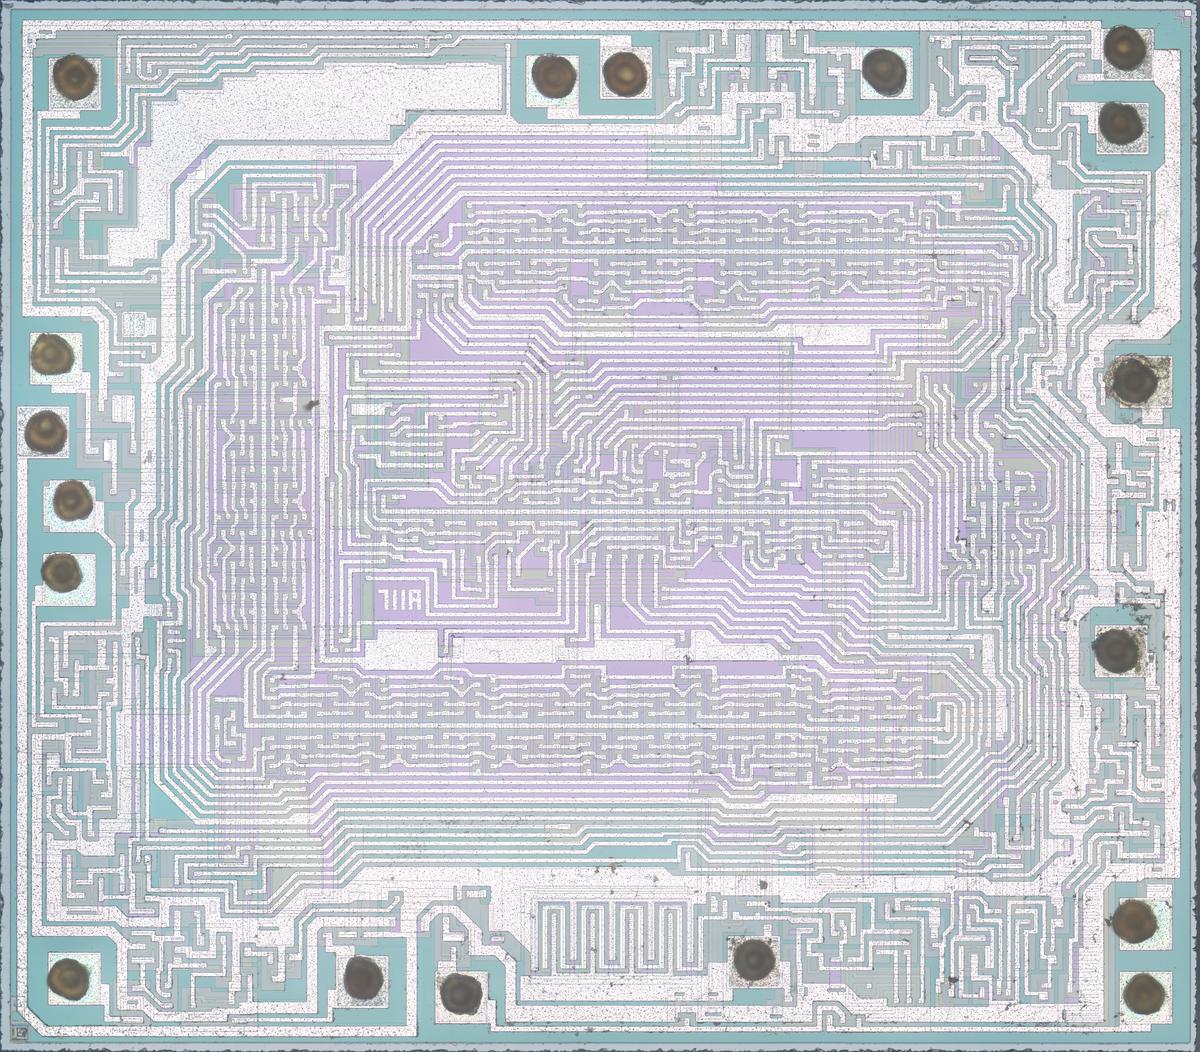
The camera is controlled by a complex logic chip that controlled the timing of the various mechanisms, running the motor and solenoids. It had to handle four different use cases: ejecting the protective cover sheet when a film package was inserted, taking a photo, taking a photo with the flash, and ejecting an empty film package.
This chip was constructed from Integrated Injection Logic (I2L), an obscure 1970s logic family featuring high density and low power. Because the camera ran off a battery in the film pack, minimizing power consumption was a critical factor. At the time, I2L was a good choice for dense, low-power circuitry, although it was soon overtaken by CMOS. Texas Instruments did a lot of development with I2L, including digital watch chips and the 76477 sound chip so it's not surprising that they chose I2L for the camera chip.
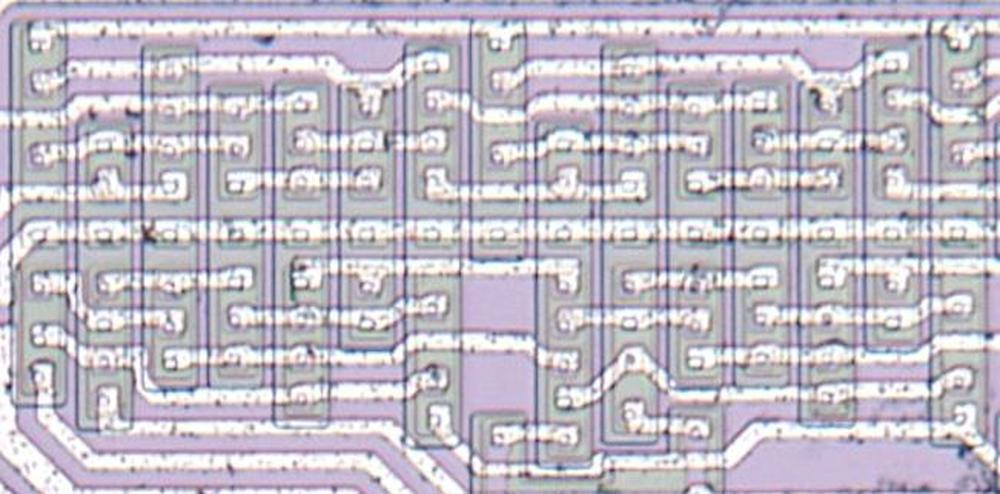
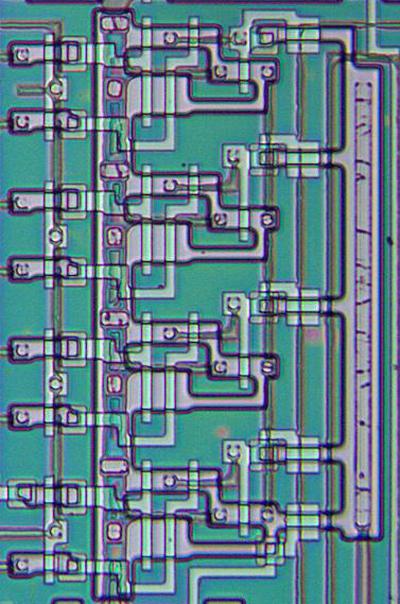
I2L gates can be packed together at high density, as shown below. Each vertical gray rectangle is two transistors (one above the horizontal centerline and one below), corresponding to two gates. The chip has very little wasted space, especially compared to TTL logic, which was commonly used at the time but required multiple transistors and bulky resistors for each gate.
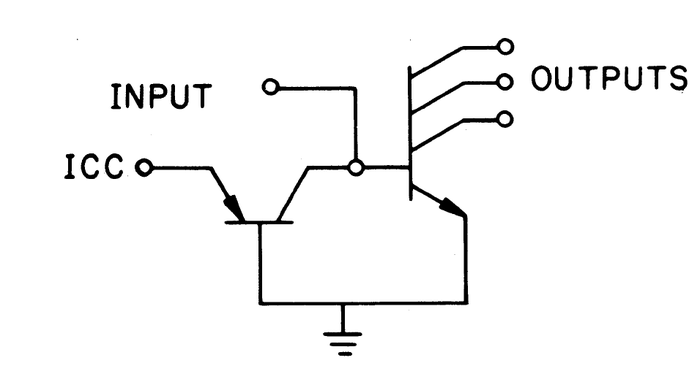
I2L is a bit tricky to understand since an I2L gate has one input and multiple outputs. How can that work? The schematic below shows an I2L gate, with one input and three outputs. Normally the current from the injector (ICC) turns on the output transistor, pulling the output low. But if the input is low, the output transistor turns off and the output will be high. Thus, the gate inverts the input. (You can think of the injector as a pull-up resistor on the input.)
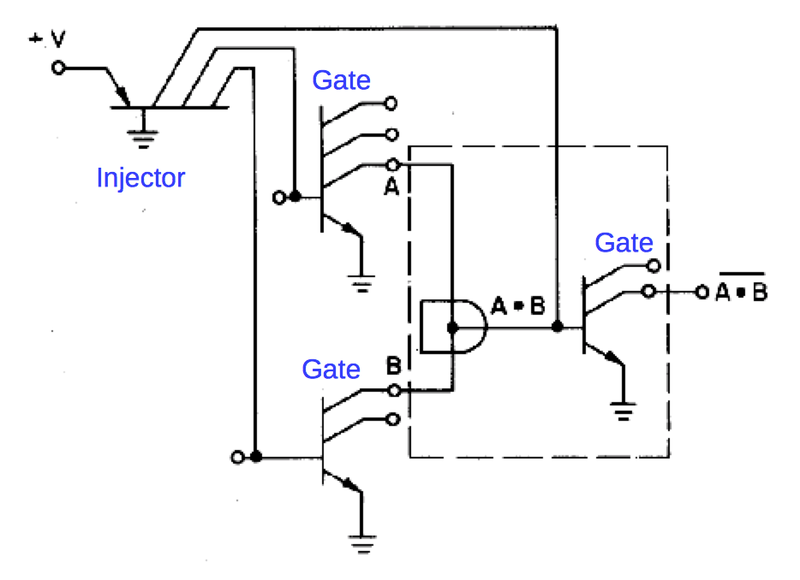
Since the circuit above has a single input, it may seem to be just an inverter. But by wiring several signals together at the input, you get an AND gate "for free": if any signal is low, it will pull the wire low, and otherwise the signal is high. This is called "wired-AND". The wired-AND input to the I2L inverter results in a NAND gate.
One problem arises with wired-AND: if you connect an output to more than one wired-AND, everything gets shorted together. The solution is to have multiple outputs from the inverter. Thus, each I2L NAND gate has a single input and multiple identical outputs. In the diagram below, the outputs from various gates (A and B below) are connected together and fed to the input of an I2L gate, creating a NAND gate.
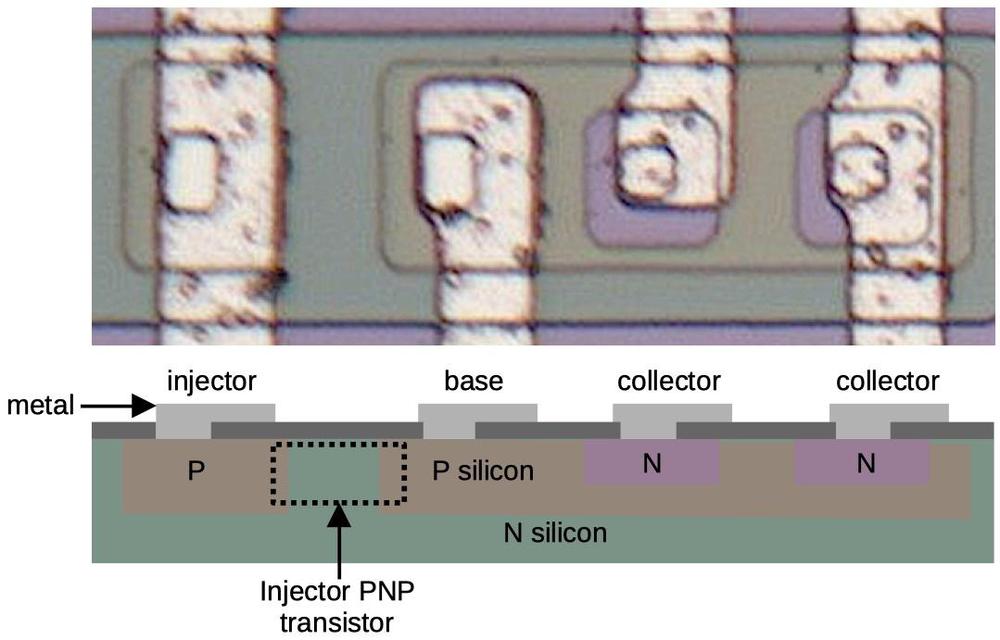
The transistors in I2L have multiple collectors, which may seem strange, but the diagram below shows how they are constructed. Each collector has an N region (purple) with a P region (tan) below for the base, and another N region (green) at the bottom, forming an NPN transistor. The multiple collectors are built by creating multiple N regions. Physically, the injector PNP transistor is just a P region for the emitter, reusing the emitter and base's N and P regions; this makes the injector more compact than a "full" transistor.
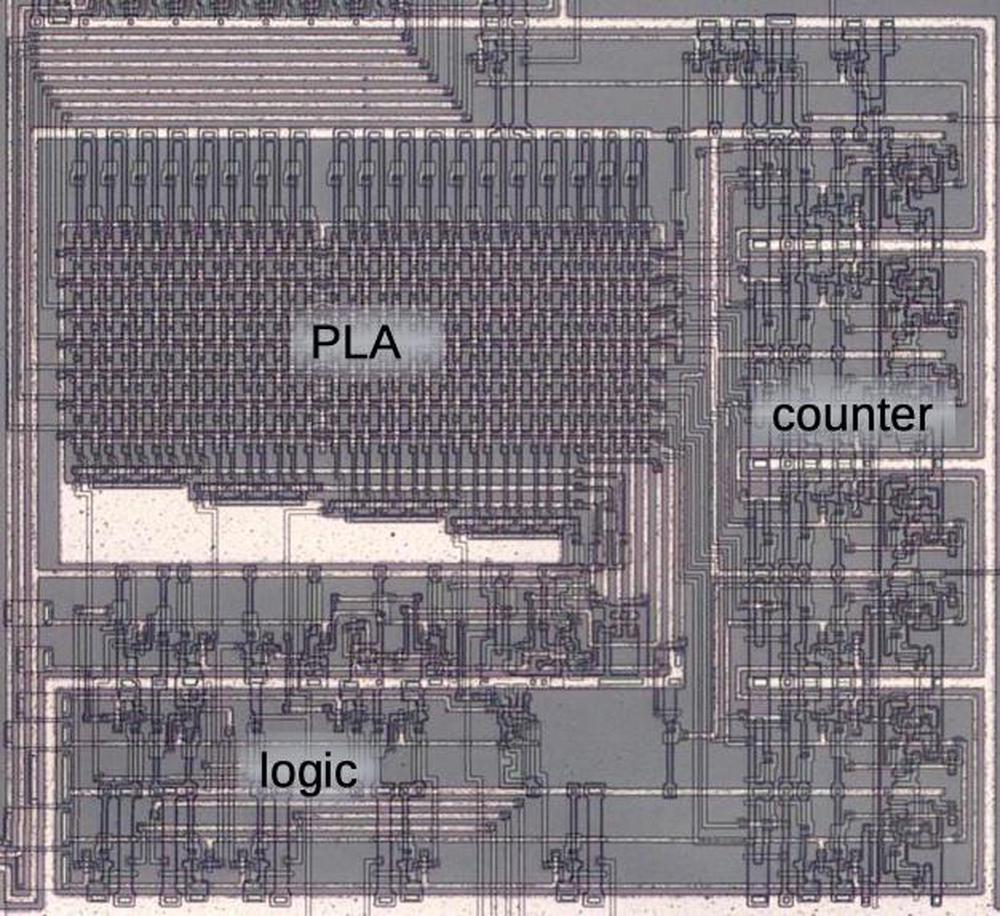
I haven't reverse-engineered this chip yet. I believe that it contains an oscillator and a chain of flip flops for timing, as well as a comparator for the light level and some miscellaneous control logic.
Conclusion
While the electronics of the SX-70 camera aren't impressive by modern standards, they were cutting edge at the time. They made the SX-70 easy to operate by handling the exposure and timing automatically. Texas Instruments split the electronics across three chips: a precision JFET op-amp with a photodiode, a high-current power driver chip, and a complex logic chip using dense, low-power I2L logic.
Unfortunately, innovative technology wasn't enough for Polaroid. The company declined after competition from Kodak, the expensive failure of the Polavision instant home movie system, and the rise of digital cameras. Polaroid declared bankruptcy in 2001 and the company was broken up. The SX-70 has seen a resurgence in popularity, with film and cameras sold by polaroid.com, which acquired the Polaroid name in 2017.
Follow me on Twitter @kenshirriff for more posts. I also have an RSS feed. Thanks to Joaquín De Prada and Peter Kooiman of openSX70 for providing the chips and John McMaster for decapping them.
For more about the SX-70, see the interesting and quirky 10-minute movie below, which markets the SX-70, explains how to use it, and discusses the internal operation. This movie was made in 1972 by the famous designers Ray and Charles Eames.
Notes and references
-
The name SX-70 comes from its inventor Dr. Edwin Land. He numbered all his "special experiments" in a notebook and his instant picture experiment was number 70. Although the camera was 30 years after special experiment 70, he felt that it embodied the system he had envisioned in the mid-1940s. ↩
-
Land introduced instant photography in 1947, and then color instant film in 1963, based on a peel-apart technology. The SX-70 eliminated the problems of the peel-apart instant photos. As Polaroid said, “No pulling the picture packet out of the camera, no timing the development process, no peeling apart of the negative and positive results, no waste material to dispose of, no coating of the print, no print mount to attach, no chance for double exposure, no chance to forget to remove the film cover sheet and spoil a picture, no exposure settings to make, no flash settings to remember, no batteries to replace.” ↩
-
Although Polaroid photos develop in a minute or so without any user intervention, shaking the photo was a common custom. "Shaking the Polaroid" was the theme of a 1998 Polaroid ad. Outkast's 2003 song Hey Ya! featured the refrain "Shake it like a Polaroid picture". ↩
-
I haven't investigated all the chips in the SX-70. The motor control module contains a linear control IC and power transistors. The camera also takes a flashbar with five flashbulbs. The flash circuit has another chip that checks the bulbs to find an unused bulb. ↩
-
"The Battle for the SX-70 Camera", IEEE Spectrum, May 1989 discusses in detail the battle between Fairchild and Texas Instruments to win the Polaroid contract.
The internal circuitry of the camera is described in "Behind the Lens of the SX-70", IEEE Spectrum, Dec 1973. This circuitry, however, is for the earlier Fairchild version and the implementation is considerably different from the Texas Instruments circuitry that I examined. The Fairchild implementation is also described in "Camera Electronics, A New Approach", WESCON 1973. ↩
