The Arduino
The Arduino is a popular microcontroller platform consisting of a small, inexpensive board and an easy-to-use C-based development environment. The board has multiple digital I/O pins and analog inputs, and a USB serial port connection for programming and communication. The Arduino can be interfaced with a wide variety of hardware. (The Arduino is kind of like a Microchip PIC development board, but uses the ATmega328 AVR microcontroller.) The Arduino is about the size of a credit card (but thick). It has connectors on top which will receive a daughter board (inexplicably called a "shield"), or jumper wires.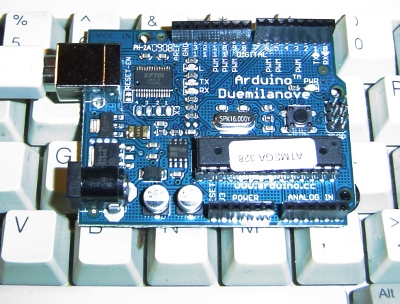
The Arduino is very easy to program and use. The Arduino is programmed using the Wiring language, which is an extension of C with many libraries to interface with various types of hardware. The Arduino IDE provides an editor and compiler for a "sketch" (which is the name for an Arduino program), and downloads the code to the Arduino board over USB. After seeing the Arduino hype at the Maker Faire, I got a Adafruit Arduino Starter Pack, and I've been happy with it. More information about the Arduino is at www.arduino.cc; the playground is a good place to start.
You can do a lot with an Arduino, but it has some limitations. There's only 30KB of memory for programming (yes, kilobytes). Many things you might want to connect (Ethernet, SD card, USB hard drive or flash) require additional hardware, and even then are pretty limited.
The SheevaPlug
The Marvell SheevaPlug is a very small Linux server with a 1.2GHz 88F6281 ARM processor and 512MB of RAM and 512MB of flash storage. The SheevaPlug has a Gigabit Ethernet connection, a SD card slot, and a serial USB console connection. This all fits into a box the size of three cassette tapes that sells for $99 and uses about 5 watts of power.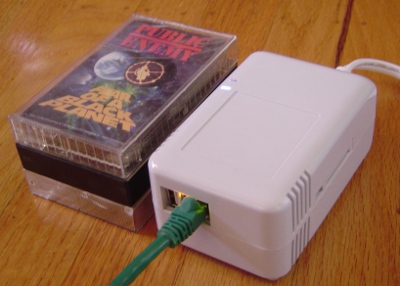
The SheevaPlug is designed to be plugged directly into the wall as a wall-wart, but the plug snaps out and can be replaced by a power coard. I'm currently using the "desktop" configuration with a power cord, since it's easier to connect things. Marvell recently gave me a SheevaPlug, and I've been enjoying it a lot.
Because the SheevaPlug is a full Linux system, the standard Linux software packages are available and easily installed with apt-get (full list). You can run X-windows (of course you need to VPN in). You can run Apache and PHP on the SheevaPlug and use it as a web server. The GCC toolchain runs on it. You can program it in C++, Python, Scheme, or whatever.
The main information source on the SheevaPlug is plugcomputer.org. Another useful site is computingplugs.com, a wiki about the SheevaPlug which is actually served by a SheevaPlug.
There are a few limitations of the SheevaPlug. The SheevaPlug is headless, so you need to access it via ssh or VNC. You can't run x86 binaries. The SheevaPlug's performance is roughly at the Pentium III level (benchmark), so it won't replace a state-of the-art server. Also, floating point performance is poor since there's no hardware FPU. The Linux install has some annoying minor issues with apt-get, DNS, NTP, and passwd (fixes). The SheevaPlug isn't really suited for low-level electronics projects because it doesn't have any accessible general-purpose I/O pins. (The CPU has 50 digital GPIO pins, but the SheevaPlug doesn't expose them.)
Arduino + SheevaPlug
The SheevaPlug and Arduino make a great pair together for hardware hacking projects since the SheevaPlug can easily provide the web server, computing, and storage functionality that the Arduino lacks, while the Arduino makes it easy to interface to hardware circuits. Moreover, the two are easily connected with a USB cable, and then they can communicate through simple serial communication (modulo kernel details below).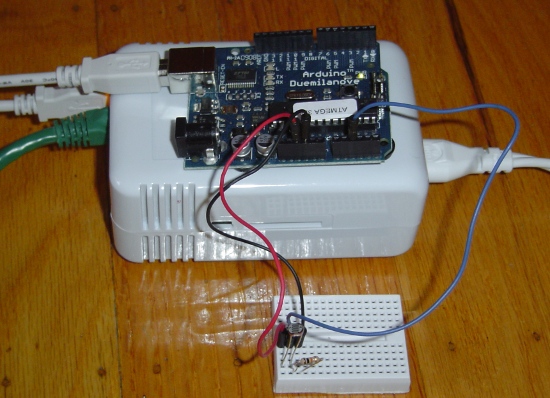
The above picture shows the SheevaPlug and Arduino connected together by a USB cable. The SheevaPlug also has an Ethernet connection (green) and power (on the right). The Arduino has some jumpers to a breadboard circuit (described below).
A sample project: illumination recording
For an initial project, I decided to collect data on the illumnination in my room. (Temperature would have been more useful, but I didn't have a temperature sensor handy.) I implemented a simple Arduino sketch (i.e. program) to read illumination from a photocell and write it to the serial port. The SheevaPlug collects the data, generates a graph using gnuplot, and provides the data as a web page on the Internet. (Sorry, no URL to access it since I'm not currently running this.)
The screenshot below shows the web page that the SheevaPlug serves showing illumination across a few days. There are a lot of spikes due to turning lights on and off, but you can see where the sun rises, light increases through the day, peaking shortly before sunset. This web page illustrates the ability of the Arduino to measure analog data combined with the SheevaPlug's ability to collect data, plot it, and serve web pages.
The Arduino code
Hooking up the Arduino to measure illumination was trivial; I used a 10K resistor and a photocell connected to an analog input pin. (I made the following schematic with Eagle.)
The Arduino sketch below (download) simply reads the analog input once a second and writes the value to the serial port as a decimal number. (One annoyance is the Arduino IDE won't run on the ARM processor, so I have to connect the Arduino to a separate computer to download the sketch.)
int ainPin = 2;     // select the analog input pin

void setup() {
  Serial.begin(9600);
}

void loop() {
  Serial.println(analogRead(ainPin), DEC);    // read the value from the sensor and write to serial
  delay(1000);
}
The Python code
The Python code that runs on the SheevaPlug (download) is straightforward. I used a simple Python web server to provide the graph page and some static files. It uses gnuplot to generate the graph. Some highlights of the code:
The pyserial library (apt-get install python-serial) provides simple access to the serial port. One thread reads lines from the serial port and dumps them to the data file along with a timestamp. Only one sample per minute is kept, and the others discarded. The Arduino may appear as a different device, e.g. /dev/ttyUSB0. If no such device appears when you plug the Arduino into the SheevaPlug, you probably need the kernel update below.
class Arduino(threading.Thread):
  def run(self):
    f = open('/tmp/data', 'a')
    # Port may vary from /dev/ttyUSB1
    self.ser = serial.Serial('/dev/ttyUSB1', 9600, timeout=10)
    self.ser.flushInput()
    old_timestamp = None
    while 1:
      data = self.ser.readline().strip()
      if data:
        timestamp = time.strftime("%m/%d/%Y %H:%M", time.localtime())
        if timestamp != old_timestamp:
          # Only log once per minute
          print >>f, timestamp, data.strip()
          old_timestamp = timestamp
        f.flush()
The other part of the Python code is an HTTP server using SimpleHTTPServer; a /graph URL runs gnuplot on the data file to generate a png image file. The returned web page loads the image, which is served by the Python server as a static file. (Since the SheevaPlug supports Apache, PHP, and mysql, I could have used them, but it seems like overkill for a simple demo.)
 def graph(self):
    g = os.popen('gnuplot', 'w')
    print >>g, GNUPLOT_CMD
    self.send_response(200)
    self.send_header('Content-type', 'text/html')
    self.end_headers()
    self.wfile.write(GRAPH_HTML)
22 comments:
The ATmega328P actually has a built-in temperature sensor. It's documented in section 21.8 of the ATmega328P reference manual.
I haven't tried to access this from within the Arduino sketch framework, but I suppose it's possible in some way.
Hi Greg! I considered using the built-in temperature sensor until I read that it is accurate +/- 10 degrees C. I might as well use a random number generator :-)
Brilliant!
Very, very interesting idea.
I am sure it will be useful to many.
My congratulations.
OldBeaver
Chile
South America
This is really cool. I've been wondering how those two would work together.
Do more!
This is excellent. Thanks! I'm trying to do the exact same thing except with XBee instead, but it also uses FTDI.
I knew it could be done.
This brings even more posibilities to make with the Arduino especialy proyects like home automation and monitoring.
Keep working.
This is overkill imo, why go with a sheevaplug for 100$ when you can use an ethernet shield for 20$?
If you still like the idea of using embeded linux devices running webservers and all that, a much cheaper and more elegant solution can be achieved using a router (ex. FON) running openwrt and connecting the arduino to it via rs232.
I am definitely interested! Please keep going, I may just to set up something like this myself (but I am quite a newbie).
I have set up ethernet shield for what you have described in your blog, and have Arduino running the basic server codes, limitation of the server really hurts me though.. no php, no python, etc.... so I can definitely see a use for this set up, especially since it is "standalone" and you can do some analysis on the Sheevaplug?
Keep going!
Sorry for double posting.. but is it possible to do you think this with the Pogo Plug as well?
Code example to measure tempreature with the built in sensor can be found at http://code.google.com/p/tinkerit/wiki/SecretThermometer
Matt
Usually Arduino is programmed with the Arduino IDE.
As far as i can see, gcc-avr and avrdude are available packages for Sheeva with Debian installed.
Did somebody find out what params especially for avrdude are needed ??
Would be nice to do all Arduino work simply from SheevaPlug commandline.
Thanks for hints!
Hi Ken,
I'm trying to do something similar. I've got a sheevaplug that I want to have monitor sensors and generate audio, and I've got an arduino that will monitor five motion sensors and spit the data out over USB.
I tried to install http://sheeva.with-linux.com/sheeva/README-2.6.34.1 to NAND and now it will no longer boot after "uncompressing linux, booting kernel."
I'd like to try again. Before I restore the OS, can you tell me what OS you used, and what kernel you popped on top of it?
Thanks,
Todd
I found my issue. I forgot a setenv that was required to boot the new kernel. Things look good now! Thanks!
I'm glad you figured out the OS installation, lance_!
Hello Ken,
I was wondering if you are the Kenny that runs the site
http://computingplugs.com/index.php/Main_Page
Could could you pass inquiry on to him if you know him ?
At any rate I admire what you are doing: attaching some hardware to the plug:
I designed my own arduino like board (except arm cortex m0)
Ref:=A0 http://www.lpc1100challenge.com/detail/836
I presently own two plug computers and am finally getting into it.
Ref: http://plugcomputer.org/plugforum/index.php?topic=3D2201.0
It looks like I have apt-get of aptitude working and have downloaded to
my plug with debian squeeze installed on a 4 gb mmc card using ESIA.
1) aptitude install gnome=20
2) aptitude install xfonts-base
3) aptitude install tightvncserver
After this
I DID NOT SEE GNOME ANY WHERE using bash find command SO DECIDED TO ALSO TRY
4) aptitude install gnome-core
Now lets try "df"
debian:/# df
Filesystem 1K-blocks Used Available Use% Mounted on
tmpfs 256748 0 256748 0% /lib/init/rw
udev 10240 236 10004 3% /dev
tmpfs 256748 4 256744 1% /dev/shm
rootfs 3799976 1535404 2071540 43% /
debian:/#
NOW THAT DID SOME DAMAGE, MAYBE IT WORKED !
###################################
BEING A GLUTTON FOR MORE DISKSPACE PUNISHMENT LET try
5) aptitude -install gnome-desktop-environment
APPARENTLY THIS ALSO INCLUDES vino which is the "VNC server for GNOME"
(nice !)
If this works then I will have both "vino" and "tightvncserver" installed..
Lets try:
WELL THE "-" in front of install makes it give this comment:
This aptitude does not have Super Cow Powers.
Lets retry aptitude install gnome-desktop-environment
And my disk space took another hit but survived.
NEXT TIME I WILL USE AN 8 gb MMC CARD !
Processing triggers for python-support ...
debian:/# df
Filesystem 1K-blocks Used Available Use% Mounted on
tmpfs 256748 0 256748 0% /lib/init/rw
udev 10240 236 10004 3% /dev
tmpfs 256748 4 256744 1% /dev/shm
rootfs 3799976 2552564 1054380 71% /
debian:/#
################################
if all goes well this may come in handy:
http://www.linuxquestions.org/questions/debian-26/how-to-start-gnome-or-kde=-command-line-468648/
>>>>>>>>>>>>>>>>>>>>>>> Finally,
Ken, I hope this may all be of intererset or value to you.
At any rate, if you have any comments about what the next steps are to get a gnome virtual VNC window on my laptop going into my plug computer. (I think I may have just about installed everthing I need now. But, how do I flip the on switch ??) Also I have just installed "TightVNC" onto
my laptop. Up until now I have been using a pUTTY terminal screen to talk to my plug via my laptop. I am hoping to see a Gnome desktop soon in it's stead.
Let me know your suggestions, or those from the Kenny of
http://computingplugs.com/index.php/Main_Page
Take care, and happy plugging
Joe
Hi Peruli - that's quite the effort, getting Gnome running on a plug computer. Unfortunately, I don't have any advice to give, as that's more ambitious than anything I tried.
I'm not Kenny from computingplugs.com, since you were wondering; he'd probably be able to help you more :-)
I have a sheeva PLUG and documentation with the package shows the process as a 88F6182. Maybe my doc is wrong or my PLUG is a different model, physically looks exactly the same.
Herman
Getting com error while uploading code in arduino
Post a Comment