Update
The easiest way to use the library is through the Arduino IDE's library manager; the library is "IRremote".The code is at github.com/Arduino-IRremote/Arduino-IRremote. If you have any issues, please report them there. (I haven't been involved with this code for many years.)
Do you want to control your Arduino with an IR remote? Do you want to use your Arduino to control your stereo or other devices? This IR remote library lets you both send and receive IR remote codes in multiple protocols. It supports NEC, Sony SIRC, Philips RC5, Philips RC6, and raw protocols. If you want additional protocols, they are straightforward to add. The library can even be used to record codes from your remote and re-transmit them, as a minimal universal remote.
How to send
This infrared remote library consists of two parts: IRsend transmits IR remote packets, while IRrecv receives and decodes an IR message. IRsend uses an infrared LED connected to output pin 3. To send a message, call the send method for the desired protocol with the data to send and the number of bits to send. Theexamples/IRsendDemo sketch provides a simple example of how to send codes:
#include <IRremote.h>
IRsend irsend;

void setup()
{
  Serial.begin(9600);
}

void loop() {
  if (Serial.read() != -1) {
    for (int i = 0; i < 3; i++) {
      irsend.sendSony(0xa90, 12); // Sony TV power code
      delay(100);
    }
  }
}
This sketch sends a Sony TV power on/off code whenever a character is sent to the serial port, allowing the Arduino to turn the TV on or off. (Note that Sony codes must be sent 3 times according to the protocol.)
How to receive
IRrecv uses an infrared detector connected to any digital input pin.
The examples/IRrecvDemo sketch provides a simple example of how to receive codes:
#include <IRremote.h>

int RECV_PIN = 11;
IRrecv irrecv(RECV_PIN);
decode_results results;

void setup()
{
  Serial.begin(9600);
  irrecv.enableIRIn(); // Start the receiver
}

void loop() {
  if (irrecv.decode(&results)) {
    Serial.println(results.value, HEX);
    irrecv.resume(); // Receive the next value
  }
}
The IRrecv class performs the decoding, and is initialized with enableIRIn(). The decode() method is called to see if a code has been received; if so, it returns a nonzero value and puts the results into the decode_results structure. (For details of this structure, see the examples/IRrecvDump sketch.) Once a code has been decoded, the resume() method must be called to resume receiving codes. Note that decode() does not block; the sketch can perform other operations while waiting for a code because the codes are received by an interrupt routine.
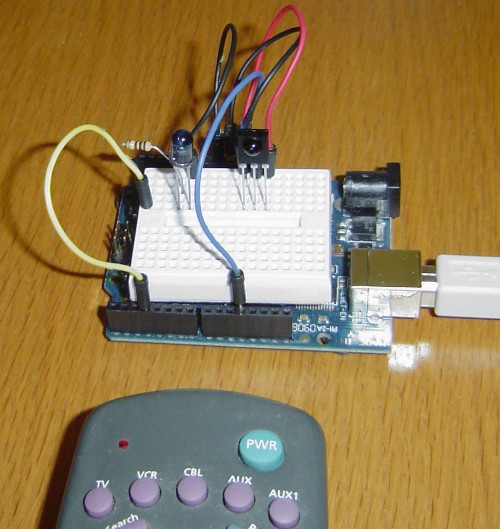
Hardware setup
The library can use any of the digital input signals to receive the input from a 38KHz IR receiver module. It has been tested with the Radio Shack 276-640 IR receiver and the Panasonic PNA4602. Simply wire power to pin 1, ground to pin 2, and the pin 3 output to an Arduino digital input pin, e.g. 11. These receivers provide a filtered and demodulated inverted logic level output; you can't just use a photodiode or phototransistor. I have found these detectors have pretty good range and easily work across a room.
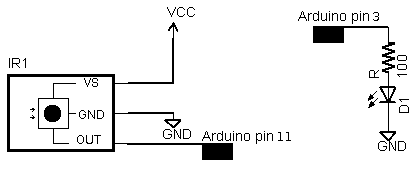
For output, connect an IR LED and appropriate resistor to PWM output pin 3. Make sure the polarity of the LED is correct, or it won't illuminate - the long lead is positive. I used a NTE 3027 LED (because that's what was handy) and 100 ohm resistor; the range is about 15 feet. For additional range, you can amplify the output with a transistor.
Some background on IR codes
An IR remote works by turning the LED on and off in a particular pattern. However, to prevent inteference from IR sources such as sunlight or lights, the LED is not turned on steadily, but is turned on and off at a modulation frequency (typically 36, 38, or 40KHz). The time when a modulated signal is being sent will be called a mark, and when the LED is off will be called a space.Each key on the remote has a particular code (typically 12 to 32 bits) associated with it, and broadcasts this code when the key is pressed. If the key is held down, the remote usually repeatedly broadcasts the key code. For an NEC remote, a special repeat code is sent as the key is held down, rather than repeatedly sending the code. For Philips RC5 or RC6 remotes, a bit in the code is toggled each time a key is pressed; the receiver uses this toggle bit to determine when a key is pressed down a second time.
On the receiving end, the IR detector demodulates this signal, and outputs a logic-level signal indicating if it is receiving a signal or not. The IR detector will work best when its frequency matches the sender's frequency, but in practice it doesn't matter a whole lot.
The best source I've found for details on the various types of IR codes is SB IR knowledge base.
Handling raw codes
The library provides support for sending and receiving raw durations. This is intended mainly for debugging, but can also be used for protocols the library doesn't implement, or to provide universal remote functionality.The raw data for received IR measures the duration of successive spaces and marks in 50us ticks. The first measurement is the gap, the space before the transmission starts. The last measurement is the final mark.
The raw data for sending IR holds the duration of successive marks and spaces in microseconds. The first value is the first mark, and the last value is the last mark.
There are two differences between the raw buffers for sending and for receiving. The send buffer values are in microseconds, while the receive buffer values are in 50 microsecond ticks. The send buffer starts with the duration of the first mark, while the receive buffer starts with the duration of the gap space before the first mark. The formats are different because I considered it useful for the library to measure gaps between transmissions, but not useful for the library to provide these gaps when transmitting. For receiving, 50us granularity is sufficient for decoding and avoids overflow of the gaps, while for transmitting, 50us granularity is more than 10% error so 1us granularity seemed better.
Obtaining codes for your remote
The easiest way to obtain codes to work with your device is to use this library to decode and print the codes from your existing remote.Various libraries of codes are available online, often in proprietary formats. The Linux Infrared Remote Control project (LIRC), however, has an open format for describing codes for many remotes. Note that even if you can't find codes for your exact device model, a particular manufacturer will usually use the same codes for multiple products.
Beware that other sources may be inconsistent in how they handle these protocols, for instance reversing the order, flipping 1 and 0 bits, making start bits explicit, dropping leading or trailing bits, etc. In other words, if the IRremote library yields different codes than you find listed elsewhere, these inconsistencies are probably why.
Details of the receiving library
The IRrecv library consists of two parts. An interrupt routine is called every 50 microseconds, measures the length of the marks and spaces, and saves the durations in a buffer. The user calls a decoding routine to decode the buffered measurements into the code value that was sent (typically 11 to 32 bits).The decode library tries decoding different protocols in succession, stopping if one succeeds. It returns a structure that contains the raw data, the decoded data, the number of bits in the decoded data, and the protocol used to decode the data.
For decoding, the MATCH macro determine if the measured mark or space time is approximately equal to the expected time.
The RC5/6 decoding is a bit different from the others because RC5/6 encode bits with mark + space or space + mark, rather than by durations of marks and spaces. The getRClevel helper method splits up the durations and gets the mark/space level of a single time interval.
For repeated transmissions (button held down), the decoding code will return the same decoded value over and over. The exception is NEC, which sends a special repeat code instead of repeating the transmission of the value. In this case, the decode routine returns a special REPEAT value.
In more detail, the receiver's interrupt code is called every time the TIMER1 overflows, which is set to happen after 50 microseconds. At each interrupt, the input status is checked and the timer counter is incremented. The interrupt routine times the durations of marks (receiving a modulated signal) and spaces (no signal received), and records the durations in a buffer. The first duration is the length of the gap before the transmission starts. This is followed by alternating mark and space measurements. All measurements are in "ticks" of 50 microseconds.
The interrupt routine is implemented as a state machine. It starts in STATE_IDLE, which waits for the gap to end. When a mark is received, it moves to STATE_MARK which times the duration of the mark. It then alternates between STATE_MARK and STATE_SPACE to time marks and spaces. When a space of sufficiently long duration is received, the state moves to STATE_STOP, indicating a full transmission is received. The interrupt routine continues to time the gap, but blocks in this state.
The STATE_STOP is used a a flag to indicate to the decode routine that a full transmission is available. When processing is done, the resume() method sets the state to STATE_IDLE so the interrupt routine can start recording the next transmission. There are a few things to note here. Gap timing continues during STATE_STOP and STATE_IDLE so an accurate measurement of the time between transmissions can be obtained. If resume() is not called before the next transmission starts, the partial transmission will be discarded. The motivation behind the stop/resume is to ensure the receive buffer is not overwritten while it is still being processed; debugging becomes very difficult if the buffer is constantly changing.
Details of the sending library
The transmission code is straightforward. To ensure accurate output frequencies and duty cycles, I use the PWM timer, rather than delay loops to modulate the output LED at the appropriate frequency. (See my Arduino PWM Secrets article for more details on the PWM timers.) At the low level, enableIROut sets up the timer for PWM output on pin 3 at the proper frequency. The mark() method sends a mark by enabling PWM output and delaying the specified time. The space() method sends a space by disabling PWM output and delaying the specified time.The IRremote library treats the different protocols as follows:
NEC: 32 bits are transmitted, most-significant bit first. (protocol details)
Sony: 12 or more bits are transmitted, most-significant bit first. Typically 12 or 20 bits are used. Note that the official protocol is least-significant bit first. (protocol details) For more details, I've written an article that describes the Sony protocol in much more detail: Understanding Sony IR remote codes.
RC5: 12 or more bits are transmitted most-significant bit first. The message starts with the two start bits, which are not part of the code values. (protocol details)
RC6: 20 (typically) bits are transmitted, most-significant bit first. The message starts with a leader pulse, and a start bit, which is not part of the code values. The fourth bit is transmitted double-wide, since it is the trailer bit. (protocol details)
For Sony and RC5/6, each transmission must be repeated 3 times as specified in the protocol. The transmission code does not implement the RC5/6 toggle bit; that is up to the caller.
Adding new protocols
Manufacturers have implemented many more protocols than this library supports. Adding new protocols should be straightforward if you look at the existing library code. A few tips: It will be easier to work with a description of the protocol rather than trying to entirely reverse-engineer the protocol. The durations you receive are likely to be longer for marks and shorter for spaces than the protocol suggests. It's easy to be off-by-one with the last bit; the last space may be implicit.Troubleshooting
To make it easier to debug problems with IR communication, I have optional debugging code in the library. Add#define DEBUG to the beginning of your code to enable debugging output on the serial console. You will need to delete the .o files and/or restart the IDE to force recompilation.
Problems with Transmission
If sending isn't working, first make sure your IR LED is actually transmitting. IR will usually show up on a video camera or cell phone camera, so this is a simple way to check. Try putting the LED right up to the receiver; don't expect a lot of range unless you amplify the output.The next potential problem is if the receiver doesn't understand the transmitter, for instance if you are sending the wrong data or using the wrong protocol. If you have a remote, use this library to check what data it is sending and what protocol it is using.
An oscilloscope will provide a good view of what the Arduino or a remote is transmitting. You can use an IR photodiode to see what is getting transmitted; connect it directly to the oscilloscope and hold the transmitter right up to the photodiode. If you have an oscilloscope, just connect the oscilloscope to the photodiode. If you don't have an oscilloscope, you can use a sound card oscilloscope program such as xoscope.
The Sony and RC5/6 protocols specify that messages must be sent three times. I have found that receivers will ignore the message if only sent once, but will work if it is sent twice. For RC5/6, the toggle bit must be flipped by the calling code in successive transmissions, or else the receiver may only respond to a code once.
Finally, there may be bugs in this library. In particular, I don't have anything that receives RC5/RC6, so they are untested.
Problems with Receiving
If receiving isn't working, first make sure the Arduino is at least receiving raw codes. The LED on pin 13 of the Arduino will blink when IR is being received. If not, then there's probably a hardware issue.If the codes are getting received but cannot be decoded, make sure the codes are in one of the supported protocols. If codes should be getting decoded, but are not, some of the measured times are probably not within the 20% tolerance of the expected times. You can print out the minimum and maximum expected values and compare with the raw measured values.
The examples/IRrecvDump sketch will dump out details of the received data. The dump method dumps out these durations but converts them to microseconds, and uses the convention of prefixing a space measurement with a minus sign. This makes it easier to keep the mark and space measurements straight.
IR sensors typically cause the mark to be measured as longer than expected and the space to be shorter than expected. The code extends marks by 100us to account for this (the value MARK_EXCESS). You may need to tweak the expected values or tolerances in this case.
The library does not support simultaneous sending and receiving of codes; transmitting will disable receiving.
Applications
I've used this library for several applications:- Controlling a pedestrian sign with a remote.
- I extend the library to arbitrary remotes.
- Controlling my stereo over the web.
- I've used this library to implement a "Universal remote" to record and playback IR codes.
- I demonstrate turning something on and off via remote in my infrared bubble maker project.
- Using the library to detect IR beam breaks
Other projects that use this library
- electrosthetics used the library to control a home theater receiver.
- Arduino: Redefining the TV Remote - using the library and an ultrasonic sensor to control a TV by waving your hand.
894 comments:
«Oldest ‹Older 201 – 400 of 894 Newer› Newest»Ken, we have Microsoft Surface like Multitouch table (see the table in action at http://www.realbox.in)
Was using your library to use Arduino to send IR commands to any entertainment system. Was not able to record RAW IR signlas and play the raw IR signal back.
We are developing a Universal Remote program for your multitouch table
hi ken , thanks for your reply ,
im trying to decode an infrared signal from a room locator, the locator send an infrared signal to a receiver the receiver decode the signal and tell if its room 1 or 2 or 3 ..etc
so i want to decode the IR signal instead of that receiver , the room locater can be programmed from room 001 to room 777 .
i used this script to get my data and used gnuplot to plot them .
http://www.arduino.cc/playground/Code/InfraredReceivers
the plot below show the signals for rooms 1,2,3,4,5,6,7 and room 10
can you make any sense of the pattern , have you seen this pattern before ?!?!
signals here :
http://img408.imageshack.us/img408/6872/wavesdx.jpg
@evan: I've been puzzling over your room locator IR signals. It looks kind of like a RC5-style code repeated over and over without a gap in between, and with about 300uS per half-bit. But it looks like codes 1 and 3 are running slower (longer) than the others, which is strange.
My best guess is the encoding is:
HH LL followed by 15 bits encoded as HL or LH. Each H or L has a duration of 300uS. However, the results don't seem to map to the room numbers in any reasonable way.
ken, thanks for taking the time to llok at the signals.
it continue with no gaps, cause the locater keep sending the signal continously so the receiver that is worn by the person can decode the signal and tel lwhere that person is at all times.
i just wanted to make sure that its not just me who cant see a specific pattern in these signals.
again, thanks alot for your help, i do appreciate it.
@Vishal, @Carl:
I've added Xbox code support (64-bit RC6 codes). Take a look at my update and let me know how it goes.
Nice Libary
But can you make a version that uses PWM PIN D9 Rather than D3
I'd like to second that other comment about the insufficient delay between sony IR-packets in your example. With my AV-receiver anything between 800us and 77ms worked, anything after that got ignored.
Please change that to a sane value - other than that: Your library is awesome, thank you very much.
Fantastic Ken. I'm so glad I've stumbled upon your blog.
I have a bit of Arduino hardware and I'm looking at moving the remote control of my Panasonic AC from a USB IR blaster on my PC to an Arduino set up so it can work autonomously.
I imagine once I get the components I'll be referring to your blog quite a bit.
Cheers.
Hi Ken,
I note the Panasonic protocol that Wolfgang added a while ago.
Is there any step by step instructions around on how to include that in the library, my programming experience is very limited?
I'm trying to use this for a Panasonic Air Conditioner Unit.
Thanks,
Ben
Great job!!!
I am thinking of possibly using IR as a "general proximity" sensor to detect when I am close to and pointed at least roughly toward the source of the IR signal. So what I was thinking was that on a fairly frequent interval I would send the shortest set of codes that seems reasonably valid as an identifier of my beacon. Any suggestions as to what code to send? It would be better to occasionally mistake something as a beacon symbol than to spend too much time checking. Checking needs to be really quick.
Hi Ken - this question was brought up earlier, but I never saw a response. I'm wondering why you didn't choose to use an Interrupt-On-Change to detect the initial IR transmission? For devices that need to do other stuff, and may not be receiving IR all the time, a 50us timer constantly ticking over uses more processor time than would really seem necessary.
I am thinking of trying to rewrite this to use Interrupt-On-Change, but if you know something I don't about why it won't work, it would save me time to tell me in advance!
Either way - thanks for the great work.
Luke
Ok, I'm back. Actually switching to interrupt-on-change turned out easier than I thought. The drawback is that the receive pin can only be modified by changing the library itself, not through the sketch. In any case that's how I wrote it, though I suppose some fancy code could make it user-friendly to modify it within the sketch.
I sent you an email with a modified version if you are interested.
Luke
I've been banging my head against the wall for over an hour. I am having a hard time sending IR codes. I used your IRrecvDemo example to get a NEC IR code in Hex (FF8877). I converted that into decimal (16746615). I then wrote a quick sketch, I looked in your IRsendDemo.
irsend.sendNEC(16746615, 12);
What am I missing? Thanks in advance.
Never mind I got it to work. Though I wasn't able to get my IR LED to work with a resistor. Any ideas why?
Would you be kind enough to help me out? :)
I'm really trying to get the RAW codes to work as my remote isn't supported. It's using 52 bit codes. You "replay" example works perfectly but I would like to store the codes inside the program (hardcoded) so they can be sent by serial command. Any tutorial or guide on how to get the "Raw dump" into a nice little sendRaw command? ... I can see your code is putting (-) before each other code, why is that?
I am trying to control my Arduino PWM duty cycle at pin 3 via IR remote control. Duty cycle adjustment works fine with the push buttons. Once I add the "irrecv.enableIRIn(); // Start the receiver" I do not have an output pulse because I think both PWM and IR decoding uses the same Timer.
Can anyone help me fix my problem so I can control the duty cycle via infrared?
My code is:
#include //Infrared Receiver library
int RECV_PIN = 11; //setting the receiver input pin to be pin 11
IRrecv irrecv(RECV_PIN);
decode_results results;
const int buttonPin2 = 2;
const int buttonPin7 = 7;
int buttonState2 = 0;
int buttonState7 = 0;
double counter=1;
void setup()
{
TCCR2A = 0x23;
TCCR2B = 0x0C; // select timer2 clock as 16 MHz I/O clock / 64 = 250 kHz
OCR2A = 62; // 250k/62 => produces a 4kHz PWM
pinMode(3, OUTPUT); // enable the PWM output (a PWM signal on digital pin 3)
OCR2B = counter; // set the PWM to 1.6% duty cycle
// initialize the pushbutton pin as an input:
pinMode(buttonPin2, INPUT);
pinMode(buttonPin7, INPUT);
Serial.begin(9600);
irrecv.enableIRIn(); // Start the receiver
}
void loop()
{
// read the state of the pushbutton value:
buttonState2 = digitalRead(buttonPin2);
buttonState7 = digitalRead(buttonPin7);
if (irrecv.decode(&results)) {
Serial.println(results.value, HEX);
irrecv.resume(); // Receive the next value
}
delay(10);
if ((buttonState2 == HIGH) || (results.value==16754775)) {
counter=counter+1;
OCR2B = counter; // set the PWM to new duty cycle
Serial.println(counter);
delay(100);
}
if ((buttonState7 == HIGH) || (results.value==16769055)) {
counter=counter-1;
OCR2B = counter; // set the PWM to new duty cycle
Serial.println(counter);
delay(100);
}
}
This library is fantastic! A quick note about the added Panasonic protocol: you have to increase the size of RAWBUF in IRremote.h to something that will hold the 48-byte (plus lead-in and lead-out) length of the Panasonic (v1) messages. After a few hours of pulling my hair out, I set mine to 104 and it decoded like a champ. Lastly, in case anyone's having issues, the JP1 definitions for the Panasonic timings are as follows:
#define PANASONIC_BIT_MARK 432
#define PANASONIC_HDR_MARK PANASONIC_BIT_MARK*8
#define PANASONIC_HDR_SPACE PANASONIC_BIT_MARK*4
#define PANASONIC_ONE_SPACE PANASONIC_BIT_MARK*3
#define PANASONIC_ZERO_SPACE PANASONIC_BIT_MARK*1
#define PANASONIC_FTR_MARK PANASONIC_BIT_MARK*1
#define PANASONIC_FTR_SPACE PANASONIC_BIT_MARK*173
Can you tell me how to add Wolfgangs panasonic protocol into your code. I have strugled with it for a while now, but can't get it working.
Hi, Ken, thanks for the awesome library. I've managed to get the Arduino Uno to send control codes to my Panasonic camcorder with one odd exception. The power code only seems to turn the camera off. The same code from the original remote turns it on and off. The only thing I can figure at this point is that there's something peculiar about the header or the power level of the LED that's causing this. Anyone out there have any ideas?
@Anonymous: Are you getting an error message?
@naimis: That's odd; the Panasonic protocol is fairly simple as far as IR protocols go. It sounds like the Arduino may not be receiving it correctly. Are you using the Panasonic protocol or a raw stream?
@Scott: The library's raw record-and-playback never worked for this device. Presumably the timings were not precise enough. For sending and receiving codes, I first used modifications to the code that I had done myself, then I took the code changes posted earlier in the comments section and modified those to match the remote's timing. The results were the same in both cases - all known codes worked, but powering on did not; only off. The codes were obtained from a user-generated LIRC configuration file, but ultimately confirmed with IRRemote using both the changes I made and the ones previously posted in the comments section.
@naimis: Do you have an IR receiver connected to the Arduino? If so, when you run the IRrecvDump sketch and press the power button on the original remote, do you get the same codes as are listed in the LIRC file?
@Scott:
I found out that Wolfgang added the "old" panasonic protocol, so that's why it didn't work.
Thanks for your concern anyway :D
@Scott: yes, with the library code I had written and with the (slightly modified) posted panasonic code both, the code for the power button is exactly the same as what was posted in the LIRC configuration I had downloaded. That was actually one of the first things I looked at.
@Lauszus: I assume you require the newer Panasonic protocol (Panasonic2) which uses a 64-bit code. All the timings are identical, but there's an extra 8 bits between the subdevice and function codes. Additionally, the checksum calculation includes those bits as well. It shouldn't be difficult to modify Wolfgang's code to support Panasonic2.
@Lauszus: Heh, by 64-bit code I mean 56-bit code, as 48+8=56. =)
(weird, my previous comment apparently didn't take, so here it is again)
@Scott: yes, with the library code I had written and with the (slightly modified) posted panasonic code both, the code for the power button is exactly the same as what was posted in the LIRC configuration I had downloaded. That was actually one of the first things I looked at.
@naimis: Odd indeed. Any chance you could post the codes you're using?
Ken,
I am using this code to toggle some L.E.D's through switch statements. I am having trouble keeping an L.E.D high so long as a button is pressed. Right now the L.E.D flashes on/off at the rate at which it receives and decodes the signal. I need it to stay high so long as the button is held down and held low if the button is not pressed.
Thank you in advance for your help.
I have a SANYO air conditioner remote which is sending out loooong stream of bits that i cant capture.
according to google searches SANYO uses the NEC protocol but it does not get recognised by irRecvDump.
irRecvDump says there were 76 time events which made me suspect the RAWBUF was full, so i set RAWBUF to 255 and it still was full. setting RAWBUF to a value over 255 crashes the atmega168 hence my dilema.
anybody come across such a problem or have any ideas as to what to do?
any help MUCH appreciated.. its been driving me nuts for about a week now.. longing for the sweet sound of the air conditioner to switch on :(
Just a follow up from my previous post. I ended up using the arduino software from
http://www.ladyada.net/learn/sensors/ir.html
with a slight modification to the array size (changed it from 100 to 150) it did the trick. the Sanyo remote was sending 272 bit long pulses! not including any repeats or repeat codes as far as i can see. Still dont know what protocol that is but doesnt really matter at this point, as I can successfully record and play it back using the same code from ladyada.
@Scott these are the definitions I put into IRremoteInt.h:
#define PANASONIC_HDR_MARK 3502
#define PANASONIC_HDR_SPACE 1750
#define PANASONIC_BIT_MARK 450
#define PANASONIC_ONE_SPACE 1244
#define PANASONIC_ZERO_SPACE 450
... and this is the lirc file I used as a reference:
begin remote
name N2QAEC000024
bits 24
flags SPACE_ENC
eps 30
aeps 100
header 3468 1731
one 446 1269
zero 446 424
ptrail 447
pre_data_bits 24
pre_data 0x40040E
gap 74451
toggle_bit_mask 0x0
begin codes
capture_still 0x14667C
T/+ 0x14465C
W/- 0x14C6DC
start/stop 0x143329
power 0x143C26
ext_display 0x14EAF0
date/time 0x14E6FC
search_back 0x14405A
play 0x14504A
search_forw 0x14C0DA
still_adv_back 0x14E0FA
pause 0x14607A
still_adv_forw 0x14F0EA
skip_back 0x149288
stop 0x14001A
skip_forw 0x145248
delete 0x140E14
menu 0x146A70
up 0x940B91
left 0x94CB51
right 0x944BD1
down 0x948B11
ok 0x141A00
end codes
end remote
@naimis: Interesting. The timing definitions according to the LIRC file are as follows:
#define PANASONIC_HDR_MARK 3468
#define PANASONIC_HDR_SPACE 1731
#define PANASONIC_BIT_MARK 446
#define PANASONIC_ONE_SPACE 1269
#define PANASONIC_ZERO_SPACE 424
The only odd thing I see with the LIRC codes is that all the checksums (which is the last byte in each code) are backwards, i.e. they're in most-significant bit first order instead of least-significant bit first order. However, you mentioned that all codes work except for one, which is even more bizarre. I suppose it wouldn't hurt to try reversing the bits of the last byte in the code you're sending and see if it makes a difference.
Hey guys, I've been playing around with this for days now trying to get it to work.
I'm basically trying to make two arduino boards communicate over IR and create an IR handshake.
So:
1. Arduino A sends.
2. Ardunio B receives, then replies.
3. Ardunio A receives.
The challenge i'm having is when I start the "irrecv.enableIRIn();" in setup and then I try:
irsend.sendSony(code, 12);
It's basically sending rubbish over the LED - except if I remove "irrecv.enableIRIn();" then it works perfectly.
What i'm basically looking for - is there a way to completely remove the affect of "irrecv.enableIRIn();" such as a "irrecv.disableIRIn();" so I can switch it off and get back to sending mode.
I have tried "irsend.enableIROut(38);" but it doesn't do anything to solve the issue.
Thanks in advance to anyone who can help!
Hi Ken,
This is such a great post and I would be so happy if I was able to make to work properly:) I'm a big newbie in electronics but I absolutely love doing it. I'm working on a video project where an Sony DVD has to respond to the commands of an IR LED. I used your library examples to take the remote protocol and then to send it to the DVD, but it wont respond. Here is what I got as codes:
Play: 4CB92
Stop:1CB92, etc. And I'm adding a 0x in front in the code, then I've tried everything from 12 to 40 bites, I've sent it 2, 3 and for times. Most of the time the LED wont illuminate, knowing that it functions normally otherwise. I've read all your posts and those of others, but my stuff is stuck and I'm desperate. Would you have any helpful advices for me? May be my code format is wrong? Im on Arduino 0022.
Thank you in advance.
Nataliya
I'm having an interesting thing happen when I run this code on and Arduino Mini Pro 3.3V 8MHz. When I send an IR signal the pulses are all too short by about a factor of two. as measured on a scope). If I run the same code on a "standard" Arduino board it works correctly.
Great library! Thanks a lot:o)
Hi,
To simulate the Canon command, to take pictures, I use the EOS_trigger() function, and a IR LED in IROUT_pin pin.
If I comment the irrecv.enableIRIn();it works great, but with this line it doesn't work.
#include
int RECV_PIN = 11;
int IROUT_pin = 13; // select the pin for the IR LED
IRrecv irrecv(RECV_PIN);
decode_results results;
void setup()
{
//set analog pin 5 and 4 to GND and Vss
DDRC |= _BV(5) | _BV(4);
PORTC &=~ _BV(4);
PORTC |= _BV(5);
Serial.begin(9600);
irrecv.enableIRIn(); // Start the receiver
delay(100);
}
void loop() {
EOS_trigger();
delay(2000);
}
void EOS_trigger() {
for(int i=0; i<16; i++) {
digitalWrite(IROUT_pin, HIGH);
delayMicroseconds(11);
digitalWrite(IROUT_pin, LOW);
delayMicroseconds(11);
}
delayMicroseconds(7330);
for(int i=0; i<16; i++) {
digitalWrite(IROUT_pin, HIGH);
delayMicroseconds(11);
digitalWrite(IROUT_pin, LOW);
delayMicroseconds(11);
}
}
What I'm doing wrong? It seems a delayMicroseconds problem. I tried in others pins and happens the same.
How can I use my EOS_Trigger function with IRremote?
Thanks in advance,
Ribeiro Santos
I am making a universal remote for three protocols..and i wanted to store values of received bytes in eeprom so that even after power goes off i can use it later..i m facing problem that how to store 20 bit data in 8 bit or how to store values in eeprom permanantely..can u help me tht??
Hi,
I've gotten as far as getting codes out of various remotes. My question is how you go about converting the hex to a usable code? For example my Sansui tv/dvd combo power button sends "Decoded NEC: 8E7152AD (32 bits)". Also if/when I have a working, transmittable code, can I simply plug into you send demo (or a slightly modified version) and voila? I'm a novice coder/hacker/artist hoping to use ir to control an artwork. Thanks for any assistance.
Many thanks for this really impressive work.
I was reading all the post and there is 2 points i'm still stacked :
1. I need to read 2 receivers and to be able to distinguish from which one the signal is received.
as this is mentioned that the last code is able ti handle multiple receivers :
A. Is there a place in the to define 2 inputs pins
B. Or do the receivers are all connected to same pins and in this case how to distinguish them ?
2. I'm not able to figure how if the following IR signal is readable. I wonder if the coding is changing at each signal??
A74EF548
Unknown encoding: A74EF548 (32 bits)
Raw (28): 13384 1500 -100 750 -250 50 -500 50 -2200 100 -1000 550 -300 50 -1000 100 -1300 50 -800 100 -1350 450 -3450 100 -1400 150 -500 100
F01AA6C0
Unknown encoding: F01AA6C0 (32 bits)
Raw (48): 9706 1500 -100 750 -250 150 -350 100 -1150 50 -2050 50 -50 400 -400 50 -650 50 -300 100 -1000 50 -250 50 -800 50 -1150 50 -350 100 -100 50 -250 150 -2050 50 -1000 100 -950 100 -400 100 -500 100 -450 100 -300 100
314BA628
Unknown encoding: 314BA628 (32 bits)
Raw (10): 26958 1400 -250 700 -200 50 -3650 700 -400 50
8DB0788F
Unknown encoding: 8DB0788F (32 bits)
Raw (24): 26428 1500 -100 750 -300 50 -400 100 -1150 50 -950 450 -150 150 -200 50 -400 250 -350 100 -550 200 -250 50
9D2A9963
Unknown encoding: 9D2A9963 (32 bits)
Raw (36): 1120 600 -150 700 -150 750 -300 50 -400 100 -1150 50 -1300 100 -200 1100 -250 300 -150 350 -1350 100 -200 50 -850 50 -1700 100 -250 50 -2100 100 -1000 50 -2100 50
11548B62
Unknown encoding: 11548B62 (32 bits)
Raw (34): 25798 550 -150 650 -250 700 -350 50 -350 100 -1100 150 -1000 100 -850 50 -300 200 -400 100 -550 50 -400 50 -1000 100 -2900 50 -2400 100 -2050 100 -350 150
385F1D9
Unknown encoding: 385F1D9 (32 bits)
Raw (28): 26376 1450 -150 800 -200 150 -350 100 -1150 50 -1000 200 -850 550 -350 50 -600 150 -300 50 -4800 200 -500 150 -450 50 -2450 50
Thanks for your help
Seb
Great tutorials Ken. Many thanks. I hope they live forever.
Todd, thanks for your DISH contribution. I've been using it to change channels for maybe a year now. Here is the code I am using:
//IRremote.h
#define DISH 5
void sendDISH(unsigned long data);
//IRremoteInt.h
#define DISH_HDR_MARK 400
#define DISH_HDR_SPACE 6100
#define DISH_BIT_MARK 400
#define DISH_ONE_SPACE 1700
#define DISH_ZERO_SPACE 2800
#define DISH_RPT_SPACE 6200
#define DISH_TOP_BIT 0x8000
#define DISH_BITS 16
//IRremote.cpp
void IRsend::sendDISH(unsigned long data)
{
enableIROut(56);
mark(DISH_HDR_MARK);
space(DISH_HDR_SPACE);
for (int i = 0; i < DISH_BITS; i++) {
if (data & DISH_TOP_BIT) {
mark(DISH_BIT_MARK);
space(DISH_ONE_SPACE);
}
else {
mark(DISH_BIT_MARK);
space(DISH_ZERO_SPACE);
}
data <<= 1;
}
}
//DishIrTransmit.pde
void send4(long code) {
int unit = 0x240; //remote has 'unit code' 10
code <<= 10;
long data = code | unit;
for (int i = 0; i < 4; i++) {
irsend.sendDISH(data);
}
}
//Lirc codes for Dish Network from http://lirc.sourceforge.net/remotes/dishnet/Dish_Network
//power_on 1
//up 26
//select 16
//0 17
//1 4
//2 5
//3 6
//4 8
//5 9
//6 10
//7 12
//8 13
//9 14
i cannot get this to compile in arduino 0022. i've unzipped it into the arduino-0022/libraries folder, but get these errors when i try to compile or upload onto uno..
IRrelay.cpp:9:22: error: IRremote.h: No such file or directory
IRrelay:7: error: variable or field 'dump' declared void
IRrelay:7: error: 'decode_results' was not declared in this scope
IRrelay:7: error: 'results' was not declared in this scope
IRrelay:13: error: 'IRrecv' does not name a type
IRrelay:14: error: 'decode_results' does not name a type
IRrelay:21: error: variable or field 'dump' declared void
IRrelay:21: error: 'decode_results' was not declared in this scope
IRrelay:21: error: 'results' was not declared in this scope
I found that if i copy the IRremote.ccp, IRremoteInt.c and IRremote.c into the ...arduino\arduino-0022\arduino-0022\hardware\arduino\cores\arduino it will compile. thought id share if anyone else had a problem.
Hi Ken!
Thanks for your library - i made what i wanted to have in less than 2 days.
Basically i wrote simple command parser for commands coming from serial port. Everything works fine until i enable mode for detecting IR from my IR sensor. Detection works, but when i try to send further commands after detection - nothing goes out. So i see that i parse commands properly, but calling .sendXXX for any protocol fails (or, to be exact, IR LED doesn't send anything). I can exit this mode and start to send after power cycle (reconnect USB). I hope you can see what i am doing wrong after setting (ProtoCode = READIR), decoding some IR commands, and setting (ProtoCode = e.g. NEC).
#include
int RECV_PIN = 11;
IRrecv irrecv(RECV_PIN);
IRsend irsend;
decode_results results;
String RcvdCmd;
int Repetitions;
int ProtoCode;
unsigned long CodeParam1, CodeParam2;
char RcvdByte;
int RcvPart;
#define READIR 100
...
void ResetRcv() {
RcvdCmd = "";
RcvPart = ONPROTO;
}
void InterpretCmd() {
switch (ProtoCode) {
case NEC: {
irsend.sendNECRepeat(CodeParam1, CodeParam2, Repetitions);
break;
}
case PANASONIC: {
for (int i = 0; i <= Repetitions; i++) {
irsend.sendPanasonic(CodeParam1, CodeParam2);
}
break;
}
case READIR: {
irrecv.enableIRIn(); // Start the receiver
Serial.println('EnableIRIn');
break;
}
}
ResetRcv();
}
// Stores the code for later playback
// Most of this code is just logging
void storeCode(decode_results *results) {
//almost unchanged code from Examples/IRRecord.pde
...
}
void setup()
{
Serial.begin(57600);
}
void loop() {
if (Serial.available() > 0) {
RcvdByte = Serial.read();
// parsing of commands coming from serial port
...
}
else {
// skip not allowed symbol and start parsing from beginning
ResetRcv();
}
}
else if (ProtoCode == READIR) {
Serial.println('irrecv.decode');
if (irrecv.decode(&results)) {
storeCode(&results);
irrecv.resume(); // resume receiver
Serial.println('irrecv.resume');
}
}
}
Hi,
First GREAT post, I'm new to all of this, and your post was clear and I got my arduino and my IR receiver to work with the remote (supplied as a kit) in no time.
But I got an interesting thing happening, I'm sure its a simple thing and just being new I don't get it.
I attached a LCD screen to the arguing and wanted to control the backlight with ANALOGERITE, after failing for many times I decided to go back to basics (the best way to debug).
So I took only the declaration of things and set up the example FADE with a led.
And then I found out that once I run this:
irrecv.enableIRIn();
The led only get "switched on" at the far end of the scale (ie analog write of 255).
I can Guess it has to do with the PWM, but not sure how that can be.
I have the IR receiver connected on d4 of the Adriano and the fading led on d3.
if you have any suggestion how to get this to work it will be great :)
Thanks again
Tal.
Never mind, I found the problem. Turned out that the buffers I had in memory were filling up the ATmega328's ram! As soon as I changed the type for the raw array I was sending to const unsigned int[], the problem went away.
A cautionary tale for others who are using sendRaw.
However, I did discover a bug. In IRRemoteint.h, line 160, the define for TIMER_DISABLE_INTR should have an = instead of the dash. As it is, it doesn't do anything.
Here is a workaround to send() using any I/O pin and without using hardware PWM :)
http://sui77.wordpress.com/2011/05/27/use-any-arduino-pin-for-transmission-with-the-irremote-libary-by-soft-pwm/
PS: Great libary, thx a lot!
Great library! I used it on my Arduino Smarthome -project. Also wrote some tutorials: http://arduinostuff.blogspot.com/
want to know how to clean the raw data for sending? check my blog!
Thanks for cool project...
I have one question about IR library,,why this library can't upload sketch IR example with board arduino NG or older w/atmega8??
when I upload sketch IR example with board atmega328 its no problem...
Can someone teach me the Ir protocol's and how they work.
and how make Hitachi TV turn off with my Arduino,
thank
Sam
Thanks for a excellent library. I made a remote controlled robot using your library. Check it out: http://youtu.be/w5ztJEvImb8 :)
- Lauszus
I built a TV remote using this library. Works great! Take a look...
http://arduinostuff.jimdo.com/home/remote/
Just wanted to say thanks for the excellent library. I managed to port the NEC send functionality to an ATtiny13 (after much reference to the data sheet). The messages are being received perfectly by an Arduino UNO.
This is great library :)
I have problem with Silva Schneider sm350 DVD micro line system. I don't have remote and can't find codes for remote.
If anyone has similar remote control to send me codes I would be very happy.
Hi together,
i am working on a project where I use an arduino with ethernet shield to replace my IR remotes with an iPad app.
My AV-Receiver from Yamaha is working fine as it is using NEC codes. But I am stuck on my cable receiver remote.
Power on off is somehow working but not really reliable and I am not able to make others work.
Wirh IRRecvDump sample I get output like this:
Raw (36): -30706 550 -150 300 -150 300 -500 300 -300 300 -450 300 -300 300 -650 300 -150 300 -150 300 -150 250 -500 300 -300 300 -500 300 -150 300 -150 250 -650 300 -650 300
Raw (36): 1038 600 -100 300 -150 300 -450 300 -300 300 -500 300 -300 300 -650 300 -150 300 -150 250 -200 250 -500 300 -350 250 -500 250 -200 250 -200 250 -700 250 -650 300
Raw (36): -17006 600 -100 300 -150 300 -450 300 -350 250 -500 300 -300 300 -650 300 -150 250 -200 250 -200 250 -500 250 -350 300 -500 250 -200 250 -200 250 -650 300 -650 250
Raw (36): -25314 550 -150 250 -200 250 -550 250 -300 300 -500 250 -400 250 -650 250 -200 250 -200 250 -200 250 -500 250 -400 250 -500 250 -200 250 -200 250 -700 250 -650 250
Raw (36): -8440 550 -200 250 -150 300 -500 300 -300 300 -500 250 -350 250 -700 250 -200 250 -150 300 -150 300 -500 250 -350 250 -500 300 -150 300 -150 300 -650 250 -700 250
Then I try to send with this code:
unsigned int info[35] = {500, 200, 253, 197, 244, 533, 245, 364, 247, 523, 248, 358, 252, 694, 242, 200, 247, 198, 244, 300, 247, 525, 248, 355, 253, 533, 238, 205, 241, 197, 248, 686, 256, 683, 256};
irsend.sendRaw(info, 35, 36);
Any ideo how I can get this to work? Any help greatly appreciated.
Regards Matoz
Hey, Ken.
I successfully used your library to jigger up a little 328-based board that sets R, G, and B values on a strip of impossibly bright LED's from Sparkfun, and it works great. I've moved into a small apartment, though, and now I'd like to be able to duplicate the effects of an IR-remote repeater: A little IR receiver (with vcc, out, and gnd) sits atop the media center, with all the (my wife says "ugly," I think they're kinda cool) components hidden behind a nice wood sliding panel. I'd like to beam arbitrary remote codes from arbitrary remotes at the receiver sitting atop the center, and have it repeat the codes to a few IR LED's dangling inside, also behind the wooden slidey thing. So far, I only got the codes to repeat to one device (a VIZIO blu-ray player). The comcast box and the Panasonic TV are immune to the charms of IRrecord.pde. Any suggestions of where to turn? My code doesn't care what the codes are, it just wants to repeat them to a place that can't see them. Should I just go with a photodiode, and have the IR LED repeat what the photodiode is sensing? Any help would be appreciated.
Oops. Sorry about posting that twice.
Dear Ken - Thank you very much for this wonderful library.
For anyone having troubles with sending raw codes - sometimes the code is too long for the buffer. Change the RAWBUF 76 to anything longer e.g. 100. It worked for me and a samsung hd recorder. Also try to repeat the code 2 or 3 times.
"you can't just use a photodiode or phototransistor."
Not totally Right, I've just decoded a NEC controler using a bpw77na ir photodiode, BC548 transistor and a TTL hex inverter 7404.
It manages to decode the keys, but it's a matter of trying and good luck, out of 50 attemps, just 2 of them get a code, so it's trial and error.
Just wanted to tell anyone like me who aren't able to get some nice IR photodetectors that there is a work around.
Best Regards
Freddy
I was testing to see what libs work with the attiny45_85 core for Arduino (hlt.media.mit.edu/wiki/pmwiki.php?n=Main.ArduinoATtiny4585).
Attiny45/85 has 6 I/O pins from which 2 are PWM (http://circuits.datasheetdir.com/18/ATTINY13-pinout.jpg). Do you think there is any way to make this lib work with the 8 pin ATtiny?
If I try to compile the IRrecvDemo I get the following errors:
C:\arduino-0022\libraries\IRremote\IRremote.cpp: In member function 'void IRsend::mark(int)':
C:\arduino-0022\libraries\IRremote\IRremote.cpp:172: error: 'TCCR2A' was not declared in this scope
C:\arduino-0022\libraries\IRremote\IRremote.cpp:172: error: 'COM2B1' was not declared in this scope
C:\arduino-0022\libraries\IRremote\IRremote.cpp: In member function 'void IRsend::space(int)':
C:\arduino-0022\libraries\IRremote\IRremote.cpp:180: error: 'TCCR2A' was not declared in this scope
C:\arduino-0022\libraries\IRremote\IRremote.cpp:180: error: 'COM2B1' was not declared in this scope
C:\arduino-0022\libraries\IRremote\IRremote.cpp: In member function 'void IRsend::enableIROut(int)':
C:\arduino-0022\libraries\IRremote\IRremote.cpp:198: error: 'TIMSK2' was not declared in this scope
C:\arduino-0022\libraries\IRremote\IRremote.cpp:198: error: 'TOIE2' was not declared in this scope
C:\arduino-0022\libraries\IRremote\IRremote.cpp:207: error: 'TCCR2A' was not declared in this scope
C:\arduino-0022\libraries\IRremote\IRremote.cpp:207: error: 'WGM20' was not declared in this scope
C:\arduino-0022\libraries\IRremote\IRremote.cpp:208: error: 'TCCR2B' was not declared in this scope
C:\arduino-0022\libraries\IRremote\IRremote.cpp:208: error: 'WGM22' was not declared in this scope
C:\arduino-0022\libraries\IRremote\IRremote.cpp:208: error: 'CS20' was not declared in this scope
C:\arduino-0022\libraries\IRremote\IRremote.cpp:211: error: 'OCR2A' was not declared in this scope
C:\arduino-0022\libraries\IRremote\IRremote.cpp:212: error: 'OCR2B' was not declared in this scope
C:\arduino-0022\libraries\IRremote\IRremote.cpp: In member function 'void IRrecv::enableIRIn()':
C:\arduino-0022\libraries\IRremote\IRremote.cpp:224: error: 'TCCR2A' was not declared in this scope
C:\arduino-0022\libraries\IRremote\IRremote.cpp:229: error: 'TCCR2B' was not declared in this scope
C:\arduino-0022\libraries\IRremote\IRremote.cpp:229: error: 'CS22' was not declared in this scope
C:\arduino-0022\libraries\IRremote\IRremote.cpp:230: error: 'CS21' was not declared in this scope
C:\arduino-0022\libraries\IRremote\IRremote.cpp:231: error: 'CS20' was not declared in this scope
C:\arduino-0022\libraries\IRremote\IRremote.cpp:234: error: 'TIMSK2' was not declared in this scope
C:\arduino-0022\libraries\IRremote\IRremote.cpp:234: error: 'TOIE2' was not declared in this scope
C:\arduino-0022\libraries\IRremote\IRremote.cpp:236: error: 'TCNT2' was not declared in this scope
C:\arduino-0022\libraries\IRremote\IRremote.cpp: In function 'void TIMER2_OVF_vect()':
C:\arduino-0022\libraries\IRremote\IRremote.cpp:266: error: 'TCNT2' was not declared in this scope
Great information and code - thanks :) Simon
Hi,
Is it possible to make this library work with 2 seperate IR receivers?
I have a robot that needs to have IR communications with its docking station, but the robot needs to receive info in 360 degrees, the most 36kHz/38kHz/40kHz IR receiver chips don't allow for that.
I'm totally frustrated. I cannot get the transmitted code to match the original. Even IRrecord detects the right code (0xa8b92) but they transmits something different. I confirmed this with Winlirc's tools. Can anyone help? I'm using an UNO with a Sony DVD power code. Agian, receiving is rock solid but sending does not match. Thanks.
--Chris
Chris I am having the same problem someone please help. I can decode ir signal. But I can not get the tv to turn on with the code I get back.
Wire54321, I checked my IR sending codes with WinLIRC's IRGraph.exe. They now match. I misunderstood the bit setting in the irsend.sendSony command. I still cannot get the DVD player to recognize the IRcode but WinLIRC does. So I must be very close. I tried xoscope but have now lost my IR detector. If I can figure out how to use it correctly, it should help a lot.
--Chris
I'm happy to say that I got this working. It was in fact the delay(100) statement as someone above suggested in a previous posting. Set as delay(50) works for me. I really thought I had tried that but probably before I had other setting corrected.
I've got really good distance and it works very consistently. Btw, Soundcard Scope work best for me out of all the open source oscilloscope I found.
http://www.zeitnitz.de/Christian/scope_en
Thanks Ken and everyone who has posted info.
--Chris
Great lib.
but i have a problem when i try to send signals, it works once and cut off the communication over serial and ir.
#include
IRsend irsend;
int RECV_PIN = 11;
IRrecv irrecv(RECV_PIN);
decode_results results;
void setup()
{
Serial.begin(9600);
pinMode(7,OUTPUT);
pinMode(8,OUTPUT);
irrecv.enableIRIn(); // Start the receiver
}
int ona = 0;
int onb = 0;
void loop() {
if (irrecv.decode(&results)) {
Serial.println(results.value);
if(results.value == 434436){
for (int i = 0; i < 3; i++) {
irsend.sendNEC(0x10EFC03F, 32);
delay(100);
}
}
// relay 1
if (results.value == 2689){
ona = !ona;
digitalWrite(7,ona ? HIGH : LOW);
}
// relay 2
if (results.value == 19209){
onb = !onb;
digitalWrite(8,onb ? HIGH : LOW);
}
delay(200);
irrecv.resume(); // Receive the next value
}
}
nevermind, i know how,just dont put resume() and restart the reciv.
#include
IRsend irsend;
int RECV_PIN = 11;
IRrecv irrecv(RECV_PIN);
decode_results results;
void setup()
{
Serial.begin(9600);
pinMode(7,OUTPUT);
pinMode(8,OUTPUT);
irrecv.enableIRIn();
}
int ona = 0;
int onb = 0;
void loop() {
if (irrecv.decode(&results)) {
Serial.println(results.value);
if(results.value == 803007){
for (int i = 0; i < 3; i++) {
irsend.sendSony(0xA81, 12);
delay(100);
}
}
if(results.value == 835902){
for (int i = 0; i < 3; i++) {
irsend.sendSony(0xC81, 12);
delay(100);
}
}
// relay 1
if (results.value == 835902){
ona = !ona;
digitalWrite(7,ona ? HIGH : LOW);
}
// relay 2
if (results.value == 19209){
onb = !onb;
digitalWrite(8,onb ? HIGH : LOW);
}
delay(200);
//irrecv.resume(); // Receive the next value
irrecv.enableIRIn(); //// <<<<<------- works for mee.
}
}
WOW.
This is what can be called an efficient post !
No documentation about the second hand robophilo i bought last week...
I used your library and could easily define it what SONY protocol and had the IR codes.
I could not send them back with success and then just made a loop with IR send demo script augmenting the delay between the codes until the robot moved :-D With the right delay i can now control the robot with and arduino and sensors.
Thank you, from France !
@hugobiwan
Has anyone had problems controlling LCD projectors? I have Ken's library working for Sony's, Motorola DVRs, Samsung TVs, etc, etc but I cannot get any of my conference room projects to respond to IR codes. I have tried it with Epson, Mitsubishi, and Eiki's so far. Thanks!
--Chris
I'm using sendRaw more and more. I like it. I reminds me of sending SNMP OIDs numerically instead of hassling with MIB file definitions. :)
For those who are interested in sending code to Samsung TV (and maybe other Samsung device) here is the code I've made quickly :
void IRsend::sendSamsung(unsigned long data, int nbits)
{
enableIROut(36);
data = data << (32 - nbits);
mark(4500);
space(4500);
for (int i = 0; i < nbits; i++) {
if (data & TOPBIT) {
mark(500);
space(1500);
} else {
mark(500);
space(500);
}
data <<= 1;
}
mark(500);
space(0); // Turn off at end
}
Really similar to RC5...
To send the power code, just write :
irsend.sendSamsung(0xE0E040BF , 32);
If you want to integrate it into the lib, feel free :)
Hi,
I'm using your receive code with a Hauppauge remote control and although it works I'm getting 2 different codes when I press any particular button. They don't alternate as such, just seems random which code I'll get.
No problem though, I just have my Arduino code check both.
Green button on remote gives me:
7B8 or FB8
Ian.
Hi there, and thank you so much for this great work!!
I have got my stuff working with a Arduino Mega 256.
Normal codes get recognized and I can send them. (Eg. TV, stereo etc)
BUT.. The thing I started out to do was to control my two heatpumps (Yes it is cold in Norway) ;-)
Here comes my issue. Not really able to get this to work? The signals is way longer than normal signals. Any tips?
hey
So i loaded up all the code and i set it up correctly however whenever i try to press a button on the remote the only number that comes up is 0
hi a big thx. and i have a question this library can work with firmata protocol ..
or in any other way. i want to read ir code from firmata in simple pc software..
and my whole project live on firmata .
thx again...
Hi together,
First of all, thanks for the library. I'm using it to control a NEC beamer with an arduino duemilanove 328. I'm able to decode the signal from the remote control and also to send it. The beamer recognizes the signal to switch it on (if the beamer is turned on), but it doesn't turn it on when the beamer is off.
The remote control only switches it on if you keep pressing the on-button. Then I get first the signal (0x189710EF) and then only 0xFFFFFFFF (0 Bit) from the decoder. Has anybody an idea how to implement this on the arduino?
thanks in advice
Here's the command from the decoder:
Decoded NEC: 189710EF (32 bits)
Raw (76): 22118 9000 -4450 600 -500 600 -550 550 -550 600 -1600 600 -1650 600 -550 550 -550 600 -500 600 -1650 600 -550 550 -550 550 -1650 600 -550 600 -1600 600 -1650 600 -1650 600 -500 650 -500 600 -500 600 -1650 600 -500 600 -500 600 -550 600 -500 600 -1650 550 -1700 600 -1600 600 -550 600 -1600 600 -1650 600 -1650 600 -1600 650 -500 600 -500 650 -450 600 -550 600
FFFFFFFF
Decoded NEC: FFFFFFFF (0 bits)
Raw (4): -31014 9000 -2200 600
FFFFFFFF
Decoded NEC: FFFFFFFF (0 bits)
Raw (4): -31014 9000 -2150 650
FFFFFFFF
Decoded NEC: FFFFFFFF (0 bits)
Raw (4): -30964 9000 -2200 600
thanks
Awesome job. I easily used the library to remote control a fan.
As for the emitter, I used a Radio Shack 276-143. I found that the 100ohm resister resulted in a very weak signal. However, this link
http://led.linear1.org/1led.wiz
allows you to calculate the perfect resistance based on the LED's specific requirements. I changed the resister to 38ohm and performance was greatly improved.
I am a very experienced software engineer but a complete hack when it comes to electronics, so if anyone can verify that my logic is on target I would appreciate it.
Also, Ken, if we want to switch the output to timer 1, where can I find the different values as compared to timer 2?
Thanks
Thanks for writing this great library. I was wondering if you've had any problems using it and the Timer1 library together in the same sketch? For example, if I define a Timer1 callback with:
Timer1.attachInterrupt(callback, 5000);
defined as:
void callback() {
delayMicroseconds(500);
}
all I get is 0 from irrecv.decode.
Can this code work on an ATmega8 at 8Mhz? Thanks
I just did a small sendNEC call that works with the ATmega8.
http://arduino.cc/forum/index.php/topic,76962.msg583124.html#msg583124
Hello,
I am trying to use a library that conflicts with yours. This it the error msg:
IRremote/IRremote.cpp.o: In function `__vector_9':
/Applications/Arduino.app/Contents/Resources/Java/libraries/IRremote/IRremote.cpp:264: multiple definition of `__vector_9'
LoLShield/Charliplexing.cpp.o:/Applications/Arduino.app/Contents/Resources/Java/libraries/LoLShield/Charliplexing.cpp:254: first defined here
The interrupt code in both libraries is using TIMER2:
ISR(TIMER2_OVF_vect){
Some forum suggests to make one of the ISR code into a function that is then called from the other ISR, but for this I need to combine both libraries.
I have also tried using TIMER1, and the code compiles, but when I upload it to the Arduino board it doesn't run correctly. TIMER0 doesn't work because it conflicts with the Arduino lib itself.
Here are the links to both libraries:
LOLshield
http://code.google.com/p/lolshield/downloads/detail?name=LoLShield%20V0.2.beta.zip&can=2&q=
IRremote
http://www.arcfn.com/2009/08/multi-protocol-infrared-remote-library.html
Find:
IRremote.zip
Thanks,
Aisen
New experiment always innovate new things that out come results may be positive or may be negative but you learn something new as in the same in this video great work is done by the Ken shirriff's.
Hello Ken, I'm trying to use your lib in my Arduino UNO to control my air conditioner, I'm also using Carrier lib that uses your lib. The Carrier lib is here: http://arduino.fisch.lu/index.php?menu=36&page=&portal=9
The problem is that when I send the codes the air conditioner doesn't receives the command. I use my cellphone to see if there is IR light going out the IR LED. The light goes out but the air conditioner doesn't receive. Do you know whats is happening?
Hi, thank you for the library,
I would ask you if it is fully working on Arduino 2009 with ATMEGA 328P because I can receive but not send Sony IR. It's 3 days i'm trying every thing but none is working.
Thank you very much.
Thanks so much for the library! I just used it for my first arduino project. I took my first step into electronics and read the signals from my remote control. :)
Hi Ken,
Thanks for your great library.
It needs on line to be changed when used with the new Arduino-1.0 stuff:
IRremoteInt.h:
< #include
> #include
Cheers, Hans.
PS: not tested on hardware yet
I'm making a wireless (i.e. over wifi network) remote with a wireless shield and was a bit overwhelmed. This page and your other tutorial really made the difference. I needed to make adjust Sony code to reflect the Time Warner Cable Synergy V protocol and LIRC info. To my amazement, the "guide" came up on my cable box first attempt! Now, not only do I know all about IR protocols, but I'll be able to change channels with the cabinet shut vice getting up every five minutes to remove and reinstall the child guards. Thanks for sharing this!
hanselpedia is correct. Change the "#include WProgram.h" in IRremoteInt.h to this:
#if defined(ARDUINO) && ARDUINO >= 100
#include "Arduino.h"
#else
#include "WProgram.h"
#endif
I there anyway to use this lib with an arduino clone using mega168 and an 8Mhz crystal ?
Hi, fist off, thanks for a fantastic library!
I was wondering if your library supported sending OBC codes at all?
Thanks
Jason
> Hi, fist off, thanks for a fantastic library!
> I was wondering if your library supported sending OBC codes at all?
I posted a comment on this page in June that includes a macro that builds a RC5 extended command and takes an OBC as one of the arguments.
I have found this issue using your library, before enabling RX it sends SONY IR code in a correct way, after enabling the receiving object it doesn't shoot a correct IR.
I'm using two Arduino 2009 with ATMEGA 328, one shooting, one receiving.
This is the result of the irparams.rawbuf:
Before enabling receiving:
8153
50
11
13
12
25
11
13
12
13
11
13
12
12
11
25
11
25
11
13
11
13
11
13
11
13
11
25
11
24
12
13
10
13
11
25
SONY
1000011000011001
After enabling receiving:
59425
93
22
23
22
45
21
23
22
23
21
23
22
22
22
45
21
45
21
23
22
23
22
23
21
23
21
45
21
46
21
23
22
22
22
45
HASH
11001011110000100011110100111110
Maybe there is some issue on timers? I'll post it also on the comments in the article.
Thank you very much
Marco
Ken, words are not enough..awesome job. The library looks very professional. I used it yesterday to turn on my Yamaha RX-v450. :-)
@Craig - thanks for taking the time to reply! I'm afraid your code goes right over my head.
First of all, how do I find out my device ID?
Second - the #define RC5XCODE - is this where you convert the OBC code (ie 190) into something that can be sent? I cannot for the life of me figue out what is going on here!
I'm using a Samsung TV, and until I found out about OBC codes, I was recording the button presses and outputting the results as a raw array of ticks and spaces.
I'm using the link below as a base, but I'd really like to intergrate this into the library as it would mean a major rewrite of my project to use another library...
[url]http://blog.lucaseckels.com/2009/08/23/arduino-ir-transmitter/[/url]
Many thanks again, for your patience!
Had a few problems with getting this library to work on an 8MHz arduino but in the end fixed this by changing the line
#define SYSCLOCK 16000000 // main Arduino clock
in IRremoteint.h
to
#define SYSCLOCK F_CPU // Get Arduino clock speed from makefile
Not tested on the complete range of arduinos but I think will make this libary more portable.
Jason:
> First of all, how do I find out my device ID?
One way would be to capture a IR command and then disassemble the bits. The best reference for the Philips RC5 protocol I know of is this page:
http://www.sbprojects.com/knowledge/ir/rc5.php
I would also look at JP1 remote webpages such as:
http://www.hifi-remote.com/forums/dload.php?action=category&cat_id=40
for IR codes, tools, etc.
> Second - the #define RC5XCODE - is this where you convert the
> OBC code (ie 190) into something that can be sent? I cannot
> for the life of me figue out what is going on here!
It's a macro that takes the device and obc codes (and the toggle bit) and moves the bits around so they're in the correct format for transmission. Maybe once you understand the format of the IR protocol, the macro will make sense.
One advantage of a using a macro is that if you're using static arguments, all the math happens at compile time.
> I'm using a Samsung TV, and until I found out about OBC codes,
> I was recording the button presses and outputting the results
> as a raw array of ticks and spaces.
It's a lot easier to make changes if you're using OBC or EFC codes.
Does anyone know why this library doesn't seem to work with the tone() function? Using this IR library with any audio functionality seems impossible. Grr.
Has anyone tried to use this library with LabVIEW?
I am in the process.
It worked perfect. Thank you very much.
http://youtu.be/B0nukBguMHU
Hey,
nice library you wrote!
But a problem occured to me using your library (for receiving IR) and SparkFun's 20x4 Serial enabled LCD (via SoftwareSerial).
When I write somthing on the LCD _before_ i initialise the IR-Library, everything is fine.
But if i'm trying to write something to it _afer_ initilising your library, the serial display only shows strange characters.
Maybe it's a problem about the interrupt?
Any advice here?
I posted my code here:
http://arduino.cc/forum/index.php/topic,86193.0.html (2nd and 3rd Post)
Thanks.
(btw: my name's also Ken ;)
I happened to try SoftwareSerial for the first time today and for whatever reason, some high bits are set. Try this:
#include
SoftwareSerial Serial1(2, 3);
Serial1.begin(115200);
cc = Serial1.available();
if (cc > 0) {
ch = Serial1.read();
ch &= 0x7f;
}
Hi Craig.
Is that an answer to my question?
If so, I don't understand what you mean..
Can you give me a further explanation?
Sorry thats my anonymous post.
Try masking away the high bits of the byte you get from read() (ch &= 0x7F).
If that isn't enough for you to make it work, try posting a question in the Arduino forum.
To enable both send and receive at the same time or in the same sketch, the timer needs to be enabled and disabled depends on send/receive.
The existing code what Ken has in the original post, will become like this. sorry for poor formatting. you check this line..
"irrecv.enableIRIn(); // This is mandatory to re-enable the timer2. "
void loop() {
if (Serial.read() != -1) {
for (int i = 0; i < 3; i++) {
irsend.sendSony(0xa90, 12); // Sony TV power code
delay(100);
}
irrecv.enableIRIn(); // This is mandatory to re-enable the timer2.
}
if (irrecv.decode(&results)) {
Serial.println(results.value, HEX);
irrecv.resume(); // Receive the next value
}
}
Hey,
sorry but i dont get it.
Why are you all talking about Serial.READ?
I'm WRITING somesthing to the LCD Display..
???
Sorry, I should have read your post more carefully.
My suggestion to move your question to a real forum is still a good one.
Hi !
Many thanks for this very useful work !!!
Hello together,
I'm testing your sample to communicate between two arduino boards. One board sends data and the other receive it. I'm use your sample code and connect the two boards with a transistor driven by the sender with a resistor on collector to 5V to invert the signal.
The boards communicate but there are many data misrecognized. here a sample:
Could not decode message
Raw (14): 30922 2450 -600 1200 -600 600 -600 1200 -650 600 -600 950 -5050 50
A90
Decoded SONY: A90 (12 bits)
Raw (26): 9108 2450 -600 1200 -600 600 -600 1250 -600 600 -600 1200 -600 600 -600 650 -600 1200 -600 600 -600 600 -600 600 -600 600
0
Could not decode message
Raw (8): -9650 600 -600 600 -600 600 -600 600
0
Could not decode message
Raw (12): 30072 1400 -650 1150 -650 600 -600 1150 -600 650 -600 1200
A90
Decoded SONY: A90 (12 bits)
Raw (26): 20172 2400 -600 1200 -600 600 -650 1200 -600 600 -600 1200 -600 600 -650 550 -650 1200 -600 600 -600 600 -600 600 -600 600
0
Could not decode message
Raw (26): 24030 2400 -600 1200 -650 600 -600 1200 -600 600 -600 1200 -600 600 -600 650 -600 1200 -600 600 -600 600 -650 550 -650 200
0
Could not decode message
Raw (8): 21622 1200 -600 600 -600 600 -600 1200
where could be the problem?
thanks
such a great post. this helped me get a poor-man's home automation system up and running, talking to a frigidaire air conditioner over ir.
had to convert from an lirc file, but your background information made it really easy.
(need XMP protocol?)
Ken, your library is GREAT, thanks for sharing it!
I'm trying to make a tv/cable remote for my almost blind mother, and your library made it simple for my Uno to turn the tv on/off.
Unfortunately,I'm having trouble with the Comcast Motorola DCH70 cable box, in that using the raw codes, I can get it to turn on, but only BRIEFLY, it turns itself off about 2-3 seconds after I turn it on.
I think the fundamental problem is that the DCH70 uses, I think, an XMP protocol, so I'm wondering if you (or anyone else here) might work up an add-in to your library for the XMP protocol?
I want to thank Ken for his wonderful library. After having read all comments I was able to tweak the library adding panasonic support and control my home's stereo system.
I suggest to anyone attempting to cope with panasonic's remote to apply suggestions found on this post's comments, expecially widening buffer to 104 and change timings in .h file.
Thank you all!
Very interesting stuff. I used the simplest of commands (channel up) in this small program:
#include
IRsend irsend;
void setup()
{
Serial.begin(9600);
}
void loop() {
for (int i = 0; i < 3; i++) {
irsend.sendRC5(0x20, 12); // 20 is the channel up code
delay(50);
}
}
and I was already ready to give up as it did not work on my Philips matchline TV, but then I decided to try another (very old) small Philips TV. worked like a charm.
That is odd, as the Universal remote I have works on both TV's
Maybe it has a bit to do with tolerances, who knows, but if someone has a suggestion, I'd be pleased to hear it :-)
Additionally, two newly bought IR LED's did not work at all on any TV, but when I plugged in one half of a 30 year old reflection detector (the IR LED half of a sharp 2SO1) it worked on my old one as described above
I want to use your Library with the new Arduino IDE Version.
But there are some Errors during compiling of the RecieveDemo .
In file included from /Applications/Arduino.app/Contents/Resources/Java/libraries/IRremote/IRremote.cpp:13:
/Applications/Arduino.app/Contents/Resources/Java/libraries/IRremote/IRremoteInt.h:15:22: error: WProgram.h: No such file or directory
In file included from /Applications/Arduino.app/Contents/Resources/Java/libraries/IRremote/IRremote.cpp:13:
/Applications/Arduino.app/Contents/Resources/Java/libraries/IRremote/IRremoteInt.h:87: error: 'uint8_t' does not name a type
/Applications/Arduino.app/Contents/Resources/Java/libraries/IRremote/IRremoteInt.h:88: error: 'uint8_t' does not name a type
/Applications/Arduino.app/Contents/Resources/Java/libraries/IRremote/IRremoteInt.h:89: error: 'uint8_t' does not name a type
/Applications/Arduino.app/Contents/Resources/Java/libraries/IRremote/IRremoteInt.h:92: error: 'uint8_t' does not name a type
/Applications/Arduino.app/Contents/Resources/Java/libraries/IRremote/IRremote.cpp: In member function 'void IRsend::mark(int)':
/Applications/Arduino.app/Contents/Resources/Java/libraries/IRremote/IRremote.cpp:173: error: 'delayMicroseconds' was not declared in this scope
/Applications/Arduino.app/Contents/Resources/Java/libraries/IRremote/IRremote.cpp: In member function 'void IRsend::space(int)':
/Applications/Arduino.app/Contents/Resources/Java/libraries/IRremote/IRremote.cpp:181: error: 'delayMicroseconds' was not declared in this scope
/Applications/Arduino.app/Contents/Resources/Java/libraries/IRremote/IRremote.cpp: In member function 'void IRsend::enableIROut(int)':
/Applications/Arduino.app/Contents/Resources/Java/libraries/IRremote/IRremote.cpp:200: error: 'OUTPUT' was not declared in this scope
/Applications/Arduino.app/Contents/Resources/Java/libraries/IRremote/IRremote.cpp:200: error: 'p
Sorry for the last Post. I Have not seen your Note to V1.0 now it works
Hey, did anyone got it working with an Attiny 45 or 85?
test.cpp.o
In file included from IRtest.cpp:13:
C:\Program Files\arduino-1.0\libraries\IRremote/IRremoteInt.h:17:22: error: WProgram.h: No such file or directory
In file included from IRtest.cpp:13:
C:\Program Files\arduino-1.0\libraries\IRremote/IRremoteInt.h:128: error: 'uint8_t' does not name a type
C:\Program Files\arduino-1.0\libraries\IRremote/IRremoteInt.h:129: error: 'uint8_t' does not name a type
C:\Program Files\arduino-1.0\libraries\IRremote/IRremoteInt.h:130: error: 'uint8_t' does not name a type
C:\Program Files\arduino-1.0\libraries\IRremote/IRremoteInt.h:133: error: 'uint8_t' does not name a type
IRtest.cpp: In member function 'void IRsendDummy::useDummyBuf()':
IRtest.pde:-1: error: 'volatile struct irparams_t' has no member named 'rcvstate'
IRtest.pde:-1: error: 'volatile struct irparams_t' has no member named 'rawlen'
IRtest.pde:-1: error: 'volatile struct irparams_t' has no member named 'rawlen'
IRtest.pde:-1: error: 'volatile struct irparams_t' has no member named 'rawlen'
IRtest.pde:-1: error: 'volatile struct irparams_t' has no member named 'rawlen'
IRtest.pde:-1: error: 'volatile struct irparams_t' has no member named 'rawlen'
IRtest.pde:-1: error: 'volatile struct irparams_t' has no member named 'rawlen'
IRtest.pde:-1: error: 'volatile struct irparams_t' has no member named 'rawlen'
This is very nice, thanks a lot!
1 question tho have you got any idea how i could send out an array in max/msp ?
Hi Ken,
Thanks for the great library! I've been trying to implement the Panasonic code supplied by Wolfgang and modifications by others. Everything seems to work, with the exception of sending to my Pani TV. For example, using my original Pani remote as well as the the other learning remotes I have programed for use with the TV, they all give me the same results with the IRrecvDump file for the power function. They all produce the hex BCBD 48 bits, which is also what is listed in the LIRC files.
I've tested the output with a camera and I see the IR led flashing. I've even gone so far as setting up a second Duemilanove to read the the send results from the first, which also yields a BCBD 48 bits. I've tested the IRsendDemo on my Sony (sendSony) and my Onkyo (sendNEC) equipment, which works just fine.
I am stumped. Any thoughts?
Thanks in advance for your help.
Loris.
Hi,
sorry for my bad english.
I want create a bluetooth remote infrared with Arduino and Android.
I find a java parser for lirc conf file and I want test it.
It is possible create a most generic send function on arduino for codes parsed by Android?
I have all info and data (header, zero and one code, etc) from lirc file and i think it is possible compute a raw send data with Android and send it to arduino via bluetooth. The arduino decode it to IR Led.
Thanks for the library. At first it appeared to be working for sending RC5 (and extended RC5) codes. Then I measured the actual modulation frequency and discovered it was 1/2 the expected rate. I guess the receiver was picking up the 1/2 rate in spite of itself. So I made the following change in IRremote.h :
// #define SYSCLOCK 16000000 // main Arduino clock
#define SYSCLOCK F_CPU // main Arduino clock
..since I'm running a low-voltage ATMega at 8MHz for a hand-held battery powered design.
Thanks.
Not sure if there is still much activity on this post, but I have a question:
With the irsend.sendRC5 command it is easy to send commands. e.g.
"irsend.sendRC5(0x20, 12);" will move the channel up on a TV. But what if I dont want to use RC5 on a TV but on say a Philips CD player 0x20 is the code for "next track" but how do i tell the code that I want it to be for a CD player and not for a TV?
In the RC5protocol this is done by 5 address bits and 6 command bits, but how do i set that in the code presented here?
Hello,
I want to receive IR-Codes with your library and show text depending on that codes on a LCD using SoftwareSerial.
It seems your Library uses Timer2 for it's interrupt. This is probably the same timer SoftwareSerial uses, because the Display only shows strange characters ...
Here's the code which enables the interrupt, but i don't know how to change it, so it uses Timer 1 instead.
void IRrecv::enableIRIn() {
// setup pulse clock timer interrupt
TCCR2A = 0; // normal mode
//Prescale /8 (16M/8 = 0.5 microseconds per tick)
// Therefore, the timer interval can range from 0.5 to 128 microseconds
// depending on the reset value (255 to 0)
cbi(TCCR2B,CS22);
sbi(TCCR2B,CS21);
cbi(TCCR2B,CS20);
//Timer2 Overflow Interrupt Enable
sbi(TIMSK2,TOIE2);
RESET_TIMER2;
sei(); // enable interrupts
// initialize state machine variables
irparams.rcvstate = STATE_IDLE;
irparams.rawlen = 0;
// set pin modes
pinMode(irparams.recvpin, INPUT);
}
Anyone a clue on that?
(Changing the "2" to "1" won't work because the one is using 16bit and the other 8bit)
Great library, I have used it for a very short time and after a shaky start I currently have my arduino turning on and off my Sony surround sound system and Wharfedale TV at the same time whenever I reset the arduino.
My next task is to make it web accessible with all my remotes.
I have the IR codes, just a matter of writing the web page and then driving the arduino.
Has anyone done something similar? I am curious as to whether the ethernet shield will interfere with the IR code. Only one way to find out - time to pull all the wires out of my arduino and give it a go!
I will document my schematics and results on my blog http://labby.co.uk
Best regards
Greg
First of all thankyou Ken for this great info.
I had a huge problem with split air conditioners. They simply never worked. It has been a few weeks but a finally got it.
If any of you want to control midea, fujitsu or electrolux AC here's the tip:
1 - The buffer is to shor for this codes, change it to 200 in the very end of the IRRemote.h
2 - This remotes uses 1.25uS tick so you have to change USECPERTICK to 10 in this same file.
Works great now.
Ken: thanks for the great library! I am using it for the Popular Science Build Your First Robot project. For some reason I can't get it to recognize my universal remote. I have tried numerous codes from various vendors. I am currently running the dump program and it always come back with "could not decode message" Following is a typical response: Raw (26): -7080 2350 -700 550 -650 500 -700 550 -700 450 -750 500 -700 500 -700 550 -700 1100 -700 450 -750 500 -700 500 -700 500. I would appreaciate any suggestion that you can make.
Hi,
I added the Panasonic and JVC protocol and updated the library to work with Arduino IDE 1.0.
I made a pull request at github.
Best Regards
Kristian Lauszus
@Lauszus:
Thanks for that!
I'm already using your code with my JVC remote.
Hi, thanks for that great Library.
I experienced that very long delay times don't work when using sendraw.
I replaced the delaymicroseconds in mark and space with:
if (time<10000){
delayMicroseconds(time);
} else {
delay(time/1000);
delayMicroseconds(time%1000);
}
and it works great.
It's a very good proyect, my congratulations Ken. My teacher and I want to make this proyect to control my class' projector, but when we are decoding the codes with IRrecvDump and press more than one time the same botton, Arduino send differents codes for the same botton, and we don't know if it can be caused for we are using a 35 Khz receiver or the program can't decode our remote control. Please we need help. Thanks, I hope your answerd.
I use a Arduino Mega 2560 Rev3,
The receiving part works great.
but I can't send the code.
I think the problem is in the IRremote.CPP with the pin 3 part.
Is this true are, is the problem probably something else ?
Thanks for the Code !!!
It's a great library.
But maybe you have some experience in build a software that maps the codes from one remote to codes of another.
The Idea is that i use a Remote of my choice to control several devices.
When i use it only with receive and than a switch case then mostly the codes will miss…
Any Idea?
#Phil
You might find my "ATtinyRemote" project interesting. It "translates" commands from my panasonic remote, so I can control my JVC stereo without needing to use the second remote.
Anyway here is a link to my github:
https://github.com/TKJElectronics/ATtinyRemote
Regards
Lauszus
#Lauszus
Thanks, you do exactly what i did… you read your Type and Map it on the other.
I receive NEC Commands and send NEC Commands, so i use the internal functions for that…
But it dosn't work really…
#Phil
Do the sending function work normally. If it does, then try to add in a delay or point the remote you are using away from the IR LED, as you can disturbed the signal with your remote.
Hi guys,
I do not understand how to read the value of the sagem protocol : http://lirc.sourceforge.net/remotes/sagem/CABLE_DECODER
Could someone help me
thanks from France ;-)
Hi,
Does anyone have code for getting two transmitters and receivers to work side by side off the one Arduino? I'm trying to use the beam break code with two beams rather than one.
Hey i'm Mahesh
Thanks for the library.Will this work if i use Atmega8 or lower . It worked well for 328.
errors popped when i compiled the same code for Atmega8
Hi at all and compliments for this library :)
Huston, we've a problem :D
I'm trying to integrate PANASONIC routine of Wolfgang (http://www.arcfn.com/2009/08/multi-protocol-infrared-remote-library.html?showComment=1253216531228#c4344993120598576281) in IRRemote, but I've a problems.
When I try to compile a sketch, the compiler return this error: /IRremote/IRremote.cpp:169: error: no ‘void IRsend::sendPanasonic(long unsigned int, long unsigned int)’ member function declared in class ‘IRsend’ and, (I don't know C++) but I've seen that in other function (sendSony, sendRC6 etc.) the arguments passed are "unsigned long data, int nbits" but in sendPanasonic are "unsigned long address, unsigned long data" and I think that the problem is there.
Can you help me?
Or for semplicity :) Is possible to download IRRemote with Panasonic already included?
I've remote control Panasonic N2QAEC000024.
Thanks for all.
Bye.
Hi,
You should have a look at my forked version of the library: https://github.com/TKJElectronics/Arduino-IRremote
It supports the Panasonic protocol as well.
Regards
Lauszus
@lauszus
Yes, after writing my comment, I've found your library, but, during the test of IRRecord with your library, I receive always:
Received unknown code, saving as raw
m3500 s1700 m400 s450 m400 s1300 m400 s500 m400 s450 m400 s450 m450 s450 m450 s400 m450 s450 m400 s450 m400 s450 m450 s450 m450 s400 m450 s450 m400 s1300 m400 s450 m450 s450 m400 s450 m450 s450 m400 s450 m400 s450 m450 s1300 m400 s1300 m400 s1300 m400 s500 m400 s450 m400 s450 m450 s450 m400 s1300 m400 s500 m400 s1300 m400 s450 m450 s450 m400 s450 m400 s450 m450 s1300 m400 s1300 m400
I've tried to change:
#define PANASONIC_HDR_MARK 3502
#define PANASONIC_HDR_SPACE 1750
#define PANASONIC_BIT_MARK 450
#define PANASONIC_ONE_SPACE 1244
#define PANASONIC_ZERO_SPACE 450
in:
#define PANASONIC_HDR_MARK 3468
#define PANASONIC_HDR_SPACE 1731
#define PANASONIC_BIT_MARK 446
#define PANASONIC_ONE_SPACE 1269
#define PANASONIC_ZERO_SPACE 424
but I've same results.
I wanted try to send command (I need to send command T / W / STARTSTOP / SNAP), but I don't understand the structure of codes to send :(
I've found this infos:
name N2QAEC000024
bits 24
flags SPACE_ENC
eps 30
aeps 100
header 3468 1731
one 446 1269
zero 446 424
ptrail 447
pre_data_bits 24
pre_data 0x40040E
gap 74451
toggle_bit_mask 0x0
begin codes
capture_still 0x14667C
T/+ 0x14465C
W/- 0x14C6DC
start/stop 0x143329
power 0x143C26
ext_display 0x14EAF0
date/time 0x14E6FC
search_back 0x14405A
play 0x14504A
search_forw 0x14C0DA
still_adv_back 0x14E0FA
pause 0x14607A
still_adv_forw 0x14F0EA
skip_back 0x149288
stop 0x14001A
skip_forw 0x145248
delete 0x140E14
menu 0x146A70
up 0x940B91
left 0x94CB51
right 0x944BD1
down 0x948B11
ok 0x141A00
end codes
but how can I use this codes through SendPanasonic?
I don't understand :(
Sorry.
Bye
--
Stefano
#stefanoxjx
It look like your remote only sends out 24 bits, try changing the following line to https://github.com/TKJElectronics/Arduino-IRremote/blob/master/IRremoteInt.h#L187 to 24 instead of 48. That will make decoding work.
To send a command is a bit more tricky. You have to change the sendPanasonic command it self. See this line of the code: https://github.com/TKJElectronics/Arduino-IRremote/blob/master/IRremote.cpp#L172
Now juts remove the first for loop and change 32 to 24 in the next for loop.
Now you can simply send a command like so:
irsend.sendPanasonic(0, 0x143C26)
This would send the power command.
Hope that works :)
I will update the library to support 24-bits as weel if it works.
Regards
Lauszus
@lauszus: I've tried it but don't work :(
Here you can download files modified by me: http://www.multiwii.it/Stefano/IRremote.zip
Can you verify if is all ok?
Thanks for your help.
Regards.
Stefano
Hi,
I forgot something.
You should add:
data = data << (32 - 24);
Just before the for loop.
Did decoding work properly?
Regards
Lauszus
I've added "data = data << (32 - 24);"
before the for loop, but don't work.
Regards
Stefano
What about decoding, does that work?
Regards
Lauszus
For testing decoding I've pressed more times the power button on remote control and these are the results:
40040E
40040E
40040E
40040E
40040E
40040E
40040E
40040E
40040E
40040E
40040E
40040E
40040E
40040E
40040E
40040E
40040E
40040E
40040E
40040E
40040E
40040E
40040E
40040E
40040E
40040E
40040E
40040E
820993DD
C71BB7D8
40040E
40040E
40040E
40040E
40040E
40040E
40040E
40040E
40040E
40040E
40040E
40040E
40040E
40040E
40040E
40040E
40040E
40040E
40040E
40040E
40040E
40040E
40040E
40040E
40040E
40040E
40040E
40040E
40040E
40040E
40040E
40040E
40040E
40040E
40040E
40040E
40040E
40040E
40040E
40040E
I'm confused :D
Thanks.
Regards.
Stefano
It looks like it's working.
0x40040E is your power command.
You could just make a switch case (http://arduino.cc/en/Reference/SwitchCase) as I did with my AttinyRemote: https://github.com/TKJElectronics/ATtinyRemote/blob/master/ATtinyRemote.ino to make it react to different buttons.
If you want to send it. Just send it like so:
irsend.sendPanasonic(0, 0x40040E);
Just remember do to modify the library as I wrote earlier.
Regards
Lauszus
Hi again,
I just read your prevoius post again. It look like your remote is 36bits long. Try to change PANASONIC_BITS to 36 and see if decoding works properly.
If that works, I'll guide you though the sending functionality as well.
Regards
Lauszus
I've tested with PANASONIC_BITS set to 36 and IRRecvDemo return always 40E143, but this code send via sendPanasonic don't work :(
Thanks again for your help :)
Hi,
You should try my version of the IRrecvDump.ino sketch: https://github.com/TKJElectronics/Arduino-IRremote/blob/master/examples/IRrecvDump/IRrecvDump.ino
It will print out all 36 received bits.
Regards
Lauszus
Finally something new :)
Your version of IRrecvDemo.ino, return this:
40E143
Decoded PANASONIC - Address: 4 Value: 40E143 (36 bits)
Raw (100): 20100 3600 -1550 550 -350 500 -1200 500 -350 500 -350 550 -300 500 -400 500 -350 500 -350 500 -350 550 -350 500 -350 500 -350 550 -300 500 -1200 550 -300 550 -350 500 -350 500 -350 550 -300 550 -350 500 -1200 500 -1200 500 -1150 550 -350 500 -350 550 -300 500 -350 550 -1150 550 -350 500 -1200 500 -350 500 -350 500 -350 550 -350 500 -1200 500 -1150 550 -1150 550 -1150 550 -350 500 -350 500 -350 500 -350 500 -1200 550 -350 500 -350 500 -1200 500 -1200 500 -350 550
40E143
Decoded PANASONIC - Address: 4 Value: 40E143 (36 bits)
Raw (100): -30434 3550 -1600 500 -400 500 -1200 500 -350 500 -350 500 -350 500 -400 500 -350 500 -350 500 -350 500 -350 550 -350 500 -350 500 -350 500 -1200 500 -350 550 -350 500 -350 550 -300 550 -300 550 -350 500 -1200 500 -1200 500 -1150 550 -350 500 -350 500 -350 500 -350 550 -1150 550 -350 500 -1200 500 -350 500 -350 500 -350 550 -350 500 -1200 500 -1150 550 -1150 550 -1150 550 -350 500 -350 500 -350 500 -350 500 -1200 500 -400 500 -350 500 -1200 500 -1200 500 -350 500
40E143
Decoded PANASONIC - Address: 4 Value: 40E143 (36 bits)
Raw (100): -10502 3550 -1600 500 -350 500 -1200 500 -350 500 -400 500 -350 500 -350 550 -300 550 -350 500 -350 500 -350 500 -350 550 -350 500 -350 500 -1200 500 -350 500 -350 500 -350 550 -350 500 -350 500 -350 500 -1200 500 -1200 500 -1200 500 -350 500 -400 500 -350 500 -350 500 -1200 500 -350 500 -1200 500 -350 550 -350 500 -350 500 -350 500 -1200 500 -1200 500 -1200 500 -1200 500 -350 500 -350 550 -350 500 -350 500 -1200 500 -350 500 -350 500 -1200 500 -1200 500 -350 550
40E143
Decoded PANASONIC - Address: 4 Value: 40E143 (36 bits)
Raw (100): -4496 3550 -1600 500 -350 550 -1150 500 -350 550 -350 500 -350 500 -350 500 -350 550 -350 500 -350 500 -350 500 -350 550 -350 500 -350 500 -1200 500 -350 500 -350 500 -400 500 -350 500 -350 500 -350 500 -1200 550 -1150 550 -1150 500 -350 500 -400 500 -350 500 -350 500 -1200 500 -350 500 -1200 500 -350 550 -350 500 -350 500 -350 500 -1200 500 -1200 500 -1200 500 -1200 500 -350 500 -350 550 -350 500 -350 500 -1200 550 -300 500 -350 550 -1150 500 -1200 500 -400 500
40E143
Decoded PANASONIC - Address: 4 Value: 40E143 (36 bits)
Raw (100): 29618 3550 -1600 500 -350 500 -1200 500 -350 500 -350 550 -350 500 -350 500 -350 500 -350 550 -350 500 -350 500 -350 500 -350 500 -400 500 -1200 500 -350 500 -350 500 -350 500 -400 500 -350 500 -350 550 -1150 500 -1200 500 -1200 500 -350 550 -300 500 -400 500 -350 500 -1200 500 -350 500 -1200 550 -300 500 -350 550 -350 500 -350 500 -1200 500 -1200 500 -1200 500 -1200 500 -350 500 -350 500 -350 550 -350 500 -1200 500 -350 500 -350 500 -1200 500 -1200 500 -350 500
These codes are generated from power button.
Regards.
Stefano
Does the value change when you press a different button? Just want to be sure, before we proceed :)
- Lauszus
These are codes with different key pressed:
POWER -> 40E143
Decoded PANASONIC - Address: 4 Value: 40E143 (36 bits)
Raw (100): -5590 3600 -1550 550 -350 500 -1200 500 -350 500 -350 500 -350 500 -400 500 -350 500 -350 500 -350 500 -400 500 -350 500 -350 500 -350 500 -1200 500 -350 550 -350 500 -350 500 -350 500 -350 550 -350 500 -1200 500 -1200 500 -1200 500 -350 500 -350 500 -350 500 -350 550 -1150 550 -350 500 -1200 500 -350 500 -350 500 -350 500 -400 500 -1200 500 -1150 550 -1150 550 -1150 500 -400 500 -350 500 -350 500 -350 500 -1200 500 -400 500 -350 500 -1200 500 -1200 500 -350 500
T -> 40E144
Decoded PANASONIC - Address: 4 Value: 40E144 (36 bits)
Raw (100): -2386 3550 -1600 500 -350 550 -1150 550 -300 500 -350 550 -350 500 -350 500 -350 550 -300 550 -350 500 -350 500 -350 500 -350 500 -400 500 -1150 550 -350 500 -350 500 -350 500 -350 550 -350 500 -350 500 -1200 500 -1200 500 -1200 500 -350 550 -300 500 -350 550 -350 500 -1200 500 -350 500 -1200 500 -350 500 -350 550 -350 500 -1200 500 -350 500 -350 500 -350 500 -1200 550 -1150 500 -350 550 -350 500 -1200 500 -350 500 -1200 500 -1200 500 -1200 500 -350 500 -350 500
W -> 40E14C
Decoded PANASONIC - Address: 4 Value: 40E14C (36 bits)
Raw (100): -17086 3550 -1600 500 -350 500 -1200 500 -350 550 -350 500 -350 500 -350 550 -300 550 -300 550 -350 500 -350 550 -300 550 -300 550 -350 500 -1200 500 -350 500 -350 500 -350 550 -350 500 -350 500 -350 500 -1200 500 -1200 500 -1200 500 -350 550 -300 550 -350 500 -350 550 -1150 500 -350 550 -1150 550 -300 500 -350 550 -1150 550 -1150 550 -350 500 -350 500 -350 500 -1200 500 -1200 500 -350 550 -1150 500 -1200 550 -300 550 -1150 550 -1150 500 -1200 550 -300 550 -350 500
PHOTO/SNAP -> 40E146
Decoded PANASONIC - Address: 4 Value: 40E146 (36 bits)
Raw (100): -8866 3600 -1550 550 -350 500 -1200 500 -350 500 -350 550 -300 550 -350 500 -350 500 -350 550 -300 550 -350 500 -350 500 -350 550 -300 550 -1150 500 -350 550 -350 500 -350 550 -300 550 -300 550 -350 500 -1200 500 -1200 500 -1200 500 -350 500 -350 550 -300 550 -300 550 -1150 550 -350 500 -1200 500 -350 500 -350 550 -300 550 -1150 550 -1150 500 -350 550 -350 500 -1200 500 -1200 500 -350 500 -350 500 -1200 550 -1150 500 -1200 500 -1200 500 -1200 500 -350 550 -300 500
PLAY -> 40E145
Decoded PANASONIC - Address: 4 Value: 40E145 (36 bits)
Raw (100): -18544 3550 -1600 500 -350 500 -1200 500 -350 500 -350 500 -350 550 -350 500 -350 550 -300 550 -300 550 -350 500 -350 550 -300 550 -300 550 -1150 550 -350 500 -350 500 -350 550 -300 500 -400 500 -350 500 -1200 500 -1200 500 -1200 500 -350 500 -350 550 -300 550 -350 500 -1200 500 -350 500 -1200 500 -350 500 -350 550 -300 550 -1150 550 -350 500 -1200 500 -350 500 -350 550 -300 500 -400 500 -350 500 -1200 500 -350 550 -300 500 -1200 500 -350 550 -1150 550 -350 500
START/STOP -> 40E143
Decoded PANASONIC - Address: 4 Value: 40E143 (36 bits)
Raw (100): 18166 3600 -1550 550 -350 500 -1200 500 -350 500 -350 550 -300 550 -350 500 -350 500 -350 500 -350 550 -350 500 -350 500 -350 550 -300 500 -1200 550 -300 550 -350 500 -350 550 -300 500 -350 550 -350 500 -1200 500 -1200 500 -1150 550 -350 500 -350 500 -350 500 -350 550 -1150 550 -350 500 -1200 500 -350 500 -350 550 -300 500 -400 500 -1150 550 -1150 550 -350 500 -350 550 -1150 500 -1200 500 -350 500 -350 550 -1150 550 -300 550 -1150 550 -350 500 -350 500 -1200 500
strangely, the code generated from key START/STOP is same code of POWER KEY :S
It looks like it's sending 48 bits anyway. Change PANASONIC_BITS back to 48 and see if it works.
Regards
Lauszus
Hi Kristian,
I've changed back PANASONIC_BITS to 48 and seem to work, the codes returned are equal to this list:
capture_still 0x14667C
T/+ 0x14465C
W/- 0x14C6DC
start/stop 0x143329
power 0x143C26
ext_display 0x14EAF0
date/time 0x14E6FC
search_back 0x14405A
play 0x14504A
search_forw 0x14C0DA
still_adv_back 0x14E0FA
pause 0x14607A
still_adv_forw 0x14F0EA
skip_back 0x149288
stop 0x14001A
skip_forw 0x145248
delete 0x140E14
menu 0x146A70
up 0x940B91
left 0x94CB51
right 0x944BD1
down 0x948B11
ok 0x141A00
but first of any code there is one "E".
For example. for power button the return code is E143C26, for T/+ button is E14465C etc.
We are getting closer to the goal :)
Regards.
Stefano
Hi,
Are you using the right sketch?
The predata or address should be 0x4004 and the data should be 0x0E......? (It wouldn't print the first 0).
It looks like you remote sends 24 bits predata and the 24 bits data (mine sends 16 bits predata and 32 bits data). But it should work just fine anyways.
Try using my version of IRrecvDemo.ino and all the 48 bits should be printed.
- Lauszus
I'm using your sketch (https://github.com/TKJElectronics/Arduino-IRremote/blob/master/examples/IRrecvDump/IRrecvDump.ino).
But what can I do with this codes?
Is possibile that your remote IR sends 16+32 bit and my 24+24?
Regards.
Stefano
Yes, that's in fact what it does. But it doesn't make any difference. Everything should work just find.
Just decode the data using the IRrecvDemo.ino sketch and then send them using my sketch- see https://github.com/TKJElectronics/Arduino-IRremote/blob/master/examples/JVCPanasonicSendDemo/JVCPanasonicSendDemo.ino
The reason why I decided to split up the data is because the Serial.print() command doesn't supports an unsigned long long data.
Regards
Lauszus
Is a nightmare, still does not work :(
I've modified your sketch so:
#include
#define PanasonicAddress 0x4004 // Panasonic address (Pre data)
#define PanasonicPower 0xE14667C // Panasonic Snap button
IRsend irsend;
void setup()
{
}
void loop() {
Serial.println("Snap");
irsend.sendPanasonic(PanasonicAddress,PanasonicPower);
delay(3000);
}
and not work, but I've thinked that IRremot.cpp was modified so:
void IRsend::sendPanasonic(unsigned int address, unsigned long data) {
enableIROut(38);
mark(PANASONIC_HDR_MARK);
space(PANASONIC_HDR_SPACE);
/*
for(int i=0;i<16;i++)
{
mark(PANASONIC_BIT_MARK);
if (address & 0x8000) {
space(PANASONIC_ONE_SPACE);
} else {
space(PANASONIC_ZERO_SPACE);
}
address <<= 1;
}
*/
data = data << (32 - 24);
for (int i=0; i < 24; i++) {
mark(PANASONIC_BIT_MARK);
if (data & TOPBIT) {
space(PANASONIC_ONE_SPACE);
} else {
space(PANASONIC_ZERO_SPACE);
}
data <<= 1;
}
mark(PANASONIC_BIT_MARK);
space(0);
}
then I tried to modify so:
void IRsend::sendPanasonic(unsigned int address, unsigned long data) {
enableIROut(38);
mark(PANASONIC_HDR_MARK);
space(PANASONIC_HDR_SPACE);
// Restored this for loop and change address from 8000 to 4004
for(int i=0;i<16;i++)
{
mark(PANASONIC_BIT_MARK);
if (address & 0x4004) {
space(PANASONIC_ONE_SPACE);
} else {
space(PANASONIC_ZERO_SPACE);
}
address <<= 1;
}
// data = data << (32 - 24); removed this line
// I've tested with "i <24" and "i < 32" but it don't work
for (int i=0; i < 24; i++) {
mark(PANASONIC_BIT_MARK);
if (data & TOPBIT) {
space(PANASONIC_ONE_SPACE);
} else {
space(PANASONIC_ZERO_SPACE);
}
data <<= 1;
}
mark(PANASONIC_BIT_MARK);
space(0);
}
I'm sure I do something wrong but what?
Thanks.
Regards.
Stefano
You shouldn't modify the sketch. Just download the library from github and only modify the example sketch. The reason why I wanted you to modify the library was because I only thought it was 24 bits (I read your first post too fast). You should not uncomment anything or change 0x8000 to 0x4004!
You should just be able to use the original library and only change the data being sent.
Regards
Lauszus
Hi Kristian, I've seen that I made a mistake because the value of 8000 is a "logic and" :(
I've re changed this value from 4004 to 8000 and now work fine :)
Very very very thanks for your help and patience :)
Regards.
Stefano
Hi,
Your welcome :)
Best Regards
Lauszus
Lauszus:
Thanks for your work on updating the library (and thanks to Ken for starting it in the first place).
I found that my Panasonic HDC-TM700 did not recognize the codes emitted by your patch. The solution was to change the carrier frequency to 35khz, i.e. in IRsend::sendPanasonic:
enableIROut(35);
I got the idea from this page describing the panasonic protocol:
http://perso.netplus.ch/FCorthay/IR/IR_Panasonic.html
You might consider adjusting your fork accordingly.
Cheers,
Jeremy
Hi,
Thank you for your feedback. I have updated the pull request: https://github.com/shirriff/Arduino-IRremote/pull/7/files#L0R173 :)
Regards
Lauszus
For anyone trying to get this to run on a Mega2560, you need to change a line in IRremoteInt.h. Change line #233 from this:
#elif defined(__AVR_ATmega1280__)
to this:
#elif defined(__AVR_ATmega1280__) || defined(__AVR_ATmega2560__)
Your IR LED output pin will be 9.
#Anonymous
Thank you. I will add it to my fork as well
- Lauszus
Thank you very much - this is maybe one of the best libraries in the ARDUINO - world.
But there is still one question: Is "RECV_PIN = 11" mandatory or can I use every pin for IR - rx?
Chicco Gold
#Chicco Gold
Yes you can use any pin you like, as the receiving routine is done by a timer overflow.
- Lauszus
Hi, I have a Mega 2560 R3 and can't get any of the sample programs to work. I am fairly new at programming so any help is appreciated.
I have a Mega 2560 R3 and can't get any of the sample programs to work, I know that both my receiver and remote work. Any help is greatly appreciated.
#leviticus
See my fork: https://github.com/TKJElectronics/Arduino-IRremote as it supports the ATmega2560 as well.
- Lauszus
Thanks for the great library, I have no problems when it comes to receiving codes. However I am unable to send codes successfully, there is no reaction from the device I'm trying to control, and for the moment I have no access to an oscilloscope. I was just wondering if you would be able to shed a little light on this issue. The code im using is:
irsend.sendSony(0xa90, 12);
delay(50);
irsend.sendSony(0xa90, 12);
delay(50);
irsend.sendSony(0xa90, 12);
Along side an OPTEK TECHNOLOGY - OP298B - IR EMITTER, TO-18, 890NM (http://ie.farnell.com/optek-technology/op298b/ir-emitter-to-18-890nm/dp/491305?Ntt=491-305)
Hey guys, this library seems really good. Unfortunately as the poster before me I also can't send any codes. The receiving seems to work OK but I suspected a strange behaviour: even when I use SONY TV-set controller I can't get the Arduino to properly decode it's signal. It can only detect the signal as RAW. In fact I did not find any remote in my house whose signal can be decoded which is strange.
I'm using an Arduino Pro Mini 3.3 V version running at 8 MHz and a TSOP34838 for IR receiving.
Hey guys!
I've managed to solve the previous problem by changing the SYSCLOCK parameter to 8000000 in the IRRemoteInt.h file to accomodate the Arduino Pro Mini's 8 MHz clock. After this the sending and receiving are working fine.
Thanks for the nice library Ken!
I have a question, i'm using PWM pins 6, 9, 10 to control three servos, and i'm using this IRremote library to control the movements of a robot with two wheels. but since this library uses timer2, pin 11 is unavailable. however, instead of following SHARP IR sensor INPUTS and my Apple Remote commands, the robot simply rotates to the right.. very weird glitch which i cannot find the source of. Is there any other own channels that are unavailable that i'm unaware of ??? any help would be greatly appreciated..
Hi
could you make it work on CHIPKIT UNO32?
Hi
I have attached a Beolink IR eye (455kHz carrier frequency)
The receiver is picking up a lot of noise when my room is dark and can be canceled by turning on the light.
Also the raw codes I receive with the IRrecvDump is pretty much the same for all the buttons on my remote (a Bang & Olufsen Beo4 remote).
This it what I get when I press the up/down button:
Raw (26): -13900 1650 -1450 1650 -4600 1600 -4600 1650 -4550 1650 -4600 1600 -4600 1600 -4600 1650 -4600 1600 -4600 1600 -4600 1600 -4650 1600 -4650 1600
And I receive the exact same code/pattern but with less/more codes. 22/24/26 raw codes...
Can anyone help my with this?
Thanks!
Ken, using your wonderful library, I've built a sort of IR extender to control my satellite receiver and my media player hidden into a closed piece of furniture.
Unfortunately I am not able to control my sky box, that I think uses the RC6-6-20 protocol (see here http://www.hifi-remote.com/wiki/index.php?title=RC6-6-20).
Do you think it is possible to add this protocol to the library? Do you know if anyone had success in controlling a sky box?
Thanks for your work
Michele
#Michele Michielin
Hi,
I think the best resource would be lirc.org - see the following page: http://lirc.sourceforge.net/remotes/sky/
Regards
Lauszus
@Lauszus
Thanks. I think the main issue for me is that I'm using a 38khz receiver while Sky remote works at 36khz.
The problem is that I think it's impossible to use at the same time on the same board two different receivers...
#Michele Michielin
It is differently possible. Just copy the routine and set it up to use timer1 for one of them and timer2 for the other one.
Just replace the defines with the code in "IRremoteInt.h" - timer1: https://github.com/TKJElectronics/Arduino-IRremote/blob/master/IRremoteInt.h#L236 and timer2: https://github.com/TKJElectronics/Arduino-IRremote/blob/master/IRremoteInt.h#L193
But I don't think it's an issue decoding an 36kHz signal with a 38kHz receiver. I have successfully decoded my Panasonic remote that's running 35kHz using a 38kHz receiver.
Regards
Lauszus
Doesn't work with Mega board.
hi Ken!
THNK YOU A LOT FOR THIS THING!!!
Now i have a qestion, or better a request: can you help me to rebuild the libary for ONLY recveing? i have already a system driven by an arduino nano and pin D3 is taken...so it doesn't work. and i have no clue to compile a h-file...
THANX
Greetings from Austria
Martin
#Anonymous
Just don't create the sending instance.
- Lauszus
This is a LOVELY piece of code - works a treat. I have one TRIVIAL comment... for lots of application, that little light that tells you your handset batteries aren't flat... D13 is not a good choice - because using this with any other hardware, say, Intranet, radio - the chances are they want to use Pin13.
I notice you've done direct port manipulation on the LED to get the speed up - was that necessary? As if not it'll make life a little easier to adjust the library to allow a custom port pin. just checking?
I could imagine adding an optional parameter...
IRrecv irrecv(RECV_PIN,A4);
Where A4 is the flashing led....
@Lauszus
Thanx for the fast answer!
Do you mean i should "erase" the class IRSend (did it with comment) like:
/*
* IRremote
* Version 0.1 July, 2009
* Copyright 2009 Ken Shirriff
* For details, see http://arcfn.com/2009/08/multi-protocol-infrared-remote-library.htm http://arcfn.com
*
* Interrupt code based on NECIRrcv by Joe Knapp
* http://www.arduino.cc/cgi-bin/yabb2/YaBB.pl?num=1210243556
* Also influenced by http://zovirl.com/2008/11/12/building-a-universal-remote-with-an-arduino/
*/
#ifndef IRremote_h;
#define IRremote_h;
// The following are compile-time library options.
// If you change them, recompile the library.
// If DEBUG is defined, a lot of debugging output will be printed during decoding.
// TEST must be defined for the IRtest unittests to work. It will make some
// methods virtual, which will be slightly slower, which is why it is optional.
// #define DEBUG
// #define TEST
// Results returned from the decoder
class decode_results {
public:
int decode_type; // NEC, SONY, RC5, UNKNOWN
unsigned long value; // Decoded value
int bits; // Number of bits in decoded value
volatile unsigned int *rawbuf; // Raw intervals in .5 us ticks
int rawlen; // Number of records in rawbuf.
};
// Values for decode_type
#define NEC 1
#define SONY 2
#define RC5 3
#define RC6 4
#define UNKNOWN -1
// Decoded value for NEC when a repeat code is received
#define REPEAT 0xffffffff
// main class for receiving IR
class IRrecv
{
public:
IRrecv(int recvpin);
void blink13(int blinkflag);
int decode(decode_results *results);
void enableIRIn();
void resume();
private:
// These are called by decode
int getRClevel(decode_results *results, int *offset, int *used, int t1);
long decodeNEC(decode_results *results);
long decodeSony(decode_results *results);
long decodeRC5(decode_results *results);
long decodeRC6(decode_results *results);
}
;
/*
// Only used for testing; can remove virtual for shorter code
#ifdef TEST
#define VIRTUAL virtual
#else
#define VIRTUAL
#endif
class IRsend
{
public:
IRsend() {}
void sendNEC(unsigned long data, int nbits);
void sendSony(unsigned long data, int nbits);
void sendRaw(unsigned int buf[], int len, int hz);
void sendRC5(unsigned long data, int nbits);
void sendRC6(unsigned long data, int nbits);
// private:
void enableIROut(int khz);
VIRTUAL void mark(int usec);
VIRTUAL void space(int usec);
}
;
*/
// Some useful constants
#define USECPERTICK 50 // microseconds per clock interrupt tick
#define RAWBUF 76 // Length of raw duration buffer
// Marks tend to be 100us too long, and spaces 100us too short
// when received due to sensor lag.
#define MARK_EXCESS 100
#endif
#Anonymous
It's more easy than that, just don't create the instance in your code like so:
https://github.com/TKJElectronics/Arduino-IRremote/blob/master/examples/IRsendDemo/IRsendDemo.ino#L11
Then you can always to use the pin for something else.
You can also just change the pin to 9 - just uncomment the following line: https://github.com/TKJElectronics/Arduino-IRremote/blob/master/IRremoteInt.h#L62
But yes, you could also delete the class, but it's not necessary.
- Lauszus
Post a Comment