Here is a simple sketch to do that. The IR LED is connected to pin 3 through a 100 ohm resistor, the detector is connected to pin 2, and a status LED is connected to pin 13 (if your Arduino board doesn't have it already.) To create the modulated output, simply call irsend.enableIROut(38); to set the PWM to 38kHz, and then irsend.mark(0) to send a mark (i.e. turn the output on). The loop simply reads the input from the detector, inverts it (since the detector is active-low), and writes it to the status LED.
#include <IRremote.h>

#define PIN_IR 3
#define PIN_DETECT 2
#define PIN_STATUS 13

IRsend irsend;
void setup()
{
  pinMode(PIN_DETECT, INPUT);
  pinMode(PIN_STATUS, OUTPUT);
  irsend.enableIROut(38);
  irsend.mark(0);
}

void loop() {
  digitalWrite(PIN_STATUS, !digitalRead(PIN_DETECT));
}
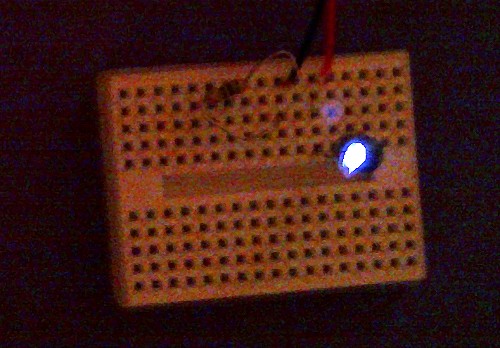
You should see the pin 13 LED light up when the IR receiver detects an infrared signal, and go dark when the receiver does not detect an infrared signal. The circuit is basically trivial, but there's a schematic at my original article if you need one. The following picture shows the detector setup. Note the illuminated status LED.

If the circuit doesn't work, first use a cell phone camera to verify that the infrared LED is lit. If the LED is not lit, try reversing it. Here's my cellphone's view of the illuminated LED:
Next, point a TV remote control at the detector and make sure the status LED flashes. If the status LED doesn't come on, make sure you wired the detector properly, and connected to input 2 of the Arduino. If the status LED won't turn off when you break the beam, you probably aren't blocking the IR signal well enough. The detector is very sensitive, and IR bounces off many things, so you may need to separate the LED and detector by several feet and make sure you're fully blocking the IR beam. Note that the library assumes you're using a ATmega168/328, so you're on your own if you have a different processor.
The tricky part of this is the optics - figuring out how to set up the LED and receiver so the beam gets interrupted when you want it to. Also, you'll probably want to modify the detection logic to do something more interesting than just set the status LED, but that's left as an exercise for the reader :-)
39 comments:
Thank you!
Best regards.
This technique can alsa be used for non-contact collision detection for robots. The Boe-Bot for example does just that, send out a 38kHz IR beam and check if it's reflected.
Yesterday I received the 38kHz IR detectors from Digi-Key and I was able to test the IR Library. Worked perfect from the first try. Thank you!
Is there any way to do this "PWM style" break beam with a simple IR detector (i.e. not one that automatically detects a 38kHz modulated IR signal, just a transistor)?
Hi, This is a great library and circuit. Thanks for sharing.
I'm having a problem with my detector, as I could figure out, I'm using TSOP1838 with basically rejects continuos 38Khz frequency, see the datasheet at:
http://www.datasheetcatalog.org/datasheets/134/301155_DS.pdf
I'm wondering what sensor can I use that does not supress continuous frequencies.
Thank you.
I have built this circuit and during testing, I noticed that when I cut the beam, the light on my arduino board (L or pin 13).
In the write up it says the light should shine always, and shut off when the beam is interrupted.
Is this a typo, or is there something strange on my end?
Also, I noticed that if I bring the detector and emitter very close, the pin 13 light goes on, but nothing happens when I break the beam.
Any idea what I have gotten wrong?
Great tutorial, works a treat!
Also that's a good tip (Anton) for the non-contact object detection, my guess is that this will use alot less power than something like the PING board (ultrasonic).
You can also use it for a really cool non-contact "switch" (for example to enable something)
regarding the comment from Anon did you remember the "!" to invert the status?
Here is a fix for the 838 and any others that reject a continuous beam.
void loop() {
irsend.space(0);
delay(1);
irsend.mark(0);
digitalWrite(PIN_STATUS, !digitalRead(PIN_DETECT));
delay(1);
}
I know this is an old post, but...
Is it possible to use two emitters and two detectors without them interfering?
Is it just a case of giving them a different frequency?
If so, do you think these will do?: http://www.sparkfun.com/products/241
Thanks in advance,
Declan
Thanks for the library. I'd like to change the pin assignment for the emitter. I tried by changing it in the code but had no success so I suspect it needs to be changed elsewhere also. How can I do this? Thanks
Hi Ken,
my sketch currently uses pin3, I attempted to change the variable declaration from your sketch:
#define PIN_IR 3 to #define PIN_IR 5
... it doesn't work,
I want to use my Arduino Uno's pin 5 for the IR emitter.
Do I have to modify some code in the library?
Any other PWM I declare does not work either except pin 3.
Please help!
Thx!
thanks a ton!!!!!!!!!
Well, the continuously lit led is a problem, concerning distances, I need a long range device, so, for better performance the led must flash at the same frequency (and must be synch) as the detector... Could you help me?
Could this pick up a paintball ( 16 mm ) moving at a speed of 91.44 mm / millisecond (300FT/Sec) ?
The ball is moving 16mm in 150 MICRO seconds. I know it's fast but the Arduino is fast too.. Thanks for any input!
9 uS per mm if the beam is the width of the LED(5mm) then that's 9uS/mm*5mm = 45uS initial beam crossing time. Then to fully pass the beam it's one ball width off so I calculate total time in front of the beam to be 195uS or .195milli seconds... I know the arduino can measure in Micros().
It's this or $60 for a chronograph .
I have a project where I want to use an IR beam to detect snow levels. My plan is to have 24 receivers (Digikey 425-2528-ND) 1/2 inch apart so they will measure up to 12 inches of snow. Since there are so many inputs, I'll use the Arduino Mega to handle all if it. For the emitters, I'm using 10 wide angle (60 degree) IR LEDs (Digikey 67-1001-ND). I'll use a MOSFET to power the LEDs from the pin 9. Do you foresee any issues with your library and this project?
Just wondering if it would be possible to detect more than one breaking line (on different digital pin).
I would need 3 of them to detect which gear is engaged in my car by looking on the lever (-:
thanks for the post,
In my project i am using the break beam to detect water level in a pipe, as part of the electronics i have added and extra receiver and an extra transmitter so that i can test if any component is not working. However for this to work I need to turn of the output signal on one transmitter and turn the other one on, but i can not figure out a way to do this in the programme. Any help would be greatly appreciated.
Hi Ken,
My LED on pin 13 remains constantly ON. I do not see the IR beam coming when viewed from a phone camera. Any indications?
Also having problems with the continuously-lit IR LED. Solution suggested by Marc didn't work for me. I verified that the detector (AX1838HS) works using a TV remote. I verified that the IR LED is emitting using my cell phone. Any suggestions would be appreciated.
hi i cannot get the emitter to be lit, tried with a normal led to see but nothing, the reciever is working.
I have the arduino mega2560 and set up on pin 3
hi i cannot get the emitter to be lit, tried with a normal led to see but nothing, the reciever is working.
I have the arduino mega2560 and set up on pin 3
have any one make it work, using a mega 2560? my does not work.
You need to use pin 9 on the mega 2560
check the tsop type.
I tested with tsop 1138 & tsop 1838
- datasheet of 1138 says "Max. Envelope Duty Cycle vs. Burstlength"
- datasheet of 1838 says "The data format should not make a continuous
signal transmission. There must be a Signal Gap Time
(longer than 15ms) at least each 90ms (see Figure A)."
- datasheet of tsop 1738 says : "Continuous data transmission possible
(1200 bit/s)"
this ir beam seems to work only with tsop 17xx
This works great. TSOP38238 used.
Thanks!
hi
i would like to know how to you stop other 38khz infrared's from triggering your beam
#include <IRremote.h>
#define PIN_DETECT 2
IRsend irsend;
void setup()
{
pinMode(PIN_DETECT, INPUT);
Serial.begin(115200);
Serial.println("READY");
attachInterrupt(digitalPinToInterrupt(PIN_DETECT), checkIRBeamBreak, RISING);
// Note : the IR emitter is on PIN #3
irsend.enableIROut(38);
IREmitterOn();
}
// Use this function instead of delay() as delay() does not work in interrupt callbacks
void pause(int ms) {
// We need a loop as the largest value for delayMicroseconds that will produce an accurate delay is 16383
for (int i = 0; i < ms; i++) {
delayMicroseconds(1000);
}
}
void IREmitterOff() {
irsend.space(0);
pause(60); // 60 ms is OK for my TSOP but should be tuned
}
void IREmitterOn() {
irsend.mark(0);
pause(10);
}
void switchOffOnIREmitter() {
IREmitterOff();
IREmitterOn();
}
void checkIRBeamBreak() {
int val = digitalRead(PIN_DETECT);
// LOW : no beam break
// HIGH : beam break
if (val == LOW)
return;
detachInterrupt(digitalPinToInterrupt(PIN_DETECT));
switchOffOnIREmitter();
if (digitalRead(PIN_DETECT) == HIGH) {
Serial.println("IR BEAM BREAK !!!!");
}
attachInterrupt(digitalPinToInterrupt(PIN_DETECT), checkIRBeamBreak, RISING);
}
void loop() {
}
Sorry, I forgot the explanations in my previous post :)
When dealing with IR Beam break detection, I prefer interrupts : if the IR beam is used for an automatic gate for instance, you want to react quickly, no matter what is being processed in the loop function.
I have a TSOP that does not allow continuous signal.
With such a TSOP, when the IR emitter is ON (with a 38kHz frequency), the TSOP will detect the IR Beam for only a specific (short) time, then, it will no longer detect anything (it's blocked). So, You have to switch off your IR emitter periodically to 're-initialize' the TSOP.
That's the trick with the previous sketch, when the interrupt is fired :
- I switch Off/On the IR emitter with a pause (60 ms for me but should be tuned to match your TSOP's specs)
- I immediately check the 'out' of the TSOP (digitalRead) :
- if the IR beam is really broken, digitalRead will return HIGH
- if not, the TSOP was just in a blocked state. Having switched off the IR emitter has re-initialized it and it's now able to detect the IR beam. Here, digitalRead() will return LOW.
Thank you for sharing. Does this method work if IR transmitter and TSOP Receiver are 2 meters apart.
@Ken .. Thanks for sharing...
@Stéphane Deniaud ... Thanks for your code... i had similar issue, this works like a dream
I'm very interested in getting this to work using Stephane Deniaud's code - as a newbie to Arduino and coding I really wish I could understand it fully!!!
I assume the code is incomplete - clearly the more experienced in coding will be able to fill in the blanks - unfortunately I cannot.
Can anyone help me here?
Charles
@Charles
Stephane Deniaud's code is working. I am a newbie to Arduino as well and the first time I tried it I received an error but the second time it worked, probably I did not select the whole code. Make sure you are copying it all.
Also, you might want to check your Serial Monitor baud rate, it must match the baud rate set in the code, in this case 115200.
Since your are not saying what's going wrong for you, I am just thinking about random errors you might encounter.
Regards,
H
@Unknown,
I realize that this blog post is quite old, but a snippet of your code from your post above allowed me to transmit a continuous 38kHz IR carrier to a pair of TSOP38238 IR receivers that will not accept a continuous IR carrier input.
I have been working on a robot docking station project that uses a 38kHz IR carrier beacon and had purchased an IR emitter/receiver package that included the TSOP38238 IR receiver. It took some IoT research to determine that the TSOP38238 IR receiver will not accept a continuous IR carrier input and how to overcome that constraint.
I now have a functioning robot IR docking station package that works quite well. It uses ROS mapping to get close to the docking station and then the IR beacon/receiver system aligns the robot to the docking station for battery charging.
The IR code does not work at first, because it seems the IRremote library has changed a lot since this post was written. My solution to get the code working was to downgrade IRremote to v3.0.2 in the Arduino IDE's Library Manager.
I am using this great idea for detecting an envelope in my mailbox. I have several photodiode-detector pairs on the bottom of my mailbox that detect the reflection from the envelope. It works great. However, I need to run this on a battery. Every half hour, I run the code on an ATMega 328P then go to sleep. However, sometimes the battery current is 3.9 mA instead of 0 during the sleep mode. It seems that the IRremote library, while sending an irsend.mark(0) provokes this problem. I have solved this by sending an irsend.space(0) before going to sleep and then a mark again for the next test. I would like to know if you could explain this. Below is a minimal code with a #define REMOVEBUG to fix the problem.
----------------------------------------------------------------------------------------------------
// https://www.gammon.com.au/power
// https://www.righto.com/2010/03/detecting-ir-beam-break-with-arduino-ir.html
#include
#define LED 12//(18)
#define PIN_IR 3
#define NBIN 8
int inPins[NBIN]={2,4,5,8,9,10,11,13};
IRsend irsend;
#include
#include
#define NSLEEPS 1 //sleeps for NSLEEPS*8 seconds.
int cntr=NSLEEPS-1;
#define REMOVEBUG
void setup()
{
Serial.begin(9600);
pinMode(LED,OUTPUT);
digitalWrite(LED,LOW);
for (int i=0;i<NBIN;i++) pinMode(inPins[i],INPUT);
irsend.enableIROut(38);
#ifdef REMOVEBUG
irsend.space(0);
#else
irsend.mark(0);
#endif
}
void loop()
{
chkCnt ();
// disable ADC
//ADCSRA = 0;
ADCSRA&=~(1<<7);//disable ADC
// clear various "reset" flags
MCUSR = 0;
// allow changes, disable reset
WDTCSR = bit (WDCE) | bit (WDE);
// set interrupt mode and an interval
WDTCSR = bit (WDIE) | bit (WDP3) | bit (WDP0); // set WDIE, and 8 seconds delay
wdt_reset(); // pat the dog
set_sleep_mode (SLEEP_MODE_PWR_DOWN);
noInterrupts (); // timed sequence follows
sleep_enable();
// turn off brown-out enable in software
MCUCR = bit (BODS) | bit (BODSE);
MCUCR = bit (BODS);
interrupts (); // guarantees next instruction executed
sleep_cpu ();
// cancel sleep as a precaution
sleep_disable();
}
void checkDetects()
{
#ifdef REMOVEBUG
pinMode(PIN_IR,OUTPUT);
irsend.mark(0);
#endif
pinMode(11,OUTPUT);
digitalWrite(11,HIGH);
digitalWrite(LED,HIGH);
delay(5000);
digitalWrite(LED,LOW);
delay(5000);
digitalWrite(11,LOW);
pinMode(11,INPUT);
#ifdef REMOVEBUG //if not 3.9mA instead of 0mA in loop() from time to time (10%)
irsend.space(0);
pinMode(PIN_IR,INPUT);
#endif
}
void chkCnt()
{
if (cntr < NSLEEPS-1) cntr++;
else
{
cntr=0;
checkDetects();
}
}
// watchdog interrupt
ISR (WDT_vect)
{
wdt_disable(); // disable watchdog
} // end of WDT_vect
I am having trouble going to sleep when sending a mark (about 10% of the time). I fixed it by sending a space before going to sleeo. Here's a minimal code below with an #ifdef REMOVEBUG. Can you explain?
--------------------------------------------------------------------------
// https://www.gammon.com.au/power
// https://www.righto.com/2010/03/detecting-ir-beam-break-with-arduino-ir.html
#include
#define LED 12//(18)
#define PIN_IR 3
#define NBIN 8
int inPins[NBIN]={2,4,5,8,9,10,11,13};
IRsend irsend;
#include
#include
#define NSLEEPS 1 //sleeps for NSLEEPS*8 seconds.
int cntr=NSLEEPS-1;
#define REMOVEBUG
void setup()
{
Serial.begin(9600);
pinMode(LED,OUTPUT);
digitalWrite(LED,LOW);
for (int i=0;i<NBIN;i++) pinMode(inPins[i],INPUT);
irsend.enableIROut(38);
#ifdef REMOVEBUG
irsend.space(0);
#else
irsend.mark(0);
#endif
}
void loop()
{
chkCnt ();
// disable ADC
//ADCSRA = 0;
ADCSRA&=~(1<<7);//disable ADC
// clear various "reset" flags
MCUSR = 0;
// allow changes, disable reset
WDTCSR = bit (WDCE) | bit (WDE);
// set interrupt mode and an interval
WDTCSR = bit (WDIE) | bit (WDP3) | bit (WDP0); // set WDIE, and 8 seconds delay
wdt_reset(); // pat the dog
set_sleep_mode (SLEEP_MODE_PWR_DOWN);
noInterrupts (); // timed sequence follows
sleep_enable();
// turn off brown-out enable in software
MCUCR = bit (BODS) | bit (BODSE);
MCUCR = bit (BODS);
interrupts (); // guarantees next instruction executed
sleep_cpu ();
// cancel sleep as a precaution
sleep_disable();
}
void checkDetects()
{
#ifdef REMOVEBUG
pinMode(PIN_IR,OUTPUT);
irsend.mark(0);
#endif
pinMode(11,OUTPUT);
digitalWrite(11,HIGH);
digitalWrite(LED,HIGH);
delay(5000);
digitalWrite(LED,LOW);
delay(5000);
digitalWrite(11,LOW);
pinMode(11,INPUT);
#ifdef REMOVEBUG //if not 3.9mA instead of 0mA in loop() from time to time (10%)
irsend.space(0);
pinMode(PIN_IR,INPUT);
#endif
}
void chkCnt()
{
if (cntr < NSLEEPS-1) cntr++;
else
{
cntr=0;
checkDetects();
}
}
// watchdog interrupt
ISR (WDT_vect)
{
wdt_disable(); // disable watchdog
} // end of WDT_vect
Post a Comment