A CT scanner reveals surprises inside the 386 processor's ceramic package

Intel released the 386 processor in 1985, the first 32-bit chip in the x86 line. This chip was packaged in a ceramic square with 132 gold-plated pins protruding from the underside, fitting into a socket on the motherboard. While this package may seem boring, a lot more is going on inside it than you might expect. Lumafield performed a 3-D CT scan of the chip for me, revealing six layers of complex wiring hidden inside the ceramic package. Moreover, the chip has nearly invisible metal wires connected to the sides of the package, the spikes below. The scan also revealed that the 386 has two separate power and ground networks: one for I/O and one for the CPU's logic.

A CT scan of the 386 package. The ceramic package doesn't show up in this image, but it encloses the spiky wires.

A CT scan of the 386 package. The ceramic package doesn't show up in this image, but it encloses the spiky wires.

The package, below, provides no hint of the complex wiring embedded inside the ceramic. The silicon die is normally not visible, but I removed the square metal lid that covers it.1 As a result, you can also see the two tiers of gold contacts that surround the silicon die.

The 386 package with the lid over the die removed.

The 386 package with the lid over the die removed.

Intel selected the 132-pin ceramic package to meet the requirements of a high pin count, good thermal characteristics, and low-noise power to the die.2: However, standard packages didn't provide sufficient power, so Intel designed a custom package with "single-row double shelf bonding to two signal layers and four power and ground planes." In other words, the die's bond wires are connected to the two shelves (or tiers) of pads surrounding the die. Internally, the package is like a 6-layer printed-circuit board made from ceramic.

Package cross-section. Redrawn from "High Performance Technology, Circuits and Packaging for the 80386".

Package cross-section. Redrawn from "High Performance Technology, Circuits and Packaging for the 80386".

The photo below shows the two tiers of pads with tiny gold bond wires attached: I measured the bond wires at 35 µm in diameter, thinner than a typical human hair. Some pads have up to five wires attached to support more current for the power and ground pads. You can consider the package to be a hierarchical interface from the tiny circuits on the die to the much larger features of the computer's motherboard. Specifically, the die has a feature size of 1 µm, while the metal wiring on top of the die has 6 µm spacing. The chip's wiring connects to the chip's bond pads, which have 0.01" spacing (.25 mm). The bond wires connect to the package's pads, which have 0.02" spacing (.5 mm); double the spacing because there are two tiers. The package connects these pads to the pin grid with 0.1" spacing (2.54 mm). Thus, the scale expands by about a factor of 2500 from the die's microscopic circuitry to the chip's pins. `

Close-up of the bond wires.

Close-up of the bond wires.

The ceramic package is manufactured through a complicated process.4 The process starts with flexible ceramic "green sheets", consisting of ceramic powder mixed with a binding agent. After holes for vias are created in the sheet, tungsten paste is silk-screened onto the sheet to form the wiring. The sheets are stacked, laminated under pressure, and then sintered at high temperature (1500ºC to 1600ºC) to create the rigid ceramic. The pins are brazed onto the bottom of the chip. Next, the pins and the inner contacts for the die are electroplated with gold.3 The die is mounted, gold bond wires are attached, and a metal cap is soldered over the die to encapsulate it. Finally, the packaged chip is tested, the package is labeled, and the chip is ready to be sold.

The diagram below shows a close-up of a signal layer inside the package. The pins are connected to the package's shelf pads through metal traces, spectacularly colored in the CT scan. (These traces are surprisingly wide and free-form; I expected narrower traces to reduce capacitance.) Bond wires connect the shelf pads to the bond pads on the silicon die. (The die image is added to the diagram; it is not part of the CT scan.) The large red circles are vias from the pins. Some vias connect to this signal layer, while other vias pass through to other layers. The smaller red circles are connections to a power layer; because the shelf pads are only on the two signal layers, the six power planes have connections to the signal layers for bonding. Since bond wires are only connected on the signal layers, the power layers need connections to pads on the signal layers.

A close-up of a signal layer. The die image is pasted in.

A close-up of a signal layer. The die image is pasted in.

The diagram below shows the corresponding portion of a power layer. A power layer looks completely different from a signal layer; it is a single conductive plane with holes. The grid of smaller holes allows the ceramic above and below this layer to bond, forming a solid piece of ceramic. The larger holes surround pin vias (red dots), allowing pin connections to pass through to a different layer. The red dots that contact the sheet are where power pins connect to this layer. Because the only connections to the die are from the signal layers, the power layers have connections to the signal layers; these are the smaller dots near the bond wires, either power vias passing through or vias connected to this layer.

A close-up of a power layer, specifically I/O Vss. The wavy blue regions are artifacts from neighboring layers. The die image is pasted in.

A close-up of a power layer, specifically I/O Vss. The wavy blue regions are artifacts from neighboring layers. The die image is pasted in.

With the JavaScript tool below, you can look at the package, layer by layer. Click on a radio button to select a layer. By observing the path of a pin through the layers, you can see where it ends up. For instance, the upper left pin passes through multiple layers until the upper signals layer connects it to the die. The pin to its right passes through all the layers until it reaches the logic Vcc plane on top. (Vcc is the 5-volt supply that powers the chip, called Vcc for historical reasons.)


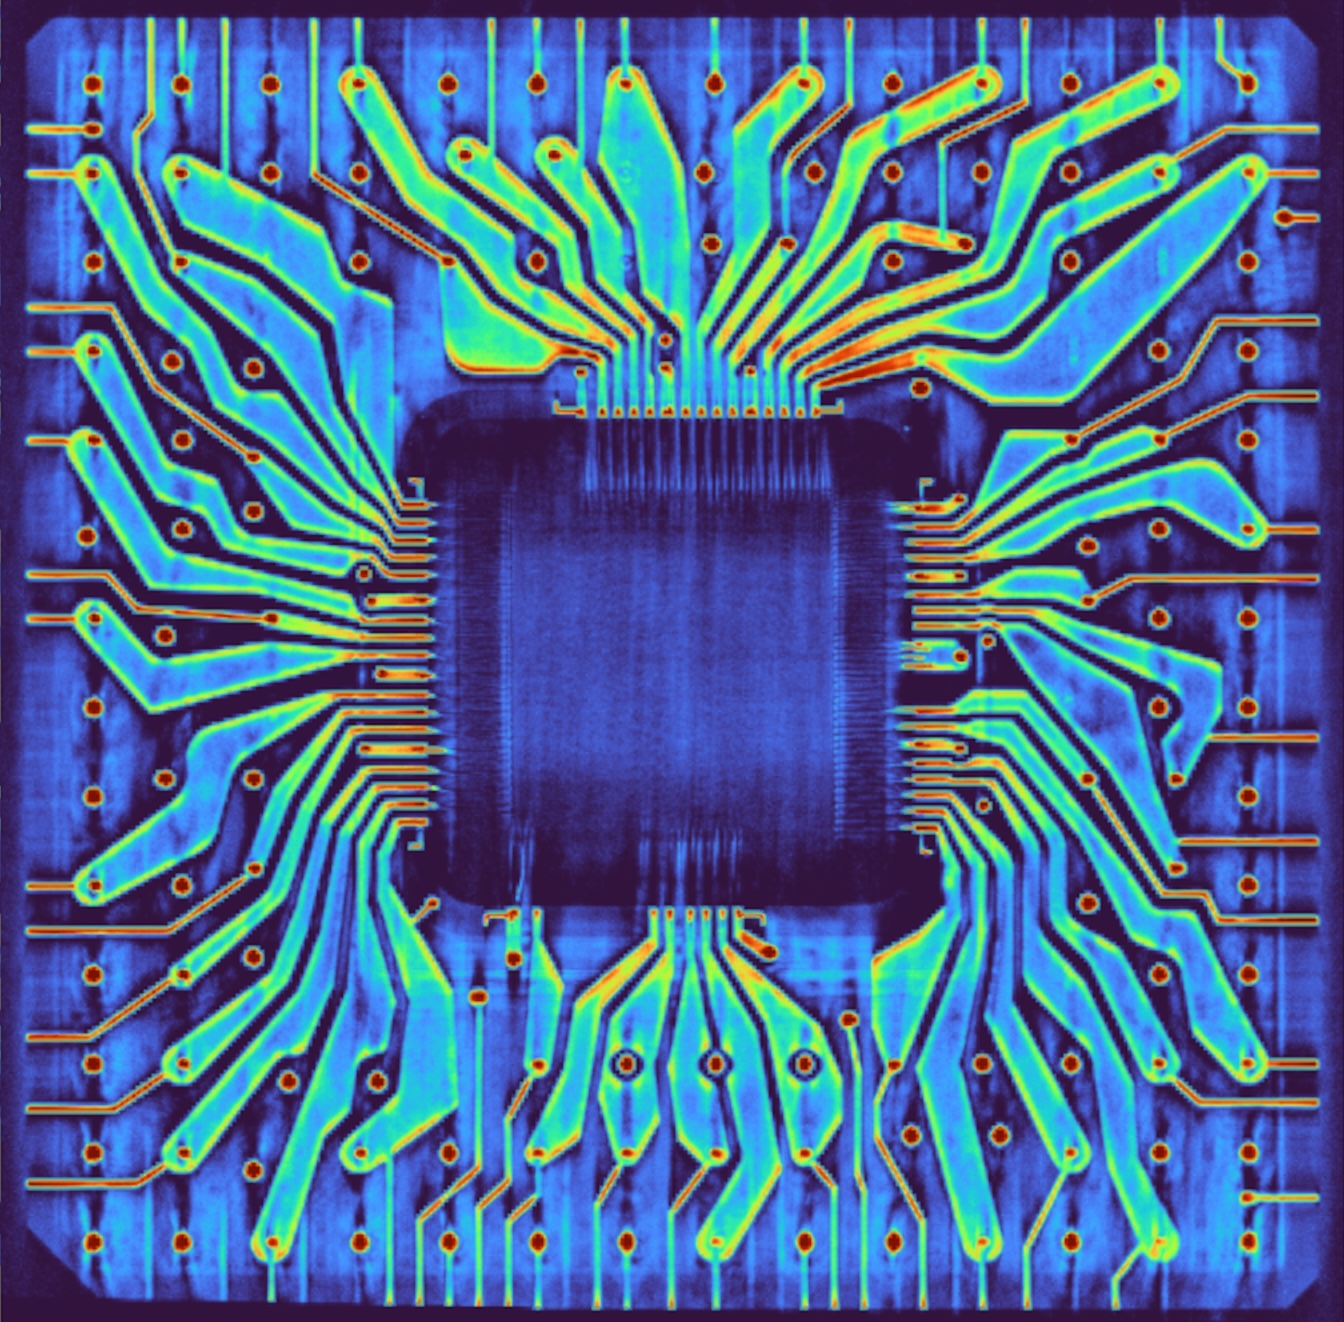
If you select the logic Vcc plane above, you'll see a bright blotchy square in the center. This is not the die itself, I think, but the adhesive that attaches the die to the package, epoxy filled with silver to provide thermal and electrical conductivity. Since silver blocks X-rays, it is highly visible in the image.

Side contacts for electroplating

What surprised me most about the scans was seeing wires that stick out to the sides of the package. These wires are used during manufacturing when the pins are electroplated with gold.5 In order to electroplate the pins, each pin must be connected to a negative voltage so it can function as a cathode. This is accomplished by giving each pin a separate wire that goes to the edge of the package.

This diagram below compares the CT scan (above) to a visual side view of the package (below). The wires are almost invisible, but can be seen as darker spots. The arrows show how three of these spots match with the CT scan; you can match up the other spots.6

A close-up of the side of the package compared to the CT scan, showing the edge contacts. I lightly sanded the edge of the package to make the contacts more visible. Even so, they are almost invisible.

A close-up of the side of the package compared to the CT scan, showing the edge contacts. I lightly sanded the edge of the package to make the contacts more visible. Even so, they are almost invisible.

Two power networks

According to the datasheet, the 386 has 20 pins connected to +5V power (Vcc) and 21 pins connected to ground (Vss). Studying the die, I noticed that the I/O circuitry in the 386 has separate power and ground connections from the logic circuitry. The motivation is that the output pins require high-current driver circuits. When a pin switches from 0 to 1 or vice versa, this can cause a spike on the power and ground wiring. If this spike is too large, it can interfere with the processor's logic, causing malfunctions. The solution is to use separate power wiring inside the chip for the I/O circuitry and for the logic circuitry, connected to separate pins. On the motherboard, these pins are all connected to the same power and ground, but decoupling capacitors absorb the I/O spikes before they can flow into the chip's logic.

The diagram below shows how the two power and ground networks look on the die, with separate pads and wiring. The square bond pads are at the top, with dark bond wires attached. The white lines are the two layers of metal wiring, and the darker regions are circuitry. Each I/O pin has a driver circuit below it, consisting of relatively large transistors to pull the pin high or low. This circuitry is powered by the horizontal lines for I/O Vcc (light red) and I/O ground (Vss, light blue). Underneath each I/O driver is a small logic circuit, powered by thinner Vcc (dark red) and Vss (dark blue). Thicker Vss and Vcc wiring goes to the logic in the rest of the chip. Thus, if the I/O circuitry causes power fluctuations, the logic circuit remains undisturbed, protected by its separate power wiring.

A close-up of the top of the die, showing the power wiring and the circuitry for seven data pins.

A close-up of the top of the die, showing the power wiring and the circuitry for seven data pins.

The datasheet doesn't mention the separate I/O and logic power networks, but by using the CT scans, I determined which pins power I/O, and which pins power logic. In the diagram below, the light red and blue pins are power and ground for I/O, while the dark red and blue pins are power and ground for logic. The pins are scattered across the package, allowing power to be supplied to all four sides of the die.

The pinout from the Intel386DX Microprocessor Datasheet. This is the view from the pin side.

The pinout from the Intel386DX Microprocessor Datasheet. This is the view from the pin side.

"No Connect" pins

As the diagram above shows, the 386 has eight pins labeled "NC" (No Connect)—when the chip is installed in a computer, the motherboard must leave these pins unconnected. You might think that the 132-pin package simply has eight extra, unneeded pins, but it's more complicated than that. The photo below shows five bond pads at the bottom of the 386 die. Three of these pads have bond wires attached, but two have no bond wires: these correspond to No Connect pins. Note the black marks in the middle of the pads: the marks are from test probes that were applied to the die during testing.7 The No Connect pads presumably have a function during this testing process, providing access to an important internal signal.

A close-up of the die showing three bond pads with bond wires and two bond pads without bond wires.

A close-up of the die showing three bond pads with bond wires and two bond pads without bond wires.

Seven of the eight No Connect pads are almost connected: the package has a spot for a bond wire in the die cavity and the package has internal wiring to a No Connect pin. The only thing missing is the bond wire between the pad and the die cavity. Thus, by adding bond wires, Intel could easily create special chips with these pins connected, perhaps for debugging the test process itself.

The surprising thing is that one of the No Connect pads does have the bond wire in place, completing the connection to the external pin. (I marked this pin in green in the pinout diagram earlier.) From the circuitry on the die, this pin appears to be an output. If someone with a 386 chip hooks this pin to an oscilloscope, maybe they will see something interesting.

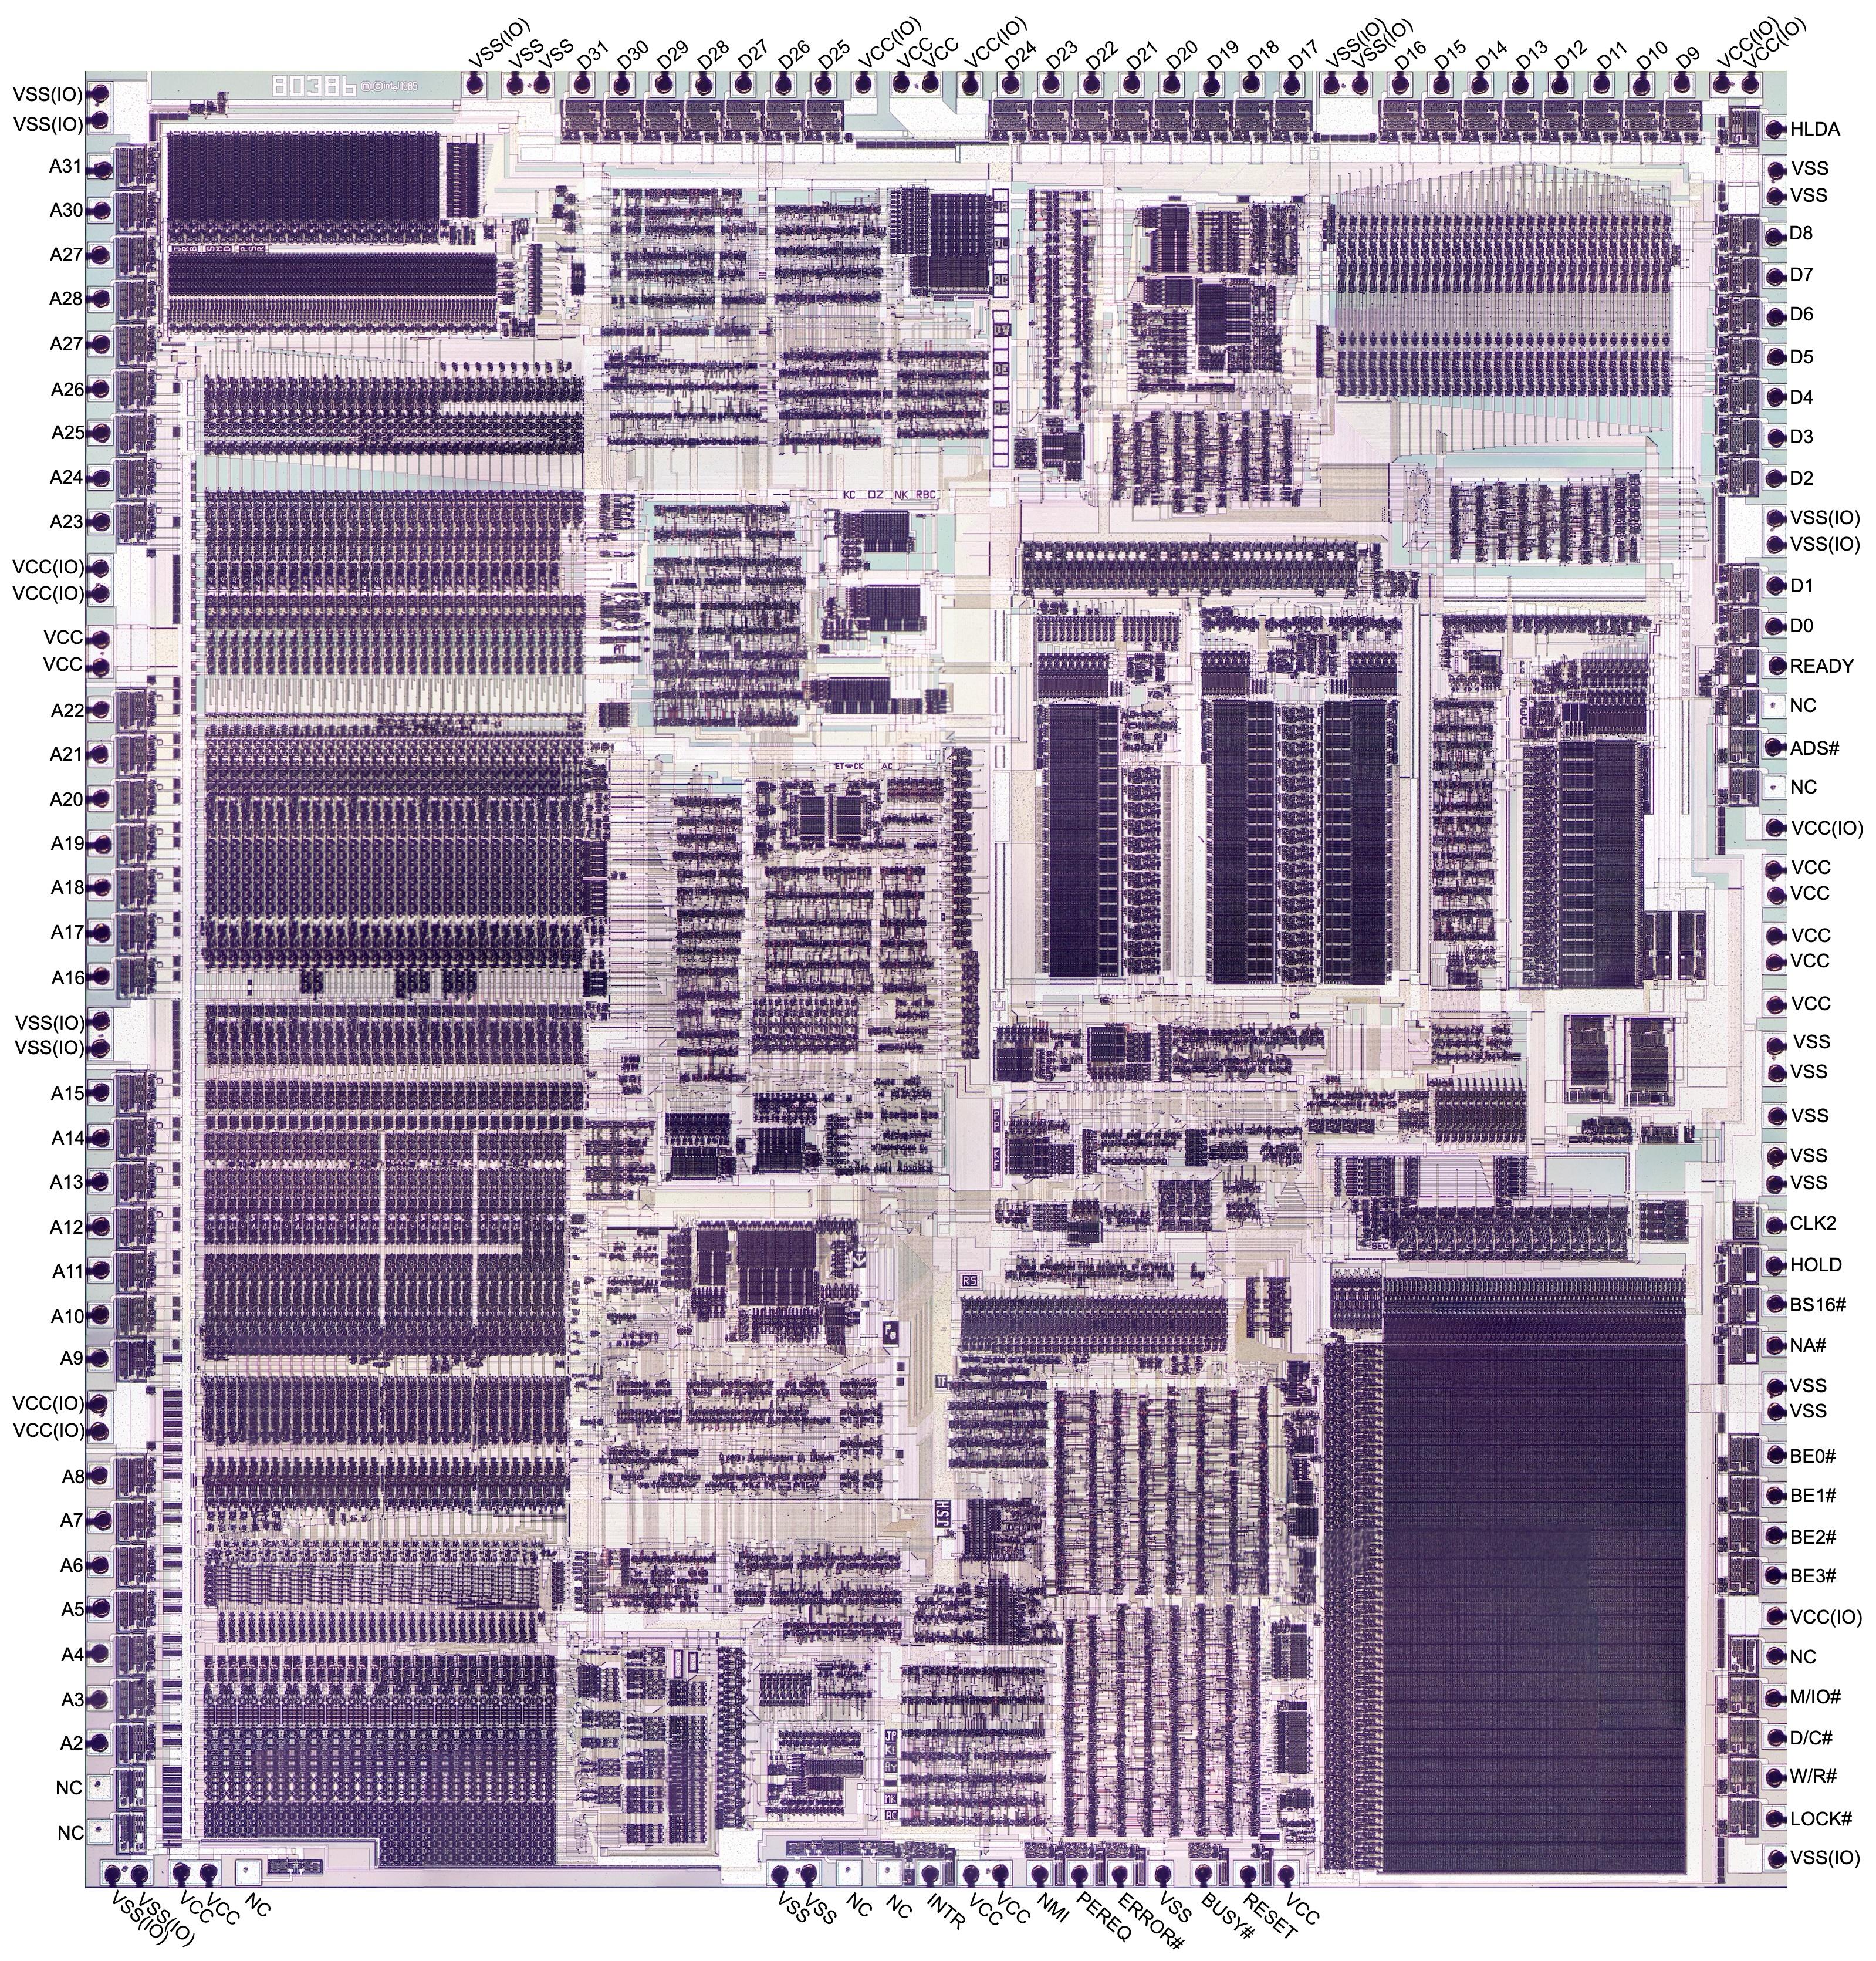
Labeling the pads on the die

The earlier 8086 processor, for example, is packaged in a DIP (Dual-Inline Package) with two rows of pins. This makes it straightforward to figure out which pin (and thus which function) is connected to each pad on the die. However, since the 386 has a two-dimensional grid of pins, the mapping to the pads is unclear. You can guess that pins are connected to a nearby pad, but ambiguity remains. Without knowing the function of each pad, I have a harder time reverse-engineering the die.

In fact, my primary motivation for scanning the 386 package was to determine the pin-to-pad mapping and thus the function of each pad.8 Once I had the CT data, I was able to trace out each hidden connection between the pad and the external pin. The image below shows some of the labels; click here for the full, completely labeled image. As far as I know, this information hasn't been available outside Intel until now.

A close-up of the 386 die showing the labels for some of the pins.

A close-up of the 386 die showing the labels for some of the pins.

Conclusions

Intel's early processors were hampered by inferior packages, but by the time of the 386, Intel had realized the importance of packaging. In Intel's early days, management held the bizarre belief that chips should never have more than 16 pins, even though other companies used 40-pin packages. Thus, Intel's first microprocessor, the 4004 (1971), was crammed into a 16-pin package, limiting its performance. By 1972, larger memory chips forced Intel to move to 18-pin packages, extremely reluctantly.9 The eight-bit 8008 processor (1972) took advantage of this slightly larger package, but performance still suffered because signals were forced to share pins. Finally, Intel moved to the standard 40-pin package for the 8080 processor (1974), contributing to the chip's success. In the 1980s, pin-grid arrays became popular in the industry as chips required more and more pins. Intel used a ceramic pin grid array (PGA) with 68 pins for the 186 and 286 processors (1982), followed by the 132-pin package for the 386 (1985).

The main drawback of the ceramic package was its cost. According to the 386 oral history, the cost of the 386 die decreased over time to the point where the chip's package cost as much as the die. To counteract this, Intel introduced a low-cost plastic package for the 386 that cost just a dollar to manufacture, the Plastic Quad Flat Package (PQFP) (details).

In later Intel processors, the number of connections exponentially increased. A typical modern laptop processor uses a Ball Grid Array with 2049 solder balls; the chip is soldered directly onto the circuit board. Other Intel processors use a Land Grid Array (LGA): the chip has flat contacts called lands, while the socket has the pins. Some Xeon processors have 7529 contacts, a remarkable growth from the 16 pins of the Intel 4004.

From the outside, the 386's package looks like a plain chunk of ceramic. But the CT scan revealed surprising complexity inside, from numerous contacts for electroplating to six layers of wiring. Perhaps even more secrets lurk in the packages of modern processors.

Follow me on Bluesky (@righto.com), Mastodon (@[email protected]), or RSS. (I've given up on Twitter.) Thanks to Jon Bruner and Lumafield for scanning the chip. Lumafield's interactive CT scan of the 386 package is available here if you to want to examine it yourself. Lumafield also scanned a 1960s cordwood flip-flop and the Soviet Globus spacecraft navigation instrument for us. Thanks to John McMaster for taking 2D X-rays.

Notes and references

  1. I removed the metal lid with a chisel, as hot air failed to desolder the lid. A few pins were bent in the process, but I straightened them out, more or less. 

  2. The 386 package is described in "High Performance Technology, Circuits and Packaging for the 80386", Proceedings, ICCD Conference, Oct. 1986. (Also see Design and Test of the 80386 by Pat Gelsinger, former Intel CEO.)

    The paper gives the following requirements for the 386 package:

    1. Large pin count to handle separate 32-bit data and address buses.
    2. Thermal characteristics resulting in junction temperatures under 110°.
    3. Power supply to the chip and I/O able to supply 600mA/ns with noise levels less than 0.4V (chip) and less than 0.8V (I/O).

    The first and second criteria motivated the selection of a 132-pin ceramic pin grid array (PGA). The custom six-layer package was designed to achieve the third objective. The power network is claimed to have an inductance of 4.5 nH per power pad on the device, compared to 12-14 nH for a standard package, about a factor of 3 better.

    The paper states that logic Vcc, logic Vss, I/O Vcc, and I/O Vss each have 10 pins assigned. Curiously, the datasheet states that the 386 has 20 Vcc pins and 21 Vss pins, which doesn't add up. From my investigation, the "extra" pin is assigned to logic Vss, which has 11 pins. 

  3. I estimate that the 386 package contains roughly 0.16 grams of gold, currently worth about $16. It's hard to find out how much gold is in a processor since online numbers are all over the place. Many people recover the gold from chips, but the amount of gold one can recover depends on the process used. Moreover, people tend to keep accurate numbers to themselves so they can profit. But I made some estimates after searching around a bit. One person reports 9.69g of gold per kilogram of chips, and other sources seem roughly consistent. A ceramic 386 reportedly weighs 16g. This works out to 160 mg of gold per 386. 

  4. I don't have information on Intel's package manufacturing process specifically. This description is based on other descriptions of ceramic packages, so I don't guarantee that the details are correct for the 386. A Fujitsu patent, Package for enclosing semiconductor elements, describes in detail how ceramic packages for LSI chips are manufactured. IBM's process for ceramic multi-chip modules is described in Multi-Layer Ceramics Manufacturing, but it is probably less similar. 

  5. An IBM patent, Method for shorting pin grid array pins for plating, describes the prior art of electroplating pins with nickel and/or gold. In particular, it describes using leads to connect all input/output pins to a common bus at the edge of the package, leaving the long leads in the structure. This is exactly what I see in the 386 chip. The patent mentions that a drawback of this approach is that the leads can act as antennas and produce signal cross-talk. Fujitsu patent Package for enclosing semiconductor elements also describes wires that are exposed at side surfaces. This patent covers methods to avoid static electricity damage through these wires. (Picking up a 386 by the sides seems safe, but I guess there is a risk of static damage.)

    Note that each input/output pin requires a separate wire to the edge. However, the multiple pins for each power or ground plane are connected inside the package, so they do not require individual edge connections; one or two suffice. 

  6. To verify that the wires from pins to the edges of the chip exist and are exposed, I used a multimeter and found connectivity between pins and tiny spots on the sides of the chip. 

  7. To reduce costs, each die is tested while it is still part of the silicon wafer and each faulty die is marked with an ink spot. The wafer is "diced", cutting it apart into individual dies, and only the functional, unmarked dies are packaged, avoiding the cost of packaging a faulty die. Additional testing takes place after packaging, of course. 

  8. I tried several approaches to determine the mapping between pads and pins before using the CT scan. I tried to beep out the connections between the pins and the pads with a multimeter, but because the pads are so tiny, the process was difficult, error-prone, and caused damage to the package.

    I also looked at the pinout of the 386 in a plastic package (datasheet). Since the plastic package has the pins in a single ring around the border, the mapping to the die is straightforward. Unfortunately, the 386 die was slightly redesigned at this time, so some pads were moved around and new pins were added, such as FLT#. It turns out that the pinout for the plastic chip almost matches the die I examined, but not quite. 

  9. In his oral history, Federico Faggin, a designer of the 4004, 8008, and Z80 processors, describes Intel's fixation on 16-pin packages. When a memory chip required 18 pins instead of 16, it was "like the sky had dropped from heaven. I never seen so [many] long faces at Intel, over this issue, because it was a religion in Intel; everything had to be 16 pins, in those days. It was a completely silly requirements [sic] to have 16 pins." At the time, other manufacturers were using 40- and 48-pin packages, so there was no technical limitation, just a minor cost saving from the smaller package. 

How to reverse engineer an analog chip: the TDA7000 FM radio receiver

Have you ever wanted to reverse engineer an analog chip from a die photo? Wanted to understand what's inside the "black box" of an integrated circuit? In this article, I explain my reverse engineering process, using the Philips TDA7000 FM radio receiver chip as an example. This chip was the first FM radio receiver on a chip.1 It was designed in 1977—an era of large transistors and a single layer of metal—so it is much easier to examine than modern chips. Nonetheless, the TDA7000 is a non-trivial chip with over 100 transistors. It includes common analog circuits such as differential amplifiers and current mirrors, along with more obscure circuits such as Gilbert cell mixers.

Die photo of the TDA7000 with the main functional blocks labeled. Click this image (or any other) for a larger version. Die photo from IEEE's Microchips that Shook the World exhibit page.

Die photo of the TDA7000 with the main functional blocks labeled. Click this image (or any other) for a larger version. Die photo from IEEE's Microchips that Shook the World exhibit page.

The die photo above shows the silicon die of the TDA7000; I've labeled the main functional blocks and some interesting components. Arranged around the border of the chip are 18 bond pads: the pads are connected by thin gold bond wires to the pins of the integrated circuit package. In this chip, the silicon appears greenish, with slightly different colors—gray, pink, and yellow-green—where the silicon has been "doped" with impurities to change its properties. Carefully examining the doping patterns will reveal the transistors, resistors, and other microscopic components that make up the chip.

The most visible part of the die is the metal wiring, the speckled white lines that connect the silicon structures. The metal layer is separated from the silicon underneath by an insulating oxide layer, allowing metal lines to pass over other circuitry without problem. Where a metal wire connects to the underlying silicon, a small white square is visible; this square is a hole in the oxide layer, allowing the metal to contact the silicon.

A close-up of the TDA7000 die, showing metal wiring above circuitry.

A close-up of the TDA7000 die, showing metal wiring above circuitry.

This chip has a single layer of metal, so it is much easier to examine than modern chips with a dozen or more layers of metal. However, the single layer of metal made it much more difficult for the designers to route the wiring while avoiding crossing wires. In the die photo above, you can see how the wiring meanders around the circuitry in the middle, going the long way since the direct route is blocked. Later, I'll discuss some of the tricks that the designers used to make the layout successful.

NPN transistors

Transistors are the key components in a chip, acting as switches, amplifiers, and other active devices. While modern integrated circuits are fabricated from MOS transistors, earlier chips such as the TDA7000 were constructed from bipolar transistors: NPN and PNP transistors. The photo below shows an NPN transistor in the TDA7000 as it appears on the chip. The different shades are regions of silicon that have been doped with various impurities, forming N and P regions with different electrical properties. The white lines are the metal wiring connected to the transistor's collector (C), emitter (E), and base (B). Below the die photo, the cross-section diagram shows how the transistor is constructed. The region underneath the emitter forms the N-P-N sandwich that defines the NPN transistor.

An NPN transistor and cross-section, adapted from the die photo. The N+ and P+ regions have more doping than the N and P regions.

An NPN transistor and cross-section, adapted from the die photo. The N+ and P+ regions have more doping than the N and P regions.

The parts of an NPN transistor can be identified by their appearance. The emitter is a compact spot, surrounded by the gray silicon of the base region. The collector is larger and separated from the emitter and base, sometimes separated by a significant distance. The colors may appear different in other chips, but the physical structures are similar. Note that although the base is in the middle conceptually, it is often not in the middle of the physical layout.

The transistor is surrounded by a yellowish-green border of P+ silicon; this border is an important part of the structure because it isolates the transistor from neighboring transistors.2 The isolation border is helpful for reverse-engineering because it indicates the boundaries between transistors.

PNP transistors

You might expect PNP transistors to be similar to NPN transistors, just swapping the roles of N and P silicon. But for a variety of reasons, PNP transistors have an entirely different construction. They consist of a circular emitter (P), surrounded by a ring-shaped base (N), which is surrounded by the collector (P). This forms a P-N-P sandwich horizontally (laterally), unlike the vertical structure of an NPN transistor. In most chips, distinguishing NPN and PNP transistors is straightforward because NPN transistors are rectangular while PNP transistors are circular.

A PNP transistor and cross-section, adapted from the die photo.

A PNP transistor and cross-section, adapted from the die photo.

The diagram above shows one of the PNP transistors in the TDA7000. As with the NPN transistor, the emitter is a compact spot. The collector consists of gray P-type silicon; in contrast, the base of an NPN transistor consists of gray P-type silicon. Moreover, unlike the NPN transistor, the base contact of the PNP transistor is at a distance, while the collector contact is closer. (This is because most of the silicon inside the isolation boundary is N-type silicon. In a PNP transistor, this region is connected to the base, while in an NPN transistor, this region is connected to the collector.)

It turns out that PNP transistors have poorer performance than NPN transistors for semiconductor reasons3, so most analog circuits use NPN transistors except when PNP transistors are necessary. For instance, the TDA7000 has over 100 NPN transistors but just nine PNP transistors. Accordingly, I'll focus my discussion on NPN transistors.

Resistors

Resistors are a key component of analog chips. The photo below shows a zig-zagging resistor in the TDA7000, formed from gray P-type silicon. The resistance is proportional to the length,4 so large-valued resistors snake back and forth to fit into the available space. The two red arrows indicate the contacts between the ends of the resistor and the metal wiring. Note the isolation region around the resistor, the yellowish border. Without this isolation, two resistors (formed of P-silicon) embedded in N-silicon could form an unintentional PNP transistor.

A resistor on the die of the TDA7000.

A resistor on the die of the TDA7000.

Unfortunately, resistors in ICs are very inaccurate; the resistances can vary by 50% from chip to chip. As a result, analog circuits are typically designed to depend on the ratio of resistor values, which is fairly constant within a chip. Moreover, high-value resistors are inconveniently large. We'll see below some techniques to reduce the need for large resistances.

Capacitors

Capacitors are another important component in analog circuits. The capacitor below is a "junction capacitor", which uses a very large reverse-biased diode as a capacitor. The pink "fingers" are N-doped regions, embedded in the gray P-doped silicon. The fingers form a "comb capacitor"; this layout maximizes the perimeter area and thus increases the capacitance. To produce the reverse bias, the N-silicon fingers are connected to the positive voltage supply through the upper metal strip. The P silicon is connected to the circuit through the lower metal strip.

A capacitor in the TDA7000. I've blurred the unrelated circuitry.

A capacitor in the TDA7000. I've blurred the unrelated circuitry.

How does a diode junction form a capacitor? When a diode is reverse-biased, the contact region between N and P silicon becomes "depleted", forming a thin insulating region between the two conductive silicon regions. Since an insulator between two conducting surfaces forms a capacitor, the diode acts as a capacitor. One problem with a diode capacitor is that the capacitance varies with the voltage because the thickness of the depletion region changes with voltage. But as we'll see later, the TDA7000's tuning circuit turns this disadvantage into a feature.

Other chips often create a capacitor with a plate of metal over silicon, separated by a thin layer of oxide or other dielectric. However, the manufacturing process for bipolar chips generally doesn't provide thin oxide, so junction capacitors are a common alternative.5 On-chip capacitors take up a lot of space and have relatively small capacitance, so IC designers try to avoid capacitors. The TDA7000 has seven on-chip capacitors but most of the capacitors in this design are larger, external capacitors: the chip uses 12 of its 18 pins just to connect external capacitors to the necessary points in the internal circuitry.

Important analog circuits

A few circuits are very common in analog chips. In this section, I'll explain some of these circuits, but first, I'll give a highly simplified explanation of an NPN transistor, the minimum you should know for reverse engineering. (PNP transistors are similar, except the polarities of the voltages and currents are reversed. Since PNP transistors are rare in the TDA7000, I won't go into details.)

In a transistor, the base controls the current between the collector and the emitter, allowing the transistor to operate as a switch or an amplifier. Specifically, if a small current flows from the base of an NPN transistor to the emitter, a much larger current can flow from the collector to the emitter, larger, perhaps, by a factor of 100.6 To get a current to flow, the base must be about 0.6 volts higher than the emitter. As the base voltage continues to increase, the base-emitter current increases exponentially, causing the collector-emitter current to increase. (Normally, a resistor will ensure that the base doesn't get much more than 0.6V above the emitter, so the currents stay reasonable.)

A comparison of the behavior of NPN transistors and PNP transistors.

A comparison of the behavior of NPN transistors and PNP transistors.

NPN transistor circuits have some general characteristics. When there is no base current, the transistor is off: the collector is high and the emitter is low. When the transistor turns on, the current through the transistor pulls the collector voltage lower and the emitter voltage higher. Thus, in a rough sense, the emitter is the non-inverting output and the collector is the inverting output.

The complete behavior of transistors is much more complicated. The nice thing about reverse engineering is that I can assume that the circuit works: the designers needed to consider factors such as the Early effect, capacitance, and beta, but I can ignore them.

Emitter follower

One of the simplest transistor circuits is the emitter follower. In this circuit, the emitter voltage follows the base voltage, staying about 0.6 volts below the base. (The 0.6 volt drop is also called a "diode drop" because the base-emitter junction acts like a diode.)

An emitter follower circuit.

An emitter follower circuit.

This behavior can be explained by a feedback loop. If the emitter voltage is too high, the current from the base to the emitter drops, so the current through the collector drops due to the transistor's amplification. Less current through the resistor reduces the voltage across the resistor (from Ohm's Law), so the emitter voltage goes down. Conversely, if the emitter voltage is too low, the base-emitter current increases, increasing the collector current. This increases the voltage across the resistor, and the emitter voltage goes up. Thus, the emitter voltage adjusts until the circuit is stable; at this point, the emitter is 0.6 volts below the base.

You might wonder why an emitter follower is useful. Although the output voltage is lower, the transistor can supply a much higher current. That is, the emitter follower amplifies a weak input current into a stronger output current. Moreover, the circuitry on the input side is isolated from the circuitry on the output side, preventing distortion or feedback.

Current mirror

Most analog chips make extensive use of a circuit called a current mirror. The idea is you start with one known current, and then you can "clone" multiple copies of the current with a simple transistor circuit, the current mirror.

In the following circuit, a current mirror is implemented with two identical PNP transistors. A reference current passes through the transistor on the right. (In this case, the current is set by the resistor.) Since both transistors have the same emitter voltage and base voltage, they source the same current, so the current on the left matches the reference current (more or less).7

A current mirror circuit using PNP transistors.

A current mirror circuit using PNP transistors.

A common use of a current mirror is to replace resistors. As mentioned earlier, resistors inside ICs are inconveniently large. It saves space to use a current mirror instead of multiple resistors whenever possible. Moreover, the current mirror is relatively insensitive to the voltages on the different branches, unlike resistors. Finally, by changing the size of the transistors (or using multiple collectors of different sizes), a current mirror can provide different currents.

A current mirror on the TDA7000 die.

A current mirror on the TDA7000 die.

The TDA7000 doesn't use current mirrors as much as I'd expect, but it has a few. The die photo above shows one of its current mirrors, constructed from PNP transistors with their distinctive round appearance. Two important features will help you recognize a current mirror. First, one transistor has its base and collector connected; this is the transistor that controls the current. In the photo, the transistor on the right has this connection. Second, the bases of the two transistors are connected. This isn't obvious above because the connection is through the silicon, rather than in the metal. The trick is that these PNP transistors are inside the same isolation region. If you look at the earlier cross-section of a PNP transistor, the whole N-silicon region is connected to the base. Thus, two PNP transistors in the same isolation region have their bases invisibly linked, even though there is just one base contact from the metal layer.

Current sources and sinks

Analog circuits frequently need a constant current. A straightforward approach is to use a resistor; if a constant voltage is applied, the resistor will produce a constant current. One disadvantage is that circuits can cause the voltage to vary, generating unwanted current fluctuations. Moreover, to produce a small current (and minimize power consumption), the resistor may need to be inconveniently large. Instead, chips often use a simple circuit to control the current: this circuit is called a "current sink" if the current flows into it and a "current source" if the current flows out of it.

Many chips use a current mirror as a current source or sink instead. However, the TDA7000 uses a different approach: a transistor, a resistor, and a reference voltage.8 The transistor acts like an emitter follower, causing a fixed voltage across the resistor. By Ohm's Law, this yields a fixed current. Thus, the circuit sinks a fixed current, controlled by the reference voltage and the size of the resistor. By using a low reference voltage, the resistor can be kept small.

The current sink circuit used in the TDA7000.

The current sink circuit used in the TDA7000.

Differential pair amplifier

If you see two transistors with the emitters connected, chances are that it is a differential amplifier: the most common two-transistor subcircuit used in analog ICs.9 The idea of a differential amplifier is that it takes the difference of two inputs and amplifies the result. The differential amplifier is the basis of the operational amplifier (op amp), the comparator, and other circuits. The TDA7000 uses multiple differential pairs for amplification. For filtering, the TDA7000 uses op-amps, formed from differential amplifiers.10

The schematic below shows a simple differential pair. The current sink at the bottom provides a fixed current I, which is split between the two input transistors. If the input voltages are equal, the current will be split equally into the two branches (I1 and I2). But if one of the input voltages is a bit higher than the other, the corresponding transistor will conduct more current, so that branch gets more current and the other branch gets less. The resistors in each branch convert the current to a voltage; either side can provide the output. A small difference in the input voltages results in a large output voltage, providing the amplification. (Alternatively, both sides can be used as a differential output, which can be fed into a second differential amplifier stage to provide more amplification. Note that the two branches have opposite polarity: when one goes up, the other goes down.)

Schematic of a simple differential pair circuit.  The current sink sends a fixed current I through the differential pair.  If the two inputs are equal, the current is split equally between the two branches.  Otherwise, the branch with the higher input voltage gets most of the current.

Schematic of a simple differential pair circuit. The current sink sends a fixed current I through the differential pair. If the two inputs are equal, the current is split equally between the two branches. Otherwise, the branch with the higher input voltage gets most of the current.

The diagram below shows the locations of differential amps, voltage references, mixers, and current mirrors. As you can see, these circuits are extensively used in the TDA7000.

The die with key circuits labeled.

The die with key circuits labeled.

Tips on tracing out circuitry

Over the years, I've found various techniques helpful for tracing out the circuitry in an IC. In this section, I'll describe some of those techniques.

First, take a look at the datasheet if available. In the case of the TDA7000, the datasheet and application note provide a detailed block diagram and a description of the functionality.21 Sometimes datasheets include a schematic of the chip, but don't be too trusting: datasheet schematics are often simplified. Moreover, different manufacturers may use wildly different implementations for the same part number. Patents can also be helpful, but they may be significantly different from the product.

Mapping the pinout in the datasheet to the pads on the die will make reverse engineering much easier. The power and ground pads are usually distinctive, with thick traces that go to all parts of the chip, as shown in the photo below. Once you have identified the power and ground pads, you can assign the other pads in sequence from the datasheet. Make sure that these pad assignments make sense. For instance, the TDA7000 datasheet shows special circuitry between pads 5 and 6 and between pads 13 and 14; the corresponding tuning diodes and RF transistors are visible on the die. In most chips, you can distinguish output pins by the large driver transistors next to the pad, but this turns out not to help with the TDA7000. Finally, note that chips sometimes have test pads that don't show up in the datasheet. For instance, the TDA7000 has a test pad, shown below; you can tell that it is a test pad because it doesn't have a bond wire.

Ground, power, and test pads in the TDA7000.

Ground, power, and test pads in the TDA7000.

Once I've determined the power and ground pads, I trace out all the power and ground connections on the die. This makes it much easier to understand the circuits and also avoids the annoyance of following a highly-used signal around the chip only to discover that it is simply ground. Note that NPN transistors will have many collectors connected to power and emitters connected to ground, perhaps through resistors. If you find the opposite situation, you probably have power and ground reversed.

For a small chip, a sheet of paper works fine for sketching out the transistors and their connections. But with a larger chip, I find that more structure is necessary to avoid getting mixed up in a maze of twisty little wires, all alike. My solution is to number each component and color each wire as I trace it out, as shown below. I use the program KiCad to draw the schematic, using the same transistor numbering. (The big advantage of KiCad over paper is that I can move circuits around to get a nicer layout.)

This image shows how I color the wires and number the components as I work on it. I use GIMP for drawing on the die, but any drawing program should work fine.

This image shows how I color the wires and number the components as I work on it. I use GIMP for drawing on the die, but any drawing program should work fine.

It works better to trace out the circuitry one area at a time, rather than chasing signals all over the chip. Chips are usually designed with locality, so try to avoid following signals for long distances until you've finished up one block. A transistor circuit normally needs to be connected to power (if you follow the collectors) and ground (if you follow the emitters).11 Completing the circuit between power and ground is more likely to give you a useful functional block than randomly tracing out a chain of transistors. (In other words, follow the bases last.)

Finally, I find that a circuit simulator such as LTspice is handy when trying to understand the behavior of mysterious transistor circuits. I'll often whip up a simulation of a small sub-circuit if its behavior is unclear.

How FM radio and the TDA7000 work

Before I explain how the TDA7000 chip works, I'll give some background on FM (Frequency Modulation). Suppose you're listening to a rock song on 97.3 FM. The number means that the radio station is transmitting at a carrier frequency of 97.3 megahertz. The signal, perhaps a Beyoncé song, is encoded by slightly varying the frequency, increasing the frequency when the signal is positive and decreasing the frequency when the signal is negative. The diagram below illustrates frequency modulation; the input signal (red) modulates the output. Keep in mind that the modulation is highly exaggerated in the diagram; the modulation would be invisible in an accurate diagram since a radio broadcast changes the frequency by at most ±75 kHz, less than 0.1% of the carrier frequency.

A diagram showing how a signal (red) modulates the carrier (green), yielding the frequency-modulated output (blue). Created by Gregors, CC BY-SA 2.0.

A diagram showing how a signal (red) modulates the carrier (green), yielding the frequency-modulated output (blue). Created by Gregors, CC BY-SA 2.0.

FM radio's historical competitor is AM (Amplitude Modulation), which varies the height of the signal (the amplitude) rather than the frequency.12 One advantage of FM is that it is more resistant to noise than AM; an event such as lightning will interfere with the signal amplitude but will not change the frequency. Moreover, FM radio provides stereo, while AM radio is mono, but this is due to the implementation of radio stations, not a fundamental characteristic of FM versus AM. (The TDA7000 chip doesn't implement stereo.13) Due to various factors, FM stations require more bandwidth than AM, so FM stations are spaced 200 kHz apart while AM stations are just 10 kHz apart.

An FM receiver such as the TDA7000 must demodulate the radio signal to recover the transmitted audio, converting the changing frequency into a changing signal level. FM is more difficult to demodulate than AM, which can literally be done with a piece of rock: lead sulfide in a crystal detector. There are several ways to implement an FM demodulator; this chip uses a technique called a quadrature detector. The key to a quadrature detector is a circuit that shifts the phase, with the amount of phase shift depending on the frequency. The detector shifts the signal by approximately 90º, multiplies it by the original signal, and then smooths it out with a low-pass filter. If you do this with a sine wave and a 90º phase shift, the result turns out to be 0. But since the phase shift depends on the frequency, a higher frequency gets shifted by more than 90º while a lower frequency gets shifted by less than 90º. The final result turns out to be approximately linear with the frequency, positive for higher frequencies and negative for lower frequencies. Thus, the FM signal is converted into the desired audio signal.

Like most radios, the TDA7000 uses a technique called superheterodyning that was invented around 1917. The problem is that FM radio stations use frequencies from 88.0 MHz to 108.0 MHz. These frequencies are too high to conveniently handle on a chip. Moreover, it is difficult to design a system that can process a wide range of frequencies. The solution is to shift the desired radio station's signal to a frequency that is fixed and much lower. This frequency is called the intermediate frequency. Although FM radios commonly use an intermediate frequency of 10.7 MHz, this was still too high for the TDA7000, so the designers used an intermediate frequency of just 70 kilohertz. This frequency shift is accomplished through superheterodyning.

For example, suppose you want to listen to the radio station at 97.3 MHz. When you tune to this station, you are actually tuning the local oscillator to a frequency that is 70 kHz lower, 97.23 MHz in this case. The local oscillator signal and the radio signal are mixed by multiplying them. If you multiply two sine waves, you get one sine wave at the difference of the frequencies and another sine wave at the sum of the frequencies. In this case, the two signals are at 70 kHz and 194.53 MHz. A low-pass filter (the IF filter) discards everything above 70 kHz, leaving just the desired radio station, now at a fixed and conveniently low frequency. The rest of the radio can then be optimized to work at 70 kHz.

The Gilbert cell multiplier

But how do you multiply two signals? This is accomplished with a circuit called a Gilbert cell.14 This circuit takes two differential inputs, multiplies them, and produces a differential output. The Gilbert cell is a bit tricky to understand,15 but you can think of it as a stack of differential amplifiers, with the current directed along one of four paths, depending on which transistors turn on. For instance, if the A and B inputs are both positive, current will flow through the leftmost transistor, labeled "pos×pos". Likewise, if the A and B inputs are both negative, current flows through the rightmost transistor, labeled "neg×neg". The outputs from both transistors are connected, so both cases produce a positive output. Conversely, if one input is positive and the other is negative, current flows through one of the middle transistors, producing a negative output. Since the multiplier handles all four cases of positive and negative inputs, it is called a "four-quadrant" multiplier.

Schematic of a Gilbert cell.

Schematic of a Gilbert cell.

Although the Gilbert cell is an uncommon circuit in general, the TDA7000 uses it in multiple places. The first mixer implements the superheterodyning. A second mixer provides the FM demodulation, multiplying signals in the quadrature detector described earlier. The TDA7000 also uses a mixer for its correlator, which determines if the chip is tuned to a station or not.16 Finally, a Gilbert cell switches the audio off when the radio is not properly tuned. On the die, the Gilbert cell has a nice symmetry that reflects the schematic.

This is the Gilbert cell for the first mixer. It has capacitors on either side.

This is the Gilbert cell for the first mixer. It has capacitors on either side.

The voltage-controlled oscillator

One of the trickiest parts of the TDA7000 design is how it manages to use an intermediate frequency of just 70 kilohertz. The problem is that broadcast FM has a "modulation frequency deviation" of 75 kHz, which means that the broadcast frequency varies by up to ±75 kHz. The mixer shifts the broadcast frequency down to 70 kHz, but the shifted frequency will vary by the same amount as the received signal. How can you have a 70 kilohertz signal that varies by 75 kilohertz? What happens when the frequency goes negative?

The solution is that the local oscillator frequency (i.e., the frequency that the radio is tuned to) is continuously modified to track the variation in the broadcast frequency. Specifically, a change in the received frequency causes the local oscillator frequency to change, but only by 80% as much. For instance, if the received frequency decreases by 5 hertz, the local oscillator frequency is decreased by 4 hertz. Recall that the intermediate frequency is the difference between the two frequencies, generated by the mixer, so the intermediate frequency will decrease by just 1 hertz, not 5 hertz. The result is that as the broadcast frequency changes by ±75 kHz, the local oscillator frequency changes by just ±15 kHz, so it never goes negative.

How does the radio constantly adjust the frequency? The fundamental idea of FM is that the frequency shift corresponds to the output audio signal. Since the output signal tracks the frequency change, the output signal can be used to modify the local oscillator's frequency, using a voltage-controlled oscillator.17 Specifically, the circuit uses special "varicap" diodes that vary their capacitance based on the voltage that is applied. As described earlier, the thickness of a diode's "depletion region" depends on the voltage applied, so the diode's capacitance will vary with voltage. It's not a great capacitor, but it is good enough to adjust the frequency.

The varicap diodes allow the local oscillator frequency to be adjusted.

The varicap diodes allow the local oscillator frequency to be adjusted.

The image above shows how these diodes appear on the die. The diodes are relatively large and located between two bond pads. The two diodes have interdigitated "fingers"; this increases the capacitance as described earlier with the "comb capacitor". The slightly grayish "background" region is the P-type silicon, with a silicon control line extending to the right. (Changing the voltage on this line changes the capacitance.) Regions of N-type silicon are underneath the metal fingers, forming the PN junctions of the diodes.

Keep in mind that most of the radio tuning is performed with a variable capacitor that is external to the chip and adjusts the frequency from 88 MHz to 108 MHz. The capacitance of the diodes provides the much smaller adjustment of ±60 kHz. Thus, the diodes only need to provide a small capacitance shift.

The VCO and diodes will also adjust the frequency to lock onto the station if the tuning is off by a moderate amount, say, 100 kHz. However, if the tuning is off by a large amount, say, 200 kHz, the FM detector has a "sideband" and the VCO can erroneously lock onto this sideband. This is a problem because the sideband is weak and nonlinear so reception will be bad and will have harmonic distortion. To avoid this problem, the correlator will detect that the tuning is too far off (i.e. the local oscillator is way off from 70 kHz) and will replace the audio with white noise. Thus, the user will realize that they aren't on the station and adjust the tuning, rather than listening to distorted audio and blaming the radio.

Noise source

Where does the radio get the noise signal to replace distorted audio? The noise is generated from the circuit below, which uses the thermal noise from diodes, amplified by a differential amplifier. Specifically, each side of the differential amplifier is connected to two transistors that are wired as diodes (using the base-emitter junction). Random thermal fluctuations in the transistors will produce small voltage changes on either side of the amplifier. The amplifier boosts these fluctuations, creating the white noise output.

The circuit to generate white noise.

The circuit to generate white noise.

Layout tricks and unusual transistors

Because this chip has just one layer of metal, the designers had to go to considerable effort to connect all the components without wires crossing. One common technique to make routing easier is to separate a transistor's emitter, collector, and base, allowing wires to pass over the transistor. The transistor below is an example. Note that the collector, base, and emitter have been stretched apart, allowing one wire to pass between the collector and the base, while two more pass between the base and the emitter. Moreover, the transistor layout is flexible: this one has the base in the middle, while many others have the emitter in the middle. (Putting the collector in the middle won't work since the base needs to be next to the emitter.)

A transistor with gaps between the collector, base, and emitter.

A transistor with gaps between the collector, base, and emitter.

The die photo below illustrates a few more routing tricks. This photo shows one collector, three emitters, and four bases, but there are three transistors. How does that work? First, these three transistors are in the same isolation region, so they share the same "tub" of N-silicon. If you look back at the cross-section of an NPN transistor, you'll see that this tub is connected to the collector contact. Thus, all three transistors share the same collector.18 Next, the two bases on the left are connected to the same gray P-silicon. Thus, the two base contacts are connected and function as a single base. In other words, this is a trick to connect the two base wires together through the silicon, passing under the four other metal wires in the way. Finally, the two transistors on the right have the emitter and base slightly separated so a wire can pass between them. When reverse-engineering a chip, be on the lookout for unusual transistor layouts such as these.

Three transistors with an unusual layout.

Three transistors with an unusual layout.

When all else failed, the designers could use a "cross-under" to let a wire pass under other wires. The cross-under is essentially a resistor with a relatively low resistance, formed from N-type silicon (pink in the die photo below). Because silicon has much higher resistance than metal, cross-unders are avoided unless necessary. I see just two cross-unders in the TDA7000.

A cross-under in the TDA7000.

A cross-under in the TDA7000.

The circuit that caused me the most difficulty is the noise generator below. The transistor highlighted in red below looks straightforward: a resistor is connected to the collector, which is connected to the base. However, the transistor turned out to be completely different: the collector (red arrow) is on the other side of the circuit and this collector is shared with five other transistors. The structure that I thought was the collector is simply the contact at the end of the resistor, connected to the base.

The transistors in the noise generator, with a tricky transistor highlighted.

The transistors in the noise generator, with a tricky transistor highlighted.

Conclusions

The TDA7000 almost didn't become a product. It was invented in 1977 by two engineers at the Philips research labs in the Netherlands. Although Philips was an innovative consumer electronics company in the 1970s, the Philips radio group wasn't interested in an FM radio chip. However, a rogue factory manager built a few radios with the chips and sent them to Japanese companies. The Japanese companies loved the chip and ordered a million of them, convincing Philips to sell the chips.

The TDA7000 became a product in 1983—six years after its creation—and reportedly more than 5 billion have now been sold.19 Among other things, the chip allowed an FM radio to be built into a wristwatch, with the headphone serving as an antenna. Since the TDA7000 vastly simplified the construction of a radio, the chip was also popular with electronics hobbyists. Hobbyist magazines provided plans and the chip could be obtained from Radio Shack.20

A wristwatch using the TDA7010T, the Small Outline package version of the TDA7000.
From FM receivers for mono and stereo on a single chip, Philips Technical Review.

A wristwatch using the TDA7010T, the Small Outline package version of the TDA7000. From FM receivers for mono and stereo on a single chip, Philips Technical Review.

Why reverse engineer a chip such as the TDA7000? In this case, I was answering some questions for the IEEE microchips exhibit, but even when reverse engineering isn't particularly useful, I enjoy discovering the logic behind the mysterious patterns on the die. Moreover, the TDA7000 is a nice chip for reverse engineering because it has large features that are easy to follow, but it also has many different circuits. Since the chip has over 100 transistors, you might want to start with a simpler chip, but the TDA7000 is a good exercise if you want to increase your reverse-engineering skills. If you want to check your results, my schematic of the TDA7000 is here; I don't guarantee 100% accuracy :-) In any case, I hope you have enjoyed this look at reverse engineering.

Follow me on Bluesky (@righto.com), Mastodon (@[email protected]), or RSS. (I've given up on Twitter.) Thanks to Daniel Mitchell for asking me about the TDA7000 and providing the die photo; be sure to check out the IEEE Chip Hall of Fame's TDA7000 article.

Notes and references

  1. The first "radio-on-a-chip" was probably the Ferranti ZN414 from 1973, which implemented an AM radio. An AM radio receiver is much simpler than an FM receiver (you really just need a diode), explaining why the AM radio ZN414 was a decade earlier than the FM radio TDA7000. As a 1973 article stated, "There are so few transistors in most AM radios that set manufacturers see little profit in developing new designs around integrated circuits merely to shave already low semiconductor costs." The ZN414 has just three pins and comes in a plastic package resembling a transistor. The ZN414 contains only 10 transistors, compared to about 132 in the TDA7000. 

  2. The transistors are isolated by the P+ band that surrounds them. Because this band is tied to ground, it is at a lower voltage than the neighboring N regions. As a result, the PN border between transistor regions acts as a reverse-biased diode PN junction and current can't flow. (For current to flow, the P region must be positive and the N region must be negative.)

    The invention of this isolation technique was a key step in making integrated circuits practical. In earlier integrated circuits, the regions were physically separated and the gaps were filled with non-conductive epoxy. This manufacturing process was both difficult and unreliable. 

  3. NPN transistors perform better than PNP transistors due to semiconductor physics. Specifically, current in NPN transistors is primarily carried by electrons, while current in PNP transistors is primarily carried by "holes", the positively-charged absence of an electron. It turns out that electrons travel better in silicon than holes—their "mobility" is higher.

    Moreover, the lateral construction of a PNP transistor results in a worse transistor than the vertical construction of an NPN transistor. Why can't you just swap the P and N domains to make a vertical PNP transistor? The problem is that the doping elements aren't interchangeable: boron is used to create P-type silicon, but it diffuses too rapidly and isn't soluble enough in silicon to make a good vertical PNP transistor. (See page 280 of The Art of Analog Layout for details). Thus, ICs are designed to use NPN transistors instead of PNP transistors as much as possible. 

  4. The resistance of a silicon resistor is proportional to its length divided by its width. (This makes sense since increasing the length is like putting resistors in series, while increasing the width is like putting resistors in parallel.) When you divide length by width, the units cancel out, so the resistance of silicon is described with the curious unit ohms per square (Ω/□). (If a resistor is 5 mm long and 1 mm wide, you can think of it as five squares in a chain; the same if it is 5 µm by 1 µm. It has the same resistance in both cases.)

    A few resistances are mentioned on the TDA7000 schematic in the datasheet. By measuring the corresponding resistors on the die, I calculate that the resistance on the die is about 200 ohms per square (Ω/□). 

  5. See The Art of Analog Layout page 197 for more information on junction capacitors. 

  6. You might wonder about the names "emitter" and "collector"; it seems backward that current flows from the collector to the emitter. The reason is that in an NPN transistor, the emitter emits electrons, they flow to the collector, and the collector collects them. The confusion arises because Benjamin Franklin arbitrarily stated that current flows from positive to negative. Unfortunately this "conventional current" flows in the opposite direction from the actual electrons. On the other hand, a PNP transistor uses holes—the absence of electrons—to transmit current. Positively-charged holes flow from the PNP transistor's emitter to the collector, so the flow of charge carriers matches the "conventional current" and the names "emitter" and "collector" make more sense. 

  7. The basic current mirror circuit isn't always accurate enough. The TDA7000's current mirrors improve the accuracy by adding emitter degeneration resistors. Other chips use additional transistors for accuracy; some circuits are here

  8. The reference voltages are produced with versions of the circuit below, with the output voltage controlled by the resistor values. In more detail, the bottom transistor is wired as a diode, providing a voltage drop of 0.6V. Since the upper transistor acts as an emitter follower, its base "should" be at 1.2V. The resistors form a feedback loop with the base: the current (I) will adjust until the voltage drop across R1 yields a base voltage of 1.2V. The fixed current (I) through the circuit produces a voltage drop across R1 and R2, determining the output voltage. (This circuit isn't a voltage regulator; it assumes that the supply voltage is stable.)

    The voltage reference circuit.

    The voltage reference circuit.

    Note that this circuit will produce a reference voltage between 0.6V and 1.2V. Without the lower transistor, the voltage would be below 0.6V, which is too low for the current sink circuit. A closer examination of the circuit shows that the output voltage depends on the ratio between the resistances, not the absolute resistances. This is beneficial since, as explained earlier, resistors on integrated circuits have inaccurate absolute resistances, but the ratios are much more constant. 

  9. Differential pairs are also called long-tailed pairs. According to Analysis and Design of Analog Integrated Circuits, differential pairs are "perhaps the most widely used two-transistor subcircuits in monolithic analog circuits." (p214)

    Note that the transistors in the differential pair act like an emitter follower controlled by the higher input. That is, the emitters will be 0.6 volts below the higher base voltage. This is important since it shuts off the transistor with the lower base. (For example, if you put 2.1 volts in one base and 2.0 volts in the other base, you might expect that the base voltages would turn both transistors on. But the emitters are forced to 1.5 volts (2.1 - 0.6). The base-emitter voltage of the second transistor is now 0.5 volts (2.0 - 1.5), which is not enough to turn the transistor on.) 

  10. Filters are very important to the TDA7000 and these filters are implemented by op-amps. If you want details, take a look at the application note, which describes the "second-order low-pass Sallen-Key" filter, first-order high-pass filter, active all-pass filter, and other filters. 

  11. Most transistor circuits connect (eventually) to power and ground. One exception is open-collector outputs or other circuits with a pull-up resistor outside the chip. 

  12. Nowadays, satellite radio such as SiriusXM provides another competitor to FM radio. SiriusXM uses QPSK (Quadrature Phase-Shift Keying), which encodes a digital signal by encoding pairs of bits using one of four different phase shifts. 

  13. FM stereo is broadcast in a clever way that allows it to be backward-compatible with mono FM receivers. Specifically, the mono signal consists of the sum of the left and right channels, so you hear both channels combined. For stereo, the difference between the channels is also transmitted: the left channel minus the right channel. Adding this to the mono signal gives you the desired left channel, while subtracting this from the mono signal gives you the desired right channel. This stereo signal is shifted up in frequency using a somewhat tricky modulation scheme, occupying the audio frequency range from 23 kHz to 53 kHz, while the mono signal occupies the range 0 kHz to 15 kHz. (Note: these channels are combined to make an audio-frequency signal before the frequency modulation.) A mono FM receiver uses a low-pass filter to strip out the stereo signal so you hear the mono channel, while a stereo FM receiver has the circuitry to shift the stereo signal down and then add or subtract it. A later chip, the TDA7021T, supported a stereo signal, although it required a separate stereo decoder chip (TDA7040T)to generate the left and right channels. 

  14. A while ago, I wrote about the Rockwell RC4200 analog multiplier chip. It uses a completely different technique from the Gilbert cell, essentially adding logarithms to perform multiplication. 

  15. For a detailed explanation of the Gilbert cell, see Gilbert cell mixers

  16. The TDA7000's correlator determines if the radio is correctly tuned or not. The idea is to multiply the signal by the signal delayed by half a cycle (180º) and inverted. If the signal is valid, the two signals match, giving a uniformly positive product. But if the frequency is off, the delay will be off, the signals won't match, and the product will be lower. Likewise, if the signal is full of noise, the signals won't match.

    If the radio is mistuned, the audio is muted: the correlator provides the mute control signal. Specifically, when tuned properly, you hear the audio output, but when not tuned, the audio is replaced with a white noise signal, providing an indication that the tuning is wrong. The muting is accomplished with a Gilbert cell, but in a slightly unusual way. Instead of using differential inputs, the output audio is fed into one input branch and a white noise signal is fed into the other input branch. The mute control signal is fed into the upper transistors, selecting either the audio or the white noise. You can think of it as multiplying by +1 to get the audio and multiplying by -1 to get the noise. 

  17. The circuit to track the frequency is called a Frequency-Locked Loop; it is analogous to a Phase-Locked Loop, except that the phase is not tracked. 

  18. Some chips genuinely have transistors with multiple collectors, typically PNP transistors in current mirrors to produce multiple currents. Often these collectors have different sizes to generate different currents. NPN transistors with multiple emitters are used in TTL logic gates, while NPN transistors with multiple collectors are used in Integrated Injection Logic, a short-lived logic family from the 1970s. 

  19. The history of the TDA7000 is based on the IEEE Spectrum article Chip Hall of Fame: Philips TDA7000 FM Receiver. Although the article claims that "more than 5 billion TDA7000s and variants have been sold", I'm a bit skeptical since that is more than the world's population at the time. Moreover, this detailed page on the TDA7000 states that the TDA7000 "found its way into a very few commercially made products". 

  20. The TDA7000 was sold at stores such as Radio Shack; the listing below is from the 1988 catalog.

    The TDA7000 was listed in the 1988 Radio Shack Catalog.

    The TDA7000 was listed in the 1988 Radio Shack Catalog.


  21. The TDA7000 is well documented, including the datasheet, application note, a technical review, an article, and Netherlands and US patents.

    The die photo is from IEEE Microchips that Shook the World and the history is from IEEE Chip Hall of Fame: Philips TDA7000 FM Receiver. The Cool386 page on the TDA7000 has collected a large amount of information and is a useful resource.

    The application note has a detailed block diagram, which makes reverse engineering easier:

    Block diagram of the TDA7000 with external components. From the TDA7000 application note 192

    Block diagram of the TDA7000 with external components. From the TDA7000 application note 192

    If you're interested in analog chips, I highly recommend the book Designing Analog Chips, written by Hans Camenzind, the inventor of the famous 555 timer. The free PDF is here or get the book.


Reverse engineering the mysterious Up-Data Link Test Set from Apollo

Back in 2021, a collector friend of ours was visiting a dusty warehouse in search of Apollo-era communications equipment. A box with NASA-style lights caught his eye—the "AGC Confirm" light suggested a connection with the Apollo Guidance Computer. Disappointingly, the box was just an empty chassis and the circuit boards were all missing. He continued to poke around the warehouse when, to his surprise, he found a bag on the other side of the warehouse that contained the missing boards! After reuniting the box with its wayward circuit cards, he brought it to us: could we make this undocumented unit work?

The Up-Data Link Confidence Test Set, powered up.

The Up-Data Link Confidence Test Set, powered up.

A label on the back indicated that it is an "Up-Data Link Confidence Test Set", built by Motorola. As the name suggests, the box was designed to test Apollo's Up-Data Link (UDL), a system that allowed digital commands to be sent up to the spacecraft. As I'll explain in detail below, these commands allowed ground stations to switch spacecraft circuits on or off, interact with the Apollo Guidance Computer, or set the spacecraft's clock. The Up-Data Link needed to be tested on the ground to ensure that its functions operated correctly. Generating the test signals for the Up-Data Link and verifying its outputs was the responsibility of the Up-Data Link Confidence Test Set (which I'll call the Test Set for short)

The Test Set illustrates how, before integrated circuits, complicated devices could be constructed from thumb-sized encapsulated modules. Since I couldn't uncover any documentation on these modules, I had to reverse-engineer them, discovering that different modules implemented everything from flip-flops and logic gates to opto-isolators and analog circuits. With the help of a Lumafield 3-dimensional X-ray scanner, we looked inside the modules and examined the discrete transistors, resistors, diodes, and other components mounted inside.

Four of the 13-pin Motorola modules. These implement logic gates (2/2G & 2/1G), lamp drivers (LD), more logic gates (2P/3G), and a flip-flop (LP FF). The modules have 13 staggered pins, ensuring that they can't be plugged in backward.

Four of the 13-pin Motorola modules. These implement logic gates (2/2G & 2/1G), lamp drivers (LD), more logic gates (2P/3G), and a flip-flop (LP FF). The modules have 13 staggered pins, ensuring that they can't be plugged in backward.

Reverse-engineering this system—from the undocumented modules to the mess of wiring—was a challenge. Mike found one NASA document that mentioned the Test Set, but the document was remarkably uninformative.1 Moreover, key components of the box were missing, probably removed for salvage years ago. In this article, I'll describe how we learned the system's functionality, uncovered the secrets of the encapsulated modules, built a system to automatically trace the wiring, and used the UDL Test Set in a large-scale re-creation of the Apollo communications system.

The Apollo Up-Data Link

Before describing the Up-Data Link Test Set, I'll explain the Up-Data Link (UDL) itself. The Up-Data Link provided a mechanism for the Apollo spacecraft to receive digital commands from ground stations. These commands allowed ground stations to control the Apollo Guidance Computer, turn equipment on or off, or update the spacecraft's clock. Physically, the Up-Data Link is a light blue metal box with an irregular L shape, weighing almost 20 pounds.

The Up-Data Link box.

The Up-Data Link box.

The Apollo Command Module was crammed with boxes of electronics, from communication and navigation to power and sequencing. The Up-Data Link was mounted above the AC power inverters, below the Apollo Guidance Computer, and to the left of the waste management system and urine bags.

The lower equipment bay of the Apollo Command Module. The Up-Data Link is highlighted in yellow. Click this image (or any other) for a larger version. From Command/Service Module Systems Handbook p212.

The lower equipment bay of the Apollo Command Module. The Up-Data Link is highlighted in yellow. Click this image (or any other) for a larger version. From Command/Service Module Systems Handbook p212.

Up-Data Link Messages

The Up-Data Link supported four types of messages:

  • Mission Control had direct access to the Apollo Guidance Computer (AGC) through the UDL, controlling the computer, keypress by keypress. That is, each message caused the UDL to simulate a keypress on the Display/Keyboard (DSKY), the astronaut's interface to the computer.

  • The spacecraft had a clock, called the Central Timing Equipment or CTE, that tracked the elapsed time of the mission, from days to seconds. A CTE message could set the clock to a specified time.

  • A system called Real Time Control (RTC) allowed the UDL to turn relays on or off, so some spacecraft systems to be controlled from the ground.2 These 32 relays, mounted inside the Up-Data Link box, could do everything from illuminating an Abort light—indicating that Mission Control says to abort—to controlling the data tape recorder or the S-band radio.

  • Finally, the UDL supported two test messages to "exercise all process, transfer and program control logic" in the UDL.

The diagram below shows the format of messages to the Up-Data Link. Each message consisted of 12 to 30 bits, depending on the message type. The first three bits, the Vehicle Address, selected which spacecraft should receive the message. (This allowed messages to be directed to the Saturn V booster, the Command Module, or the Lunar Module.3) Next, three System Address bits specified the spacecraft system to receive the message, corresponding to the four message types above. The remaining bits supplied the message text.

Format of the messages to the Up-Data Link. From Telecommunication Systems Study Guide.
Note that the vehicle access code uses a different sub-bit pattern from the rest of the message.
This diagram shows an earlier sub-bit encoding, not the encoding used by the Test Set.

Format of the messages to the Up-Data Link. From Telecommunication Systems Study Guide. Note that the vehicle access code uses a different sub-bit pattern from the rest of the message. This diagram shows an earlier sub-bit encoding, not the encoding used by the Test Set.

The contents of the message text depended on the message type. A Real Time Control (RTC) message had a six-bit value specifying the relay number as well as whether it should be turned off or on. An Apollo Guidance Computer (AGC) message had a five-bit value specifying a key on the Display/Keyboard (DSKY). For reliability, the message was encoded in 16 bits: the message, the message inverted, the message again, and a padding bit; any mismatching bits would trigger an error. A CTE message set the clock using four 6-bit values indicating seconds, minutes, hours, and days. The UDL processed the message by resetting the clock and then advancing the time by issuing the specified number of pulses to the CTE to advance the seconds, minutes, hours, and days. (This is similar to setting a digital alarm clock by advancing the digits one at a time.) Finally, the two self test messages consisted of 24-bit patterns that would exercise the UDL's internal circuitry. The results of the test were sent back to Earth via Apollo's telemetry system.

For reliability, each bit transmitted to the UDL was replaced by five "sub-bits": each "1" bit was replaced with the sub-bit sequence "01011", and each "0" bit was replaced with the complement, "10100".4 The purpose of the sub-bits was that any corrupted data would result in an invalid sub-bit code so corrupted messages could be rejected. The Up-Data Link performed this validation by matching the input data stream against "01011" or "10100". (The vehicle address at the start of a message used a different sub-bit code, ensuring that the start of the message was properly identified.) By modern standards, sub-bits are an inefficient way of providing redundancy, since the message becomes five times larger. As a consequence, the effective transmission rate was low: 200 bits per second.

There was no security in the Up-Data Link messages, apart from the need for a large transmitter. Of the systems on Apollo, only the rocket destruct system—euphemistically called the Propellant Dispersion System—was cryptographically secure.5

Since the Apollo radio system was analog, the digital sub-bits couldn't be transmitted from ground to space directly. Instead, a technique called phase-shift keying (PSK) converted the data into an audio signal. This audio signal consists of a sine wave that is inverted to indicate a 0 bit versus a 1 bit; in other words, its phase is shifted by 180 degrees for a 0 bit. The Up-Data Link box takes this audio signal as input and demodulates it to extract the digital message data. (Transmitting this audio signal from ground to the Up-Data Link required more steps that aren't relevant to the Test Set, so I'll describe them in a footnote.6)

The Up-Data Link Test Set

Now that I've explained the Up-Data Link, I can describe the Test Set in more detail. The purpose of the UDL Test Set is to test the Up-Data Link system. It sends a message—as an audio signal—to the Up-Data Link box, implementing the message formatting, sub-bit encoding, and phase shift keying described above. Then it verifies the outputs from the UDL to ensure that the UDL performed the correct action.

Perhaps the most visible feature of the Test Set is the paper tape reader on the front panel: this reader is how the Test Set obtains messages to transmit. Messages are punched onto strips of paper tape, encoded as a sequence of 13 octal digits.7 After a message is read from paper tape, it is shown on the 13-digit display. The first three digits are an arbitrary message number, while the remaining 10 octal digits denote the 30-bit message to send to the UDL. Based on the type of message, specified by the System Address digit, the Test Set validates the UDL's response and indicates success or errors on the panel lights.

I created the block diagram below to explain the architecture and construction of the Test Set (click for a larger view). The system has 25 circuit boards, labeled A1 through A25;8 for the most part, they correspond to functional blocks in the diagram.

My block diagram of the Up-Data Link Test Set. (Click for a larger image.)

My block diagram of the Up-Data Link Test Set. (Click for a larger image.)

The Test Set's front panel is dominated by its display of 13 large digits. It turns out that the storage of these digits is the heart of the Test Set. This storage (A3-A9) assembles the digits as they are read from the paper tape, circulates the bits for transmission, and provides digits to the other circuits to select the message type and validate the results. To accomplish this, the 13 digit circuits are configured as a 39-bit shift register. As the message is read from the paper tape, its bits are shifted into the digit storage, right to left, and the message is shown on the display. To send the message, the shift register is reconfigured so the 10 digits form a loop, excluding the message number. As the bits cycle through the loop, the leftmost bit is encoded and transmitted. At the end of the transmission, the digits have cycled back to their original positions, so the message can be transmitted again if desired. Thus, the shift-register mechanism both deserializes the message when it is read and serializes the message for transmission.

The Test Set uses three boards (A15, A2, and A1) to expand the message with sub-bits and to encode the message into audio. The first board converts each bit into five sub-bits. The second board applies phase-shift keying (PSK) modulation, and the third board has filters to produce clean sine waves from the digital signals.

On the input side, the Test Set receives signals from the Up-Data Link (UDL) box through round military-style connectors. These input signals are buffered by boards A25, A22, A23, A10, and A24. Board 15 verifies the input sub-bits by comparing them with the transmitted sub-bits. For an AGC message, the computer signals are verified by board A14. The timing (CTE) signals are verified by boards A20 and A21. The UDL status (validity) signals are processed by board A12. Board A11 implements a switching power supply to power the interface boards.

You can see from the block diagram that the Test Set is complex and implements multiple functions. On the other hand, the block diagram also shows that it takes a lot of 1960s circuitry to implement anything. For instance, one board can only handle two digits, so the digit display alone requires seven boards. Another example is the inputs, requiring a full board for two or three input bits.

Encapsulated modules

The box is built from modules that are somewhat like integrated circuits but contain discrete components. Modules like these were used in the early 1960s before ICs caught on. Each module implements a simple function such as a flip-flop or buffer. They were more convenient than individual components, since a module provided a ready-made function. They were also compact, since the components were tightly packaged inside the module.

Physically, each module has 13 pins: a row of 7 on one side and a row of 6 offset on the other side. This arrangement ensures that a module cannot be plugged in backward.

A Motorola "LP FF" module. This module implements a J-K flip-flop. "LP" could indicate low performance, low power, or low propagation; the system also uses "HP FF" modules, which could be high performance.

A Motorola "LP FF" module. This module implements a J-K flip-flop. "LP" could indicate low performance, low power, or low propagation; the system also uses "HP FF" modules, which could be high performance.

Reverse engineering these modules was difficult since they were encapsulated in plastic and the components were inaccessible. The text printed on each module hinted at its function. For example, the J-K flip-flop module above is labeled "LP FF". The "2/2G & 2/1G" module turned out to contain two NAND gates and two inverters (the 2G and 1G gates). A "2P/3G" module contains two pull-up resistors and two three-input NAND gates. Other modules provided special-purpose analog functions for the PSK modulation.

I reverse-engineered the functions of the modules by applying signals and observing the results. Conveniently, the pins are on 0.200" spacing so I could plug modules into a standard breadboard. The functions of the logic modules were generally straightforward to determine. The analog modules were more difficult; for instance, the "-3.9V" module contains a -3.9-volt Zener diode, six resistors, and three capacitors in complicated arrangements.

To determine how the modules are constructed internally, we had a module X-rayed by John McMaster and another module X-rayed in three dimensions by Lumafield. The X-rays revealed that modules were built with "cordwood construction", a common technique in the 1960s. That is, cylindrical components were mounted between two boards, stacked parallel similar to a pile of wood logs. Instead of using printed-circuit boards, the leads of the components were welded to metal strips to provide the interconnections.

A 3-D scan of the module showing the circuitry inside the compact package, courtesy of Lumafield. Two transistors are visible near the center.

A 3-D scan of the module showing the circuitry inside the compact package, courtesy of Lumafield. Two transistors are visible near the center.

For more information on these modules, see my articles Reverse-engineering a 1960s cordwood flip-flop module with X-ray CT scans and X-ray reverse-engineering a hybrid module. You can interact with the scan here.

The boards

In this section, I'll describe some of the circuit boards and point out their interesting features. A typical board has up to 15 modules, arranged as five rows of three. The modules are carefully spaced so that two boards can be meshed with the components on one board fitting into the gaps on the other board. Thus, a pair of boards forms a dense block.

This photo shows how the modules of the two circuit boards are arranged so the boards can be packed together tightly.

This photo shows how the modules of the two circuit boards are arranged so the boards can be packed together tightly.

Each pair of boards is attached to side rails and a mounting bracket, forming a unit.8 The bracket has ejectors to remove the board unit, since the backplane connectors grip the boards tightly. Finally, each bracket is labeled with the board numbers, the test point numbers, and the Motorola logo. The complexity of this mechanical assembly suggests that Motorola had developed an integrated prototyping system around the circuit modules, prior to the Test Set.

Digit driver boards

The photo below shows a typical board, the digit driver board. At the left, a 47-pin plug provides the connection between the board and the Test Set's backplane. At the right, 15 test connections allow the board to be probed and tested while it is installed. The board itself is a two-sided printed circuit board with gold plating. Boards are powered with +6V, -6V, and ground; the two red capacitors in the lower left filter the two voltages.

Boards A4 through A9 are identical digit driver boards.

Boards A4 through A9 are identical digit driver boards.

The digit driver is the most common board in the system, appearing six times.9 Each board stores two octal digits in a shift register and drives two digit displays on the front panel. Since the digits are octal, each digit requires three bits of storage, implemented with three flip-flop modules connected as a shift register. If you look closely, you can spot the six flip-flop modules, labeled "LP FF".

The digits are displayed through an unusual technology: an edge-lit lightguide display.10 From a distance, it resembles a Nixie tube, but it uses 10 lightbulbs, one for each number value, with a plastic layer for each digit. Each plastic sheet has numerous dots etched in the shape of the corresponding number. One sheet is illuminated from the edge, causing the dots in the sheet to light up and display that number. In the photo below, you can see both the illuminated and the unilluminated dots. The displays take 14 volts, but the box runs at 28 volts, so a board full of resistors on the front panel drops the voltage from 28 to 14, giving off noticeable heat in the process.

A close-up of a digit in the Test Set, showing the structure of the edge-lit lightguide display.

A close-up of a digit in the Test Set, showing the structure of the edge-lit lightguide display.

For each digit position, the driver board provides eight drive signals, one for each bulb. The drivers are implemented in "LD" modules. Since each LD module contains two drive transistors controlled by 4-input AND gates, a module supports two bulbs. Thus, a driver board holds eight LD modules in total. The LD modules are also used on other boards to drive the lights on the front panel.

Ring counters

The Test Set contains multiple counters to count bits, sub-bits, digits, states, and so forth. While a modern design would use binary counters, the Test Set is implemented with a circuit called a ring counter that optimizes the hardware.

For instance, to count to ten, five flip-flops are arranged as a shift register so each flip-flop sends its output to the next one. However, the last flip-flop sends its inverted output to the first. The result is that the counter will proceed: 10000, 11000, 11100, 11110, 11111 as 1 bits are shifted in at the left. But after a 1 reaches the last bit, 0 bits will be shifted in at the left: 01111, 00111, 00011, 00001, and finally 0000. Thus, the counter moves through ten states.

Why not use a 4-bit binary counter and save a flip-flop? First, the binary counter requires additional logic to go from 9 back to 0. Moreover, acting on a particular binary value requires a 4-input gate to check the four bits. But a particular value of a ring counter can be detected with a smaller 2-input gate by checking the bits on either side of the 0/1 boundary. For instance, to detect a count of 3 (11100), only the two highlighted bits need to be tested. Thus, the decoding logic is much simpler for a ring counter, which is important when each gate comes in an expensive module.

Another use of the ring counter is in the sub-state generator, counting out the five states. Since this ring counter uses three flip-flops, you might expect it to count to six. However, the first flip-flop gets one of its inputs from the second flip-flop, resulting in five states: 000, 100, 110, 011, and 001, with the 111 state skipped.11 This illustrates the flexibility of ring counters to generate arbitrary numbers of states.

The PSK boards

Digital data could not be broadcast directly to the spacecraft, so the data was turned into an audio signal using phase-shift keying (PSK). The Test Set uses two boards (A1 and A2) to produce this signal. These boards are interesting and unusual because they are analog, unlike the other boards in the Test Set.

The idea behind phase-shift keying is to change the phase of a sine wave depending on the bit (i.e., sub-bit) value. Specifically, a 2 kHz sine wave indicated a one bit, while the sine wave was inverted for a zero bit. That is, a phase shift of 180º indicated a 0 bit. But how do you tell which sine wave is original and which is flipped? The solution was to combine the information signal with a 1 kHz reference signal that indicates the start and phase of each bit. The diagram below shows how the bits 1-0-1 are encoded into the composite audio signal that is decoded by the Up-Data Link box.

The phase-shift keying modulation process. This encoded digital data into an audio signal for transmission to the Up-DataLink. Note that "1 kc" is 1 kilocycle, or 1 kilohertz in modern usage. From Apollo Digital Up-Data Link Description.

The phase-shift keying modulation process. This encoded digital data into an audio signal for transmission to the Up-DataLink. Note that "1 kc" is 1 kilocycle, or 1 kilohertz in modern usage. From Apollo Digital Up-Data Link Description.

The core of the PSK modulation circuit is a transformer with a split input winding. The 2 kHz sine wave is applied to the winding's center tap. One side of the winding is grounded (by the "ø DET" module) for a 0 bit, but the other side of the winding is grounded for a 1 bit. This causes the signal to go through the winding in one direction for a 1 bit and the opposite direction for a 0 bit. The transformer's output winding thus receives an inverted signal for a 0 bit, giving the 180º phase shift seen in the second waveform above. Finally, the board produces the composite audio signal by mixing in the reference signal through a potentiometer and the "SUM" module.12

Board A2 is the heart of the PSK encoding. The black transformer selects the phase shift, controlled by the "ø DET" and "ø DET D" modules in front of it. The two central potentiometers  balance the components of the output signal.

Board A2 is the heart of the PSK encoding. The black transformer selects the phase shift, controlled by the "ø DET" and "ø DET D" modules in front of it. The two central potentiometers balance the components of the output signal.

Inconveniently, some key components of the Test Set were missing; probably the most valuable components were salvaged when the box was scrapped. The missing components included the power supplies and amplifiers on the back of the box, as well as parts from PSK board A1. This board had ten white wires that had been cut, going to missing components labeled MP1, R2, L1, and L2. By studying the circuitry, I determined that MP1 had been a 4-kHz oscillator that provided the master clock for the Test Set. R2 was simply a potentiometer to adjust signal levels.

Marc added circuitry to board A1 to replace the two missing filters and the missing oscillator. (The oscillator was used earlier to drive a clock from Soyuz.)

Marc added circuitry to board A1 to replace the two missing filters and the missing oscillator. (The oscillator was used earlier to drive a clock from Soyuz.)

But L1 and L2 were more difficult. It took a lot of reverse-engineering before we determined that L1 and L2 were resonant filters to convert the digital waveforms to the sine waves needed for the PSK output. Marc used a combination of theory and trial-and-error to determine the inductor and capacitor values that produced a clean signal. The photo above shows our substitute filters, along with a replacement oscillator.

Input boards

The Test Set receives signals from the Up-Data Link box under test and verifies that these signals are correct. The Test Set has five input boards (A22 through A25) to buffer the input signals and convert them to digital levels. The input boards also provide electrical isolation between the input signals and the Test Set, avoiding problems caused by ground loops or different voltage levels.

A typical input board is A22, which receives two input signals, supplied through coaxial cables. The board buffers the signals with op-amps, and then produces a digital signal for use by the box. The op-amp outputs go into "1 SS" isolation modules that pass the signal through to the box while ensuring isolation. These modules are optocouplers, using an LED and a phototransistor to provide isolation.13 The op-amps are powered by an isolated power supply.

Board A22 handles two input signals. It has two op-amps and associated circuitry. Note the empty module positions; board A23 has these positions populated so it supports three inputs.

Board A22 handles two input signals. It has two op-amps and associated circuitry. Note the empty module positions; board A23 has these positions populated so it supports three inputs.

Each op-amp module is a Burr-Brown Model 1506 module,14 encapsulating a transistorized op-amp into a convenient 8-pin module. The module is similar to an integrated-circuit op-amp, except it has discrete components inside and is considerably larger than an integrated circuit. Burr-Brown is said to have created the first solid-state op-amp in 1957, and started making op-amp modules around 1962.

Board A24 is also an isolated input board, but uses different circuitry. It has two modules that each contain four Schmitt triggers, circuits to sharpen up a noisy input. These modules have the puzzling label "-12+6LC". Each output goes through a "1 SS" isolation module, as with the previous input boards. This board receives the 8-bit "validity" signal from the Up-Data Link.

The switching power supply board

Board A11 is interesting: instead of sealed modules, it has a large green cube with numerous wires attached. This board turned out to be a switching power supply that implements six dual-voltage power supplies. The green cube is a transformer with 14 center-tapped windings connected to 42 pins. The transformer ensures that the power supply's outputs are isolated. This allows the op-amps on the input boards to remain electrically isolated from the rest of the Test Set.

The switching power supply board is dominated by a large green transformer with many windings. The two black power transistors are at the front.

The switching power supply board is dominated by a large green transformer with many windings. The two black power transistors are at the front.

The power supply uses a design known as a Royer Converter; the two transistors drive the transformer in a push-pull configuration. The transistors are turned on alternately at high frequency, driven by a feedback winding. The transformer has multiple windings, one for each output. Each center-tapped winding uses two diodes to produce a DC output, filtered by the large capacitors. In total, the power supply has four ±7V outputs and two ±14V outputs to supply the input boards.

This switching power supply is independent from the power supplies for the rest of the Test Set. On the back of the box, we could see where power supplies and amplifiers had been removed. Determining the voltages of the missing power supplies would have been a challenge. Fortunately, the front of the box had test points with labels for the various voltages: -6, +6, and +28, so we knew what voltages were required.

The front panel

The front panel reveals many of the features of the Test Set. At the top, lights indicate the success or failure of various tests. "Sub-bit agree/error" indicates if the sub-bits read back into the Test Set match the values sent. "AGC confirm/error" shows the results of an Apollo Guidance Computer message, while "CTE confirm/error" shows the results of a Central Timing Equipment message. "Verif confirm/error" indicates if the verification message from the UDL matches the expected value for a test message. At the right, lights indicate the status of the UDL: standby, active, or powered off.

A close-up of the Test Set's front panel.

A close-up of the Test Set's front panel.

In the middle, toggle switches control the UDL operation. The "Sub-bit spoil" switch causes sub-bits to be occasionally corrupted for testing purposes. "Sub-bit compare/override" enables or disables sub-bit verification. The four switches on the right control the paper tape reader. The "Program start" switch is the important one: it causes the UDL to send one message (in "Single" mode) or multiple messages (in "Serial" mode). The Test Set can stop or continue when an error occurs ("Stop on error" / "Bypass error"). Finally, "Tape advance" causes messages to be read from paper tape, while "Tape stop" causes the UDL to re-use the current message rather than loading a new one.

The UDL provides a verification code that indicates its status. The "Verification Return" knob selects the source of this verification code: the "Direct" position uses a 4-bit verification code, while "Remote" uses an 8-bit verification code.15

At the bottom, "PSK high/low" selects the output level for the PSK signal from the Test Set. (Since the amplifier was removed from our Test Set, this switch has no effect. Likewise, the "Power On / Off" switch has no effect since the power supplies were removed. We power the Test Set with an external lab supply.) In the middle, 15 test points allow access to various signals inside the Test Set. The round elapsed time indicator shows how many hours the Test Set has been running (apparently over 12 months of continuous operation).

Reverse-engineering the backplane

Once I figured out the circuitry on each board, the next problem was determining how the boards were connected. The backplane consists of rows of 47-pin sockets, one for each board. Dense white wiring runs between the sockets as well as to switches, displays, and connectors. I started beeping out the connections with a multimeter, picking a wire and then trying to find the other end. Some wires were easy since I could see both ends, but many wires disappeared into a bundle. I soon realized that manually tracing the wiring was impractically slow: with 25 boards and 47 connections per board, brute-force testing of every pair of connections would require hundreds of thousands of checks.

The backplane wiring of the Test Set consisted of bundles of white wires, as shown in this view of the underside of the Test Set.

The backplane wiring of the Test Set consisted of bundles of white wires, as shown in this view of the underside of the Test Set.

To automate the beeping-out of connections, I built a system that I call Beep-o-matic. The idea behind Beep-o-matic is to automatically find all the connections between two motherboard slots by plugging two special boards into the slots. By energizing all the pins on the first board in sequence, a microcontroller can detect connected pins on the second board, revealing the wiring between the two slots.

This system worked better than I expected, rapidly generating a list of connections. I still had to plug the Beep-o-matic boards into each pair of slots (about 300 combinations in total), but each scan took just a few seconds, so a full scan was practical. To find the wiring to the switches and connectors, I used a variant of the process. I plugged a board into a slot and used a program to continuously monitor the pins for changes. I went through the various switch positions and applied signals to the connectors to find the associated connections.

Conclusions

I started reverse-engineering the Test Set out of curiosity: given an undocumented box made from mystery modules and missing key components, could we understand it? Could we at least get the paper tape reader to run and the lights to flash? It was a tricky puzzle to figure out the modules and the circuitry, but eventually we could read a paper tape and see the results on the display.

But the box turned out to be useful. Marc has amassed a large and operational collection of Apollo communications hardware. We use the UDL Test Set to generate realistic signals that we feed into Apollo's S-band communication system. We haven't transmitted these signals to the Moon, but we have transmitted signals between antennas a few feet apart, receiving them with a box called the S-band Transponder. Moreover, we have used the Test Set to control an Up-Data Link box, a CTE clock, and a simulated Apollo Guidance Computer, reading commands from the paper tape and sending them through the complete communication path. Ironically, the one thing we haven't done with the Test Set is use it to test the Up-Data Link in the way it is intended: connecting the UDL's outputs to the Test Set and checking the panel lights.

From a wider perspective, the Test Set provides a glimpse of the vast scope of the Apollo program. This complicated box was just one part of the test apparatus for one small part of Apollo's electronics. Think of the many different electronic systems in the Apollo spacecraft, and consider the enormous effort to test them all. And electronics was just a small part of Apollo alongside the engines, mechanical structures, fuel cells, and life support systems. With all this complexity, it's not surprising that the Apollo program employed 400,000 people.

For more information, the footnotes include a list of UDL documentation16 and CuriousMarc's videos17. Follow me on Bluesky (@righto.com), Mastodon (@[email protected]), or RSS. (I've given up on Twitter.) I worked on this project with CuriousMarc, Mike Stewart, and Eric Schlapfer. Thanks to John McMaster for X-rays, thanks to Lumafield for the CT scans, and thanks to Marcel for providing the box.

Notes and references

  1. Mike found a NASA document Functional Integrated System Schematics that includes "Up Data Link GSE/SC Integrated Schematic Diagram". Unfortunately, this was not very helpful since the diagram merely shows the Test Set as a rectangle with one wire in and one wire out. The remainder of the diagram (omitted) shows that the output line passes through a dozen boxes (modulators, switches, amplifiers, and so forth) and then enters the UDL onboard the Spacecraft Command Module. At least we could confirm that the Test Set was part of the functional integrated testing of the UDL.

    Detail from "Up Data Link GSE/SC Integrated Schematic Diagram", page GT3.

    Detail from "Up Data Link GSE/SC Integrated Schematic Diagram", page GT3.

    Notably, this diagram has the Up-Data Link Confidence Test Set denoted with "2A17". If you examine the photo of the Test Set at the top of the article, you can see that the physical box has a Dymo label "2A17", confirming that this is the same box. 

  2. The table below lists the functions that could be performed by sending a "realtime command" to the Up-Data Link to activate a relay. The crew could reset any of the relays except for K1-K5 (Abort Light A and Crew Alarm).

    The functions controlled by the relays. Adapted from Command/Service Module Systems Handbook.

    The functions controlled by the relays. Adapted from Command/Service Module Systems Handbook.

    A message selected one of 32 relays and specified if the relay should be turned on or off. The relays were magnetic latching relays, so they stayed in the selected position even when de-energized. The relay control also supported "salvo reset": four commands to reset a bank of relays at once. 

  3. The Saturn V booster had a system for receiving commands from the ground, closely related to the Up-Data Link, but with some differences. The Saturn V system used the same Phase-Shift Keying (PSK) and 70 kHz subcarrier as the Up-Data Link, but the frequency of the S-band signal was different for Saturn V (2101.8 MHz). (Since the Command Module and the booster use separate frequencies, the use of different addresses in the up-data messages was somewhat redundant.) Both systems used sub-bit encoding. Both systems used three bits for the vehicle address, but the remainder of the Saturn message was different, consisting of 14 bits for the decoder address, and 18 bits for message data. A typical message for the Launch Vehicle Digital Computer (LVDC) includes a 7-bit command followed by the 7 bits inverted for error detection. The command system for the Saturn V was located in the Instrument Unit, the ring containing most of the electronic systems that was mounted at the top of the rocket, below the Lunar Module. The command system is described in Astrionics System Handbook section 6.2.

    The Saturn Command Decoder. From Saturn IB/V Instrument Unit System Description and Component Data.

    The Saturn Command Decoder. From Saturn IB/V Instrument Unit System Description and Component Data.

    The Lunar Module also had an Up-Data system, called the Digital Up-link Assembly (DUA) and built with integrated circuits. The Digital Up-link Assembly was similar to the Command Module's Up-Data Link and allowed ground stations to control the Lunar Guidance Computer. The DUA also controlled relays to arm the ascent engine. The DUA messages consisted of three vehicle address bits, three system address bits, and 16 information bits. Unlike the Command Module's UDL, the DUA includes the 70-kHz discriminator to demodulate the sub-band. The DUA also provided a redundant up-link voice path, using the data subcarrier to transmit audio. (The Command Module had a similar redundant voice path, but the demodulation was performed in the Premodulation Processor.) The DUA was based on the Digital-Command Assembly (DCA) that received up-link commands on the development vehicles. See Lunar Module Communication System and LM10 Handbook 2.7.4.2.2. 

  4. Unexpectedly, we found three different sets of sub-bit codes in different documents. The Telecommunications Study Guide says that the first digit (the Vehicle Address) encodes a one bit with the sub-bits 11011; for the remaining digits, a one bit is encoded by 10101. Apollo Digital Command System says that the first digit uses 11001 and the remainder use 10001. The schematic in Apollo Digital Up-Data Link Description shows that the first digit uses 11000 and the remainder use 01011. This encoding matches our Up-Data Link and the Test Set, although the Test Set flipped the phase in the PSK signal. (In all cases, a zero bit is encoded by inverting all five sub-bits.) 

  5. To provide range safety if the rocket went off course, the Saturn V booster had a destruct system. This system used detonating fuses along the RP-1 and LOX tanks to split the tanks open. As this happened, the escape tower at the top of the rocket would pull the astronauts to safety, away from the booster. The destruct system was controlled by the Digital Range Safety Command System (DRSCS), which used a cryptographic plug to prevent a malevolent actor from blowing up the rocket.

    The DRSCS—used on both the Saturn and Skylab programs—received a message consisting of a 9-character "Address" word and a 2-character "Command" word. Each character was composed of two audio-frequency tones from an "alphabet" of seven tones, reminiscent of the Dual-Tone Multi-Frequency (DTMF) signals used by Touch-Tone phones. The commands could arm the destruct circuitry, shut off propellants, disperse propellants, or switch the DRSCS off.

    To make this system secure, a "code plug" was carefully installed in the rocket shortly before launch. This code plug provided the "key-of-the-day" by shuffling the mapping between tone pairs and characters. With 21 characters, there were 21! (factorial) possible keys, so the chances of spoofing a message were astronomically small. Moreover, as the System Handbook writes with understatement: "Much attention has been given to preventing execution of a catastrophic command should one component fail during flight."

    For details of the range safety system, see Saturn Launch Vehicle Systems Handbook, Astrionics System Handbook (schematic in section 6.3), Apollo Spacecraft & Saturn V Launch Vehicle Pyrotechnics / Explosive Devices, The Evolution of Electronic Tracking, Optical, Telemetry, and Command Systems at the Kennedy Space Center, and Saturn V Stage I (S-IC) Overview

  6. I explained above how the Up-Data Link message was encoded into an audio signal using phase-shift keying. However, more steps were required before this signal could be transmitted over Apollo's complicated S-band radio system. Rather than using a separate communication link for each subsystem, Apollo unified most communication over a high-frequency S-band link, calling this the "Unified S-Band". Apollo had many communication streams—voice, control data, scientific data, ranging, telemetry, television—so cramming them onto a single radio link required multiple layers of modulation, like nested Russian Matryoshka dolls with a message inside.

    For the Up-Data Link, the analog PSK signal was modulated onto a subcarrier using frequency modulation. It was combined with the voice signal from ground and the pseudo-random ranging signal, and the combined signal was phase-modulated at 2106.40625 MHz and transmitted to the spacecraft through an enormous dish antenna at a ground station.

    The spectrum of the S-band signal to the Command Module. The Up-Data is transmitted on the 70 kHz subcarrier. Note the very wide spectrum of the pseudo-random ranging signal.

    The spectrum of the S-band signal to the Command Module. The Up-Data is transmitted on the 70 kHz subcarrier. Note the very wide spectrum of the pseudo-random ranging signal.

    Thus, the initial message was wrapped in several layers of modulation before transmission: the binary message was expanded to five times its length by the sub-bits, modulated with Phase-Shift Keying, modulated with frequency modulation, and modulated with phase modulation.

    On the spacecraft, the signal went through corresponding layers of demodulation to extract the message. A box called the Unified S-band Transceiver demodulated the phase-modulated signal and sent the data and voice signals to the pre-modulation processor (PMP). The PMP split out the voice and data subcarriers and demodulated the signals with FM discriminators. It sent the data signal (now a 2-kHz audio signal) to the Up-Data Link, where a phase-shift keying demodulator produced a binary output. Finally, each group of five sub-bits was converted to a single bit, revealing the message. 

  7. The Test Set uses eight-bit paper tape, but the encoding is unusual. Each character of the paper tape consists of a three-bit octal digit, the same digit inverted, and two control bits. Because of this redundancy, the Test Set could detect errors while reading the tape.

    One puzzling aspect of the paper tape reader was that we got it working, but when we tilted the Test Set on its side, the reader completely stopped working. It turned out that the reader's motor was controlled by a mercury-wetted relay, a high-current relay that uses mercury for the switch. Since mercury is a liquid, the relay would only work in the proper orientation; when we tilted the box, the mercury rolled away from the contacts. 

  8. This view of the Test Set from the top shows the positions of the 25 circuit boards, A1 through A25. Most of the boards are mounted in pairs, although A1, A2, and A15 are mounted singly. Because boards A1 and A11 have larger components, they have empty slots next to them; these are not missing boards. Each board unit has two ejector levers to remove it, along with two metal tabs to lock the unit into position. The 15 numbered holes allow access to the test points for each board. (I don't know the meaning of the text "CTS" on each board unit.) The thirteen digit display modules are at the bottom, with their dropping resistors at the bottom right.

    Top view of the Test Set.

    Top view of the Test Set.


  9. There are seven driver boards: A3 through A9. Board A3 is different from the others because it implements one digit instead of two. Instead, board A3 includes validation logic for the paper tape data. 

  10. Here is the datasheet for the digit displays in the Test Set: "Numerik Indicator IND-0300". In current dollars, they cost over $200 each! The cutaway diagram shows how the bent plastic sheets are stacked and illuminated.

    Datasheet from General Radio Catalog, 1963.

    Datasheet from General Radio Catalog, 1963.

    For amazing photos that show the internal structure of the displays, see this article. Fran Blanche's video discusses a similar display. Wikipedia has a page on lightguide displays.

    While restoring the Test Set, we discovered that a few of the light bulbs were burnt out. Since displaying an octal digit only uses eight of the ten bulbs, we figured that we could swap the failed bulbs with unused bulbs from "8" or "9". It turned out that we weren't the first people to think of this—many of the "unused" bulbs were burnt out. 

  11. I'll give more details on the count-to-five ring counter. The first flip-flop gets its J input from the Q' output of the last flip-flop as expected, but it gets its K input from the Q output of the second flip-flop, not the last flip-flop. If you examine the states, this causes the transition from 110 to 011 (a toggle instead of a set to 111), resulting in five states instead of six. 

  12. To explain the phase-shift keying circuitry in a bit more detail, board A1 produces a 4 kHz clock signal. Board A2 divides the clock, producing a 2 kHz signal and a 1 kHz signal. The 2 kHz signal is fed into the transformer to be phase-shifted. Then the 1 kHz reference signal is mixed in to form the PSK output. Resonant filters on board A1 convert the square-wave clock signals to smooth sine waves. 

  13. I was surprised to find LED opto-isolators in a device from the mid-1960s. I expected that the Test Set isolator used a light bulb, but testing showed that it switches on at 550 mV (like a diode) and operated successfully at over 100 kHz, impossible with a light bulb or photoresistor. It turns out that Texas Instruments filed a patent for an LED-based opto-isolator in 1963 and turned this into a product in 1964. The "PEX 3002" used a gallium-arsenide LED and a silicon phototransistor. Strangely, TI called this product a "molecular multiplex switch/chopper". Nowadays, an opto-isolator costs pennies, but at the time, these devices were absurdly expensive: TI's device sold for $275 (almost $3000 in current dollars). For more, see The Optical Link: A New Circuit Tool, 1965. 

  14. For more information on the Burr-Brown 1506 op amp module, see Burr-Brown Handbook of Operational Amplifier RC Networks. Other documents are Burr-Brown Handbook of Operational Amplifier Applications, Op-Amp History, Operational Amplifier Milestones, and an ad for the Burr-Brown 130 op amp. 

  15. I'm not sure of the meaning of the Direct versus Remote verification codes. The Block I (earlier) UDL had an 8-bit code, while the Block II (flight) UDL had a 4-bit code. The Direct code presumably comes from the UDL itself, while the Remote code is perhaps supplied through telemetry? 

  16. The block diagram below shows the structure of the Up-Data Link (UDL). It uses the sub-bit decoder and a 24-stage register to deserialize the message. Based on the message, the UDL triggers relays (RTC), outputs data to the Apollo Guidance Computer (called the CMC, Command Module Computer here), sends pulses to the CTE clock, or sends validity signals back to Earth.

    UDL block diagram, from Apollo Operations Handbook, page 31

    UDL block diagram, from Apollo Operations Handbook, page 31

    For details of the Apollo Up-Data system, see the diagram below (click it for a very large image). This diagram is from the Command/Service Module Systems Handbook (PDF page 64); see page 80 for written specifications of the UDL.

    This diagram of the Apollo Updata system specifies the message formats, relay usages, and internal structure of the UDL.

    This diagram of the Apollo Updata system specifies the message formats, relay usages, and internal structure of the UDL.

    Other important sources of information: Apollo Digital Up-Data Link Description contains schematics and a detailed description of the UDL. Telecommunication Systems Study Guide describes the earlier UDL that included a 450 MHz FM receiver. 

  17. The following CuriousMarc videos describe the Up-Data Link and the Test Set, so smash that Like button and subscribe :-)