Solving edge-match puzzles with Arc and backtracking

I recently saw a tricky nine piece puzzle and wondered if I could use Arc to solve it. It turned out to be straightforward to solve using standard backtracking methods. This article describes how to solve the puzzle using the Arc language.

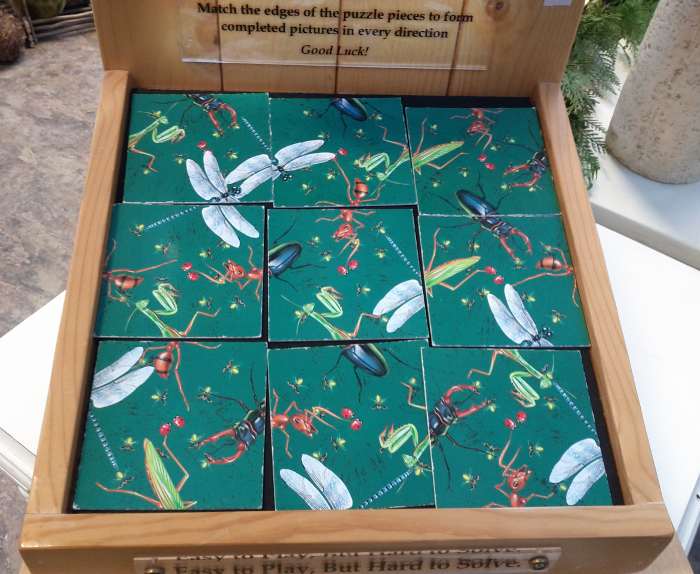
A edge-matching puzzle. The puzzle consists of nine square titles. The tiles must be placed so the pictures match up where two tiles meet. As the picture says, "Easy to play, but hard to solve." It turns out that this type of puzzle is called an edge-matching puzzle, and is NP-complete in general. For dozens of examples of these puzzles, see Rob's Puzzle Page.

Backtracking is a standard AI technique to find a solution to a problem step by step. If you reach a point where a solution is impossible, you backtrack a step and try the next possibility. Eventually, you will find all possible solutions. Backtracking is more efficient than brute-force testing of all possible solutions because you abandon unfruitful paths quickly.

To solve the puzzle by backtracking, we put down the first tile in the upper left. We then try a second tile in the upper middle. If it matches, we put it there. Then we try a third tile in the upper right. If it matches, we put it there. The process continues until a tile doesn't match, and then the algorithm backtracks. For instance, if the third tile doesn't match, we try a different third tile and continue. Eventually, after trying all possible third tiles, we backtrack and try a different second tile. And after trying all possible second tiles, we'll backtrack and try a new first tile. Thus, the algorithm will reach all possible solutions, but avoids investigating arrangements that can't possibly work.

The implementation

I represent each tile with four numbers indicating the pictures on each side. I give a praying mantis the number 1, a beetle 2, a dragonfly 3, and an ant 4. For the tail of the insect, I give it a negative value. Each tile is then a list of (top left right bottom). For instance, the upper-left tile is (2 1 -3 3). With this representation, tiles match if the value on one edge is the negative of the value on the other edge. I can then implement the list of tiles:
(with (mantis 1 beetle 2 dragonfly 3 ant 4)
  (= tiles (list
    (list beetle mantis (- dragonfly) dragonfly)
    (list (- beetle) dragonfly mantis (- ant))
    (list ant (- mantis) beetle (- beetle))
    (list (- dragonfly) (- ant) ant mantis)
    (list ant (- beetle) (- dragonfly) mantis)
    (list beetle (- mantis) (- ant) dragonfly)
    (list (- ant) (- dragonfly) beetle (- mantis))
    (list (- beetle) ant mantis (- dragonfly))
    (list mantis beetle (- dragonfly) ant))))
Next, I create some helper functions to access the edges of a tile, convert the integer to a string, and to prettyprint the tiles.
;; Return top/left/right/bottom entries of a tile
(def top (l) (l 0))
(def left (l) (l 1))
(def right (l) (l 2))
(def bottom (l) (l 3))

;; Convert an integer tile value to a displayable value
(def label (val)
  ((list "-ant" "-dgn" "-btl" "-man" "" " man" " btl" " dgn" " ant")
   (+ val 4)))

;; Print the tiles nicely
(def prettyprint (tiles (o w 3) (o h 3))
  (for y 0 (- h 1)
    (for part 0 4
      (for x 0 (- w 1)
        (withs (n (+ x (* y w)) tile (tiles n))
          (if
     (is part 0)
       (pr " ------------- ")
     (is part 1)
       (pr "|    " (label (top tile)) "     |")
     (is part 2)
       (pr "|" (label (left tile)) "    " (label (right tile)) " |")
     (is part 3)
       (pr "|    " (label (bottom tile)) "     |")
     (is part 4)
       (pr " ------------- "))))
      (prn))))
The prettyprint function uses optional arguments for width and height: (o w 3). This sets the width and height to 3 by default but allows it to be modified if desired. The part loop prints each tile row is printed as five lines. Now we can print out the starting tile set and verify that it matches the picture. I'll admit it's not extremely pretty, but it gets the job done:
arc> (prettyprint tiles)
 -------------  -------------  ------------- 
|     btl     ||    -btl     ||     ant     |
| man    -dgn || dgn     man ||-man     btl |
|     dgn     ||    -ant     ||    -btl     |
 -------------  -------------  ------------- 
 -------------  -------------  ------------- 
|    -dgn     ||     ant     ||     btl     |
|-ant     ant ||-btl    -dgn ||-man    -ant |
|     man     ||     man     ||     dgn     |
 -------------  -------------  ------------- 
 -------------  -------------  ------------- 
|    -ant     ||    -btl     ||     man     |
|-dgn     btl || ant     man || btl    -dgn |
|    -man     ||    -dgn     ||     ant     |
 -------------  -------------  ------------- 

Next is the meat of the solver. The first function is matches, which takes a grid of already-positioned tiles and a new tile, and tests if a particular edge of the new tile matches the existing tiles. (The grid is represented simply as a list of the tiles that have been put down so far.) This function is where all the annoying special cases get handled. First, the new tile may be along an edge, so there is nothing to match against. Second, the grid may not be filled in far enough for there to be anything to match against. Finally, if there is a grid tile to match against, and the value there is the negative of the new tile's value, then it matches. One interesting aspect of this function is that functions are passed in to it to select which edges (top/bottom/left/right) to match.

;; Test if one edge of a tile will fit into a grid of placed tiles successfully
;;  grid is the grid of placed tiles as a list of tiles e.g. ((1 3 4 2) nil (-1 2 -1 1) ...)
;;  gridedge is the edge of the grid cell to match (top/bottom/left/right)
;;  gridx is the x coordinate of the grid tile
;;  gridy is the y coordinate of the grid tile
;;  newedge is the edge of the new tile to match (top/bottom/left/right)
;;  newtile is the new tile e.g. (1 2 -1 -3)
;;  w is the width of the grid
;;  h is the height of the grid
(def matches (grid gridedge gridx gridy newedge newtile w h)
  (let n (+ gridx (* gridy w))
    (or
      (< gridx 0) ; nothing to left of tile to match, so matches by default
      (< gridy 0) ; tile is at top of grid, so matches
      (>= gridx w) ; tile is at right of grid, so matches
      (>= gridy h) ; tile is at bottom of grid, so matches
      (>= n (len grid)) ; beyond grid of tiles, so matches
      (no (grid n)) ; no tile placed in the grid at that position
      ; Finally, compare the two edges which should be opposite values
      (is (- (gridedge (grid n))) (newedge newtile)))))
With that method implemented, it's easy to test if a new tile will fit into the grid. We simply test that all four edges match against the existing grid. We don't need to worry about the edges of the puzzle, because the previous method handles them:
;; Test if a tile will fit into a grid of placed tiles successfully
;;   grid is the grid of tiles
;;   newtile is the tile to place into the grid
;;   (x, y) is the position to place the tile
(def is_okay (grid newtile x y w h)
    (and 
      (matches grid right (- x 1) y left newtile w h)
      (matches grid left (+ x 1) y right newtile w h)
      (matches grid top x (+ y 1) bottom newtile w h)
      (matches grid bottom x (- y 1) top newtile w h)))
Now we can implement the actual solver. The functions solve1 and try recursively call each other. solve1 calls try with each candidate tile in each possible orientation. If the tile fits, try updates the grid of placed tiles and calls solve1 to continue solving. Otherwise, the algorithm backtracks and solve1 tries the next possible tile. My main problem was accumulating all the solutions properly; on my first try, the solutions were wrapped in 9 layers of parentheses! One other thing to note is the conversion from a linear (0-8) position to an x/y grid position.

A couple refactorings are left as an exercise to the reader. The code to try all four rotations of the tile is a bit repetitive and could probably be cleaned up. More interesting would be to turn the backtracking solver into a general solver, with the puzzle just one instance of a problem.

;; grid is a list of tiles already placed
;; candidates is a list of tiles yet to be placed
;; nextpos is the next position to place a tile (0 to 8)
;; w and h are the dimensions of the puzzle
(def solve1 (grid candidates nextpos w h)
  (if
    (no candidates)
      (list grid) ; Success!
    (mappend idfn (accum addfn ; Collect results and flatten
      (each candidate candidates
        (addfn (try grid candidate (rem candidate candidates) nextpos w h))
        (addfn (try grid (rotate candidate) (rem candidate candidates) nextpos w h))
        (addfn (try grid (rotate (rotate candidate)) (rem candidate candidates) nextpos w h))
        (addfn (try grid (rotate (rotate (rotate candidate))) (rem candidate candidates) nextpos w h)))))))

; Helper to append elt to list
(def append (lst elt) (join lst (list elt)))

;; Try adding a candidate tile to the grid, and recurse if successful.
;; grid is a list of tiles already placed
;; candidate is the tile we are trying
;; candidates is a list of tiles yet to be placed (excluding candidate)
;; nextpos is the next position to place a tile (0 to 8)
;; w and h are the dimensions of the puzzle
(def try (grid candidate candidates nextpos w h)
  (if (is_okay grid candidate (mod nextpos w) (trunc (/ nextpos w)) w h)
    (solve1 (append grid candidate) candidates (+ nextpos 1) w h)))

The final step is a wrapper function to initialize the grid:

(def solve (tiles (o w 3) (o h 3))
  (solve1 nil tiles 0 w h))

With all these pieces, we can finally solve the problem, and obtain four solutions (just rotations of one solution):

arc> (solve tiles)
(((1 -2 -4 3) (2 4 1 -3) (4 -1 2 -2) (-3 1 4 -2) (3 -4 -1 2) (2 1 -3 3) (2 -4 -1 -3) (-2 1 4 -3) (-3 -4 4 1))
((2 4 -2 -1) (-3 2 3 1) (4 -3 1 -4) (1 2 -3 4) (-1 3 2 -4) (4 -2 -3 1) (-4 1 3 -2) (4 -3 -2 1) (-1 2 -3 -4))
((1 4 -4 -3) (-3 4 1 -2) (-3 -1 -4 2) (3 -3 1 2) (2 -1 -4 3) (-2 4 1 -3) (-2 2 -1 4) (-3 1 4 2) (3 -4 -2 1))
((-4 -3 2 -1) (1 -2 -3 4) (-2 3 1 -4) (1 -3 -2 4) (-4 2 3 -1) (4 -3 2 1) (-4 1 -3 4) (1 3 2 -3) (-1 -2 4 2)))
arc> (prettyprint (that 0))
 -------------  -------------  ------------- 
|     man     ||     btl     ||     ant     |
|-btl    -ant || ant     man ||-man     btl |
|     dgn     ||    -dgn     ||    -btl     |
 -------------  -------------  ------------- 
 -------------  -------------  ------------- 
|    -dgn     ||     dgn     ||     btl     |
| man     ant ||-ant    -man || man    -dgn |
|    -btl     ||     btl     ||     dgn     |
 -------------  -------------  ------------- 
 -------------  -------------  ------------- 
|     btl     ||    -btl     ||    -dgn     |
|-ant    -man || man     ant ||-ant     ant |
|    -dgn     ||    -dgn     ||     man     |
 -------------  -------------  ------------- 
I've used gimp on the original image to display the solution. I've labeled the original tiles A-I so you can see how the solution relates to the original image. Using Arc to display a solution as an image is left as an exercise to the reader :-) But seriously, this is where using a language with extensive libraries would be beneficial, such as Python's PIL imaging library.
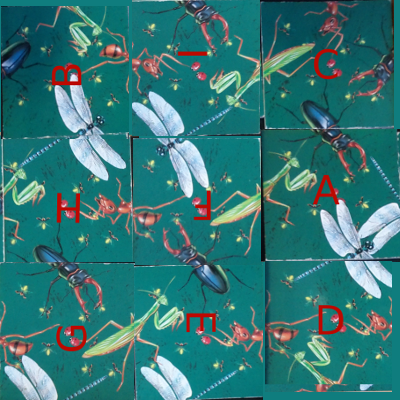
solution

Theoretical analysis

I'll take a quick look at the theory of the puzzle. The tiles can be placed in 9! (9 factorial) different locations, and each tile can be oriented 4 ways, for a total of 9! * 4^9 possible arrangements of the tiles, which is about 95 billion combinations. Clearly this puzzle is hard to solve by randomly trying tiles.
arc> (* (apply * (range 1 9)) (expt 4 9))
95126814720

We can do a back of the envelope calculation to see how many solutions we can expect. If you put the tiles down randomly, there are 12 edge constraints that must be satisfied. Since only one of the 8 possibilities matches, the chance of all the edges matching randomly is 1 in 8^12 or 68719476736. Dividing this into the 95 billion possible arrangements yields 1.38 solutions for an arbitrary random puzzle. (If this number were very large, then it would be hard to create a puzzle with only one solution.)

We can test this calculation experimentally by seeing how many solutions there are are for a random puzzle. First we make a function to create a random puzzle, consisting of 9 tiles, each with 4 random values. Then we solve 100 of these:

arc> (def randtiles ()
  (n-of 9 (n-of 4 (rand-elt '(1 2 3 4 -1 -2 -3 -4)))))
arc> (n-of 100 (len (solve (randtiles))))
(0 0 0 8 0 0 0 8 0 0 0 0 0 0 0 0 0 0 0 4 0 0 0 0 0 0 0 0 0 0 8 0 0 4 0
0 0 4 8 0 8 0 0 0 0 0 0 0 32 0 0 0 0 0 0 0 0 0 0 0 0 0 0 0 0 0 0 16 0
0 0 32 8 0 0 0 0 0 0 0 0 12 0 0 0 0 0 0 0 0 0 0 0 8 0 0 4 0 0 32)
arc> (apply + that)
196
Out of 100 random puzzles, there are 196 solutions, which is close to the 1.38 solutions per puzzle estimate above. (that is an obscure Arc variable that refers to the previous result.) Note that only 16% of the puzzles have solutions, though. Part of the explanation is that solutions always come in groups of 4, since the entire puzzle can be rotated 90 degrees into four different orientations. Solving 100 puzzles took 146 seconds, by the way.

Another interesting experiment is to add a counter to try to see how many tile combinations the solver actually tries. The result is 66384, which is much smaller than the 95 billion potential possibilities. This suggests that the puzzle is solvable manually by trial-and-error with backtracking; at a second per tile, it would probably take you 4.6 hours to get the first solution.

Conclusions

Solving the puzzle with Arc was easier than I expected, and I ran into only minor problems along the way. The code is available as puzzle.arc.

64-bit RC6 codes, Arduino, and Xbox remotes

I've extended my Arduino IRremote library to support RC6 codes up to 64 bits long. Now your Arduino can control your Xbox by acting as an IR remote control. (The previous version of my library only supported 32 bit codes, so it didn't work with the 36-bit Xbox codes.) Details of the IRremote library are here.

Note: I don't actually have an Xbox to test this code with, so please let me know if the code works for you.

Download

This code is in my "experimental" branch since I'd like to get some testing before releasing it to the world. To use it:
  • Download the IRremote library zip file from GitHub from the Arduino-IRremote experimental branch.
  • Unzip the download
  • Move/rename the shirriff-Arduino-IRremote-nnnn directory to arduino-000nn/libraries/IRremote.

Sending an Xbox code

The following program simply turns the Xbox on, waits 10 seconds, turns it off, and repeats.
#include <IRremote.h>
IRsend irsend;
unsigned long long OnOff = 0xc800f740cLL;
int toggle = 0;

void sendOnOff() {
  if (toggle == 0) {
    irsend.sendRC6(OnOff, 36);
  } else {
    irsend.sendRC6(OnOff ^ 0x8000, 36);
  }
  toggle = 1 - toggle;
}
   
void setup() {}

void loop() {
  delay(10000);  // Wait 10 seconds
  sendOnOff();  // Send power signal
}
The first important thing to note is that the On/Off code is "unsigned long long", and the associated constant ends in "LL" to indicate that it is a long long. Because a regular long is only 32 bits, a 64-bit long long must be used to hold the 64 bit code. If you try using a regular long, you'll lose the top 4 bits ("C") from the code.

The second thing to notice is the toggle bit (which is explained in more detail below). Every time you send a RC5 or RC6 code, you must flip the toggle bit. Otherwise the receiver will ignore the code. If you want to send the code multiple times for reliability, don't flip the toggle bit until you're done.

Receiving an Xbox code

The following code will print a message on the serial console if it receives an Xbox power code. It will also dump the received value.
#include <IRremote.h>

int RECV_PIN = 11;
IRrecv irrecv(RECV_PIN);
decode_results results;

void setup()
{
  Serial.begin(9600);
  irrecv.enableIRIn(); // Start the receiver
}

void loop() {
  if (irrecv.decode(&results)) {
    if ((results.value & ~0x8000LL) == 0xc800f740cLL) {
      Serial.println("Got an OnOff code");
    }
    Serial.println(results.value >> 32, HEX);
    Serial.println(results.value, HEX);
    irrecv.resume(); // Receive the next value
  }
}
Two things to note in the above code. First, the received value is anded with ~0x8000LL; this clears out the toggle bit. Second, Serial.println is called twice, first to print the top 32 bits, and second to print the bottom 32 bits.

The output when sent power codes multiple times is:

Got an OnOff code
C
800FF40C
Got an OnOff code
C
800F740C
Got an OnOff code
C
...
Note that the received value is split between the two Serial.println calls. Also note that the output oscillates between ...F740C and ...FF40C as the sender flips the toggle bit. This is why the toggle bit must be cleared when looking for a particular value.

The IRremote/IRrecvDump example code has also been extended to display values up to 64 bits, and can be used for testing.

A quick description of RC6 codes

RC6 codes are somewhat more complicated than the usual IR code. They come in 20 or 36 bit varieties (that I know of). The code consists of a leader pulse, a start bit, and then the 20 (or 36) data bits. A 0 bit is sent as a space (off) followed by a mark (on), while a 1 bit is sent as a mark (on) followed by a space (off).

The first complication is the fourth data bit sent (called a trailer bit for some reason), is twice as long as the rest of the bits. The IRremote library handles this transparently.

The second complication is RC5 and RC6 codes use a "toggle bit" to distinguish between a button that is held down and a button that is pressed twice. While a button is held down, a code is sent. When the button is released and pressed a second time, a new code with one bit flipped is sent. On the third press, the original code is sent. When sending with the IRremote library, you must keep track of the toggle bit and flip it each time you send. When receiving with the IRremote library, you will receive one of two different codes, so you must clear out the toggle bit. (I would like the library to handle this transparently, but I haven't figured out a good way to do it.)

For details of the RC6 encoding with diagrams and timings, see SB projects.

The LIRC database

The LIRC project collects IR codes for many different remotes. If you want to use RC6 codes from LIRC, there a few things to know. A typical code is the Xbox360 file, excerpted below:
begin remote
  name  Microsoft_Xbox360
  bits           16
  flags RC6|CONST_LENGTH
  pre_data_bits   21
  pre_data       0x37FF0
  toggle_bit_mask 0x8000
  rc6_mask    0x100000000

      begin codes
          OpenClose                0x8BD7
          XboxFancyButton          0x0B9B
          OnOff                    0x8BF3
...
To use these RC6 code with the Arduino takes a bit of work. First, the codes have been split into 21 bits of pre-data, followed by 16 bits of data. So if you want the OnOff code, you need to concatenate the bits together, to get 37 bits: 0x37ff08bf3. The second factor is the Arduino library provides the first start bit automatically, so you only need to use 36 bits. The third issue is the LIRC files inconveniently have 0 and 1 bits swapped, so you'll need to invert the code. The result is the 36-bit code 0xc800f740c that can be used with the IRremote library.

The rc6_mask specifies which bit is the double-wide "trailer" bit, which is the fourth bit sent (both in 20 and 36 bit RC6 codes). The library handles this bit automatically, so you can ignore it.

The toggle_bit_mask is important, as it indicates which position needs to be toggled every other transmission. For example, to transmit OnOff you will send 0xc800f740c the first time, but the next time you will need to transmit 0xc800ff40c.

More details of the LIRC config file format are at WinLIRC.

Xbox codes

Based on the LIRC file, the following Xbox codes should work with my library:
OpenClose0xc800f7428XboxFancyButton0xc800ff464OnOff0xc800f740c
Stop0xc800ff419Pause0xc800f7418Rewind0xc800ff415
FastForward0xc800f7414Prev0xc800ff41bNext0xc800f741a
Play0xc800ff416Display0xc800f744fTitle0xc800ff451
DVD_Menu0xc800f7424Back0xc800ff423Info0xc800f740f
UpArrow0xc800ff41eLeftArrow0xc800f7420RightArrow0xc800ff421
DownArrow0xc800f741fOK0xc800ff422Y0xc800f7426
X0xc800ff468A0xc800f7466B0xc800ff425
ChUp0xc800f7412ChDown0xc800ff413VolDown0xc800ff411
VolUp0xc800ff410Mute0xc800ff40eStart0xc800ff40d
Play0xc800f7416Enter0xc800ff40bRecord0xc800f7417
Clear0xc800ff40a00xc800f740010xc800f7401
20xc800ff40230xc800f740340xc800ff404
50xc800f740560xc800ff40670xc800f7407
80xc800ff40890xc800f74091000xc800ff41d
Reload0xc800f741c

Key points for debugging

The following are the main things to remember when dealing with 36-bit RC6 codes:
  • Any 36-bit hex values must start with "0x" and end with "LL". If you get the error "integer constant is too large for 'long' type", you probably forgot the LL.
  • You must use "long long" or "unsigned long long" to hold 36-bit values.
  • Serial.print will not properly print 36-bit values; it will only print the lower 32 bits.
  • You must flip the toggle bit every other time when you send a RC6 code, or the receiver will ignore your code.
  • You will receive two different values for each button depending if the sender has flipped the toggle bit or not.

Control your mouse with an IR remote

You can use an IR remote to control your computer's keyboard and mouse by using my Arduino IR remote library and a small microcontroller board called the Teensy. By pushing the buttons on your IR remote, you can steer the cursor around the screen, click on things, and enter digits. The key is the Teensy can simulate a USB keyboard and mouse, and provide input to your computer.
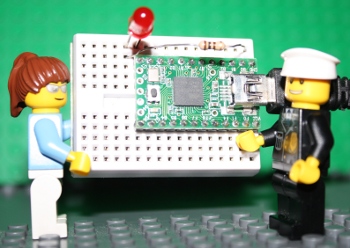
How to do this

I built a simple sketch that uses the remote from my DVD player to move and click the mouse, enter digits, or page up or down. Follow these steps:
  • The hardware is nearly trivial. Connect a IR detector to the Teensy: detector pin 1 to Teensy input 11, detector pin 2 to ground, and detector pin 3 to +5 volts.
  • Install the latest version of my IR remote library, which has support for the Teensy.
  • Download the IRusb sketch.
  • In the Arduino IDE, select Tools > Board: Teensy 2.0 and select Tools > USB Type: Keyboard and Mouse.
  • Modify the sketch to match the codes from your remote. Look at the serial console as you push the buttons on your remote, and modify the sketch accordingly. (This is explained in more detail below.)
To reiterate, this sketch won't work on a standard Arduino; you need to use a Teensy.

How the sketch works

The software is straightforward because the Teensy has USB support built in. First, the IR library is initialized to receive IR codes on pin 11:
#include <IRremote.h>

int RECV_PIN = 11;
IRrecv irrecv(RECV_PIN);
decode_results results;

void setup()
{
  irrecv.enableIRIn(); // Start the receiver
  Serial.begin(9600);
}
Next, the decode method is called to receive IR codes. If the hex value for the received code corresponds to a desired button, a USB mouse or keyboard command is sent. If a code is not recognized, it is printed on the serial port. Finally, after receiving a code, the resume method is called to resume receiving IR codes.
int step = 1;
void loop() {
  if (irrecv.decode(&results)) {
    switch (results.value) {
    case 0x9eb92: // Sony up
      Mouse.move(0, -step); // up
      break;
    case 0x5eb92:  // Sony down
      Mouse.move(0, step); // down
      break;
...
    case 0x90b92:  // Sony 0
      Keyboard.print("0");
      break;
...
    default:
      Serial.print("Received 0x");
      Serial.println(results.value, HEX);
      break;
    }
    irrecv.resume(); // Resume decoding (necessary!)
  }
}
You may wonder where the codes such as 0x9eb92 come from. These values are for my Sony DVD remote, so chances are they won't work for your remote. To get the values for your remote, look at the serial console as you press the desired buttons. As long as you have a supported remote type (NEC, Sony, RC5/6), you'll get the hex values to put into the sketch. Simply copy the hex values into the sketch, and perform the desired action.

There are a few details to note. If your remote uses the RC5 or RC6 format, there are actually two different codes assigned to each button, and the remote alternates between them. Push the button twice to see if you'll need to use two different codes. If you want to send a non-ASCII keyboard code, such as Page Down, you'll need to use a slightly more complex set of commands (documentation). For example, the following code sends a Page UP if it receives a RC5 Volume Up from the remote. Note that there are two codes for volume up, and note that KEY_PAGE_UP is sent, followed by 0 (no key).

    case 0x10: // RC5 vol up
    case 0x810:
      Keyboard.set_key1(KEY_PAGE_UP);
      Keyboard.send_now();
      Keyboard.set_key1(0);
      Keyboard.send_now();
      break;

Improvements

My first implementation of the sketch as described above was very easy, but there were a couple displeasing things. The first problem was the mouse movement was either very slow (with a small step size) or too jerky (with a large step size). Second, if you press a number on the remote, the keyboard input rapidly repeats because the IR remote repeatedly sends the IR code, so you end up with "111111" when you just wanted "1".

The solution to the mouse movement is to implement acceleration - as you hold the button down, the mouse moves faster. This was straightforward to implement. The sketch checks if the button code was received within 200ms of the previous code. If so, the sketch speeds up the mouse movement by increasing the step size. Otherwise it resets the step size to 1. The result is that tapping the button gives you fine control by moving the mouse a little bit, while holding the button down lets you zip across the screen:

    if (millis() - lastTime > GAP) {
      step = 1;
    } 
    else if (step > 20) {
      step += 1;
    }
Similarly, to prevent the keyboard action from repeating, we only output keypresses if the press is more then 200ms after the previous. This results in a single keyboard action no matter how long a button is pressed down. The same thing is done to prevent multiple mouse clicks.
 if (millis() - lastTime > GAP) {
        switch (results.value) {
        case 0xd0b92:
          Mouse.click();
          break;
        case 0x90b92:
          Keyboard.print("0");
          break;
...

Now you can control your PC from across the room by using your remote. Thanks to Paul Stoffregen of PJRC for porting my IR remote library to the Teensy and sending me a Teensy for testing.

IRremote library now runs on the Teensy, Arduino Mega, and Sanguino

Thanks to Paul Stoffregen of PJRC, my Arduino IR remote library now runs on a bunch of different platforms, including the Teensy, Arduino Mega, and Sanguino. Paul has details here, along with documentation on the library that I admit is better than mine.

I used my new IRremote test setup to verify that the library works fine on the Teensy. I haven't tested my library on the other platforms because I don't have the hardware so let me know if you have success or run into problems.

Download

The latest version of the IRremote library with the multi-platform improvements is on GitHub. To download and install the library:
  • Download the IRremote library zip file from GitHub.
  • Unzip the download
  • Move/rename the shirriff-Arduino-IRremote-nnnn directory to arduino-000nn/libraries/IRremote.

Thanks again to Paul for adding this major improvement to my library and sending me a Teensy to test it out. You can see from the picture that the Teensy provides functionality similar to the Arduino in a much smaller package that is also breadboard-compatible; I give it a thumbs-up.

Testing the Arduino IR remote library

I wrote an IR remote library for the Arduino (details) that has turned out to be popular. I want to make sure I don't break things as I improve the library, so I've created a test suite that uses a pair of Arduinos: one sends data and the other receives data. The receiver verifies the data, providing an end-to-end test that the library is working properly.
Overview of the test

The first Arudino repeatedly sends a bunch of IR codes to the second Arduino. The second Arduino verifies that the received code is what is expected. If all is well, the second Arduino flashes the LED for each successful code. If there is an error, the second Arudino's LED illuminates for 5 seconds. The test cycle repeats forever. Debugging information is output to the second Arduino's serial port, which is helpful for tracking down the cause of errors.

Hardware setup

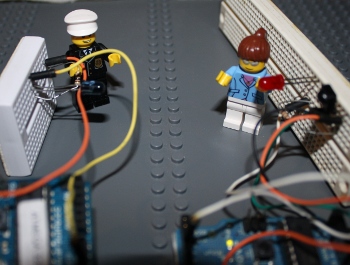
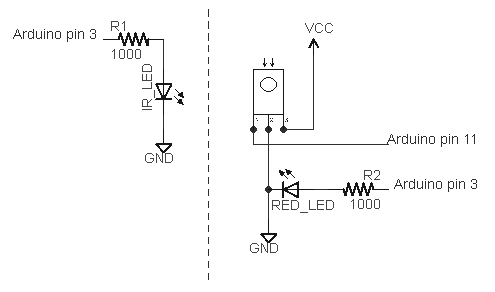
The test hardware is pretty simple: one Arduino transmits, and one Arduino receives. An IR LED is connected to pin 3 of the first Arduino to send the IR code. An IR detector is connected to pin 11 of the second Arduino to receive the IR code. A LED is connected to pin 3 of the second Arduino to provide the test status.
schematic of test setup

Details of the test software

One interesting feature of this test is the same sketch runs on the sending Arduino and the receiving Arduino. The test looks for an input on pin 11 to decide if it is the receiver:
void setup()
{
  Serial.begin(9600);
  // Check RECV_PIN to decide if we're RECEIVER or SENDER
  if (digitalRead(RECV_PIN) == HIGH) {
    mode = RECEIVER;
    irrecv.enableIRIn();
    pinMode(LED_PIN, OUTPUT);
    digitalWrite(LED_PIN, LOW);
    Serial.println("Receiver mode");
  } 
  else {
    mode = SENDER;
    Serial.println("Sender mode");
  }
}
Another interesting feature is the test suite is expressed very simply:
  test("SONY4", SONY, 0x12345, 20);
  test("SONY5", SONY, 0x00000, 20);
  test("SONY6", SONY, 0xfffff, 20);
  test("NEC1", NEC, 0x12345678, 32);
  test("NEC2", NEC, 0x00000000, 32);
  test("NEC3", NEC, 0xffffffff, 32);
...
Each test call has a debugging string, the type of code to send/receive, the value to send/receive, and the number of bits.

On the sender, the testmethod sends the code, while on the receiver, the method verifies that the proper code is received. The SENDER code calls the appropriate send method based on the type, and then delays before the next test. The RECEIVER code waits for a code. If it's correct, it flashes the LED. Otherwise, it sets the state to ERROR.

void test(char *label, int type, unsigned long value, int bits) {
  if (mode == SENDER) {
    Serial.println(label);
    if (type == NEC) {
      irsend.sendNEC(value, bits);
    } 
    else if (type == SONY) {
...
    }
    delay(200);
  } 
  else if (mode == RECEIVER) {
    irrecv.resume(); // Receive the next value
    unsigned long max_time = millis() + 30000;
    // Wait for decode or timeout
    while (!irrecv.decode(&results)) {
      if (millis() > max_time) {
        mode = ERROR; // timeout
        return;
      }
    }
    if (type == results.decode_type && value == results.value && bits == results.bits) {
      // flash LED
    } 
    else {
      mode = ERROR;
    }
  }
}
The trickiest part of the code is synchronizing the sender and the receiver. This happens in loop(). The receiver waits for 1 second without any transmission, while the sender pauses for 2 seconds after each time through the tests. Thus, the receiver will wait while the sender is running through tests, and then will start listening just before the sender starts the next cycle of tests. One other thing to point out is if there is an error, the receiver will skip through all the remaining tests, light the LED to indicate the error, and then will wait to sync up again. This avoids the problem of one bad test getting the receiver permanently out of sync; the receiver is able to re-sync and continue successfully after a failed test.
void loop() {
  if (mode == SENDER) {
    delay(2000);  // Delay for more than gap to give receiver a better chance to sync.
  } 
  else if (mode == RECEIVER) {
    waitForGap(1000);
  } 
  else if (mode == ERROR) {
    // Light up for 5 seconds for error
    mode = RECEIVER;  // Try again
    return;
  }
The test also includes some raw mode tests. These are a bit more complicated, since I want to test the various combinations of sending and receiving in raw mode.

Download and running

I'm gradually moving my development to GitHub at https://github.com/shirriff/Arduino-IRremote.

The code fragments above have been slightly abbreviated; the full code for the test sketch is here.

To download the library and try out the two-Arduino test:

  • Download the IRremote library zip file.
  • Unzip the download
  • Move/rename the shirriff-Arduino-IRremote-nnnn directory to arduino-000nn/libraries/IRremote. The test sketch is in examples/IRtest2.

To run the test, install the sketch on two Arduinos. The test should automatically start running. Note that it is a bit tricky to use two Arduinos at once. They will probably get assigned different serial ports, and you can switch ports using the Tools menu. If you get confused, you can plug one Arduino in at a time, and then you can be sure about which one is getting installed.

My plan is to do more development on the library, now that I have a reasonably solid test suite and I can be more confident that I don't break things. Let me know if there are specific features you'd like.

Thanks go to SparkFun for giving me the second Arduino that made this test possible.

Improved Arduino TV-B-Gone

Oct 2016: An updated version of the code is on github, thanks to Gabriel Staples.

The TV-B-Gone is a tiny infrared remote that can turn off almost any TV. A while ago, I ported the TV-B-Gone software to the Arduino; for details on the port and how it works see my previous post on the Arduino TV-B-Gone.

Mitch Altman, the inventor of the TV-B-Gone, made some improvements to the code for a weekly TV-B-Gone constructing workshop in San Francisco at Noisebridge. If you're in the San Francisco area and are interested in the TV-B-Gone, you might want to check it out.

The main bug fix in the new version is the European codes will now work (if you ground pin 5). (The problem was a bunch of #ifdefs to fit the codes into the ATtiny's limited memory; taking out the #ifdefs fixed the problems.) Pressing the trigger button during transmission will now restart the codes. The delay between codes was increased, which should make transmission more reliable. The Arduino's processor will now sleep when not transmitting (thanks to ka1kjz). (Unfortunately, the rest of the Arduino components are still draining power, so sleep mode will be more useful with stripped-down Arduino variants.)

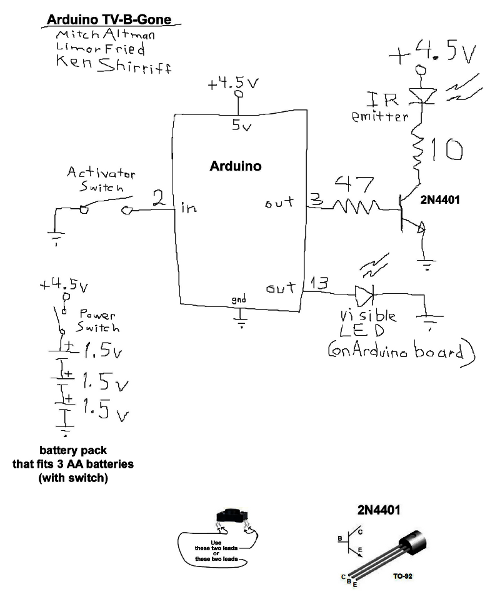
Important: the pins have been changed around in the new version (to avoid conflicts with the serial port). Pin 2 is now the trigger switch, Pin 3 is the IR output, and Pin 5 is grounded if you want European codes. If you built an Arduino TV-B-Gone before and want to use the new code, make sure you connect to the right pins.

Here's Mitch Altman's schematic for the Arduino TV-B-Gone (click for larger): Arduino TV-B-Gone schematic

To build the Arduino TV-B-Gone, follow the above schematic and download the sketch from github. My previous post on the Arduino TV-B-Gone has more information on wiring it up, if you need it.

Inside the Firesheep code: how it steals your identity

You may have heard about Firesheep, a new Firefox browser add-on that lets anyone easily snoop over Wi-Fi and hijack your identity for services such as Facebook and Twitter. This is rather scary; if you're using Wi-Fi in a coffee shop and access one of these sites, the guy in the corner with a laptop could just go click-click and be logged in as you. He could then start updating your Facebook status and feed for instance. Even if you log in securely over SSL, you're not protected.

The quick explanation

Bad guy at computer
The Firesheep site gives an overview of its operation: after you log into a website, the website gives your browser a cookie. By snooping on the Wi-Fi network, Firesheep can grab this cookie, and with the cookie the Firesheep user can hijack your session just as if they are logged in as you.

You may be wondering what these mysterious cookies are. Basically, a cookie is a short block of characters. The cookie consists of a name (e.g. "datr") and a value (e.g. "QKvHTCbufakBOZi5FOI8RTXQ"). For a login cookie, the website makes up a unique value each time someone logs in and sends it to the browser. Every time you load a new page, your browser sends the value back to the website and the website knows that you're the person who logged on. This assumes a couple things: first, that a bad guy can't guess the cookie (which would be pretty hard for a long string of random characters), and second, that nobody has stolen your cookie.

Web pages usually use https for login pages, which means SSL (Secure Socket Layer) is used to encrypt the data. When using SSL, anyone snooping will get gibberish and can't get your userid and password. However, because https is slower than regular http (because all that encryption takes time), websites often only use the secure https for login, and use insecure http after that. Banking sites and other high-security sites typically use https for everything, but most websites do not.

The consequence is that if you're using unencrypted Wi-Fi, and the website uses insecure http, it's very easy for anyone else on the Wi-Fi network to see all that data going to and from your computer, including the cookies. Once they have your cookie for a website, they can impersonate you on that website.

This insecurity has been known for a long time, and it's easy for moderately knowledgeable people to use a program such as tcpdump or wireshark to see your network traffic. What Firesheep does is makes this snooping so easy anyone can do it. (I would recommend you don't do it, though.)

The detailed explanation

A few things about Firesheep still puzzled me. In particular, how do other people's network packets get into your browser for Firesheep to steal?

To get more information on how Firesheep works, I took a look at the source code. Since it's open source, anyone can look at the code at http://github.com/codebutler/firesheep.

The packet sniffing code is in the firesheep/backend/src directory. This code implements a little program called "firesheep-backend" that uses the pcap library to sniff network traffic and output packets as JSON.

pcap is a commonly-used packet capture library that will capture data packets from your network interface. Normally, a network interface ignores network packets that aren't intended to be received by your computer, but network interfaces can be put into "promiscuous mode" (note: I didn't invent this name) and they will accept any incoming network data. Normally packet capture is used for testing and debugging, but it can also be used for evil snooping. (As an aside, the unique MAC address - the number such as 00:1D:72:BF:C9:55 on the back of a network card - is used by the network interface to determine if the packet is meant for it or not.)

Going back to the code, the http_sniffer.cpp gets a data packet from the pcap library, looks for TCP packets (normal internet data packets), and then http_packet.cpp uses http-parser to parse the packet if it's an HTTP packet. This breaks a HTTP packet into its relevant pieces including the cookies. Finally, the relevant pieces of the packet are output in JSON format (a JavaScript-based data format that can be easily used by the JavaScript plugin in the browser).

That explains how the packets get captured and converted into a format usable by the Firefox add-on. Next I will show how Firesheep knows how to deal with the cookies for a particular website.

The xpi/handlers directory has a short piece of JavaScript code for each website it knows how to snoop. For instance, for Flickr:

// Authors:
//   Ian Gallagher 
register({
  name: 'Flickr',
  url: 'http://www.flickr.com/me',
  domains: [ 'flickr.com' ],
  sessionCookieNames: [ 'cookie_session' ],

  identifyUser: function () {
    var resp = this.httpGet(this.siteUrl);
    var path = resp.request.channel.URI.path;
    this.userName = path.split('/')[2];
    this.userAvatar = resp.body.querySelector('.Buddy img').src;
  }
});
This code gives the name of the website (Flickr), the URL to access, the domain of the website, and the name of the session cookie. The session cookie is the target of the attack, so this is a key line. Next is a four line function that is used to fetch the user's name and avatar (i.e. picture) from the website once the cookie is obtained.

Firesheep currently has handlers for about 25 different websites. By writing a short handler similar to the above, new websites can easily be hacked (if their cookie is accessible).

The visible part of the extension that appears in the browser is in firesheep/xpi/chrome. The most interesting parts are in the content subdirectory. ff-sidebar.js implements the actual sidebar and displays accounts as they are sniffed.

The "meat" of the JavaScript plugin is in firesheep/xpi/modules. Firesheep.js implements the high-level operations such as startCapture() and stopCapture(). FiresheepSession.js is the glue between the plugin and the firesheep-backend binary that does the actual packet collection. Finally FiresheepWorker.js does the work of reading the packet summary from firesheep-backend (via JSON) and processing it by checking the appropriate website-specific handler and seeing if the desired cookie is present.

Finally, how do the pieces all get put together into the add-on that you can download? Firefox extensions are explained on the developer website. The install.rdf file (in firesheep/xpi) gives the Firefox browser the main information about the extension.

Well, that summarizes how the Firesheep plugin works based on my analysis of the code. Hopefully this will help you realize the risk of using unsecured Wi-Fi networks!

A visit from The Great Internet Migratory Box of Electronics Junk

tgimboej - The Great Internet Migratory Box of Electronics Junk
A mysterious package showed up on my doorstep today - box "INTJ-28", an instance of the The Great Internet Migratory Box of Electronics Junk, also known as TGIMBOEJ, which is the invention of a group called Evil Mad Scientist Laboratories (note: I am not making this up). The concept is someone sends a box of electronics junk to a recipient (e.g. me), the recipient takes some parts, adds some new parts, and sends it to a new recipient. Each recipient documents the box. There are currently about 120 of these boxes roaming the world.
Inside the box of junk
How did I end up with this box? I signed up on the request list a bit over a year ago, and was recently chosen by Mr. INTJ to receive a box. In other words, some total stranger on the internet sends me a box of junk. In turn, I've picked another total stranger from the list to receive the updated box of junk.
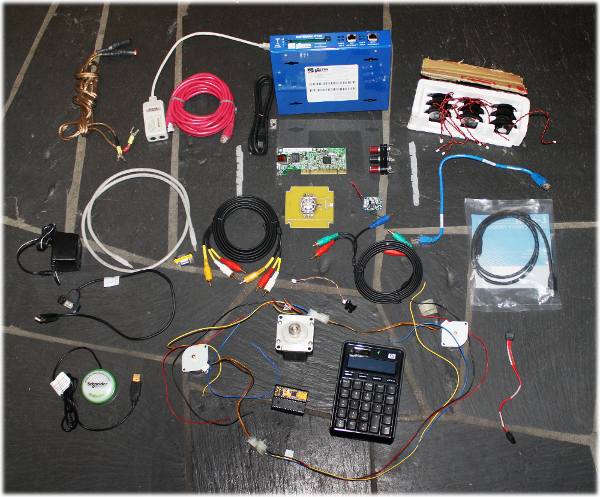
The contents of the box of junk
The contents of the box were pretty interesting. At the top is speaker wire, a USB/PS2 adapter, network cable, and a firewire cable. The blue box is the puzzling "JBM Electronics Gateway Cellular Router C120+F". To the right of it is a box of 9 small speakers, which seems like more speakers than anyone would need (which may be why they are in this box). In the next row is a wall-wart, USB extension, firewire cable, gender changer, RCA cable, a very bright 9-LED module, a Intel PRO/1000 MT Gigabit adapter, binding posts, a little mystery board, a short Ethernet cable, and a USB cable. At the bottom is a blinking USB ecobutton, two small stepper motors, a large stepper motor, and a HP combination calculator / numeric pad (which seems to be broken). Under the stepper motor is a PIC 18f4431 microcontroller, designed for motor control, and a Basic Stamp 2p microcontroller module. I think the Basic Stamp is the prize of the box, but I'm leaving it for the next recipient since I'm unlikely to switch from Arduino to a new platform. (Click the above image for a larger version.)

I ended up taking the big stepper motor, the LED, a few cables, the binding posts, one of the speakers, and the ecobutton. What I added to the box will be a surprise to the next recipient, whom I hope will post soon.

Car radio repair made difficult

My wife's car radio suddenly quit working, so I figured I'd take a look and see if I could fix it. The first problem was that it was mounted in the dash with 5-sided security fasteners, apparently to frustrate radio thieves who only have standard tools. Even my 100-piece security bit set let me down in this occasion, entirely lacking in the pentagonal category. Fortunately, Ebay rapidly provided me with the appropriate tool, and I started removing the radio. The alarm light started flashing and it made some angry beeps, but I was able to get the radio out without the alarm going off. I opened up the radio and took a look inside.
inside the radio
The symptoms were that the radio lit up and the display worked fine, but you could only hear extremely faint sound even if you cranked it up all the way. Using my diagnostic powers, I figured the problem was probably in the amplifier, which would probably be near the the back of the radio. Looking more closely, I noticed a capacitor oozing hideous brown gunk. Using my diagnostic powers again, I decided that this might be the problem. (It turns out that leaking electrolytic capacitors is a common problem, known as the capacitor plague.)
capacitor oozing gunk
I unsoldered the capacitor and removed the gunk as best I could. At least it wasn't as disgusting as the nest of ants that caused my previous electronic problem. The really annoying thing with the repair was the radio's circuit board had big globs of sticky heat sink compound exactly where I grabbed the board every time I picked it up. You can see the white patches in the lower left of the first picture. There was originally much more compound, but after getting it on my fingers twenty times, there wasn't much left. I should have learned to be more careful, but no such luck...

I figured it would be easy to get a replacement capacitor, so I checked the parts supplier Digi-Key. The good news was they had the exact capacitor listed. The bad news is they didn't have it in stock, and it would take 6 months to get it from the factory. Checking other parts catalogs, I found that this capacitor wasn't the easy-to-find commodity part I had expected, but a special short-and-wide capacitor designed to fit into the tight space, that nobody carried in stock. Too impatient to wait for 6 month delivery, I got a standard capacitor, which was the wrong size to mount nicely. I'll get no points for style, but I did manage to wedge it in place by putting it at a crazy angle. (I also put in new heat sink compound to replace the compound that I got all over my fingers.)
New capacitor installed in the radio
After replacing the radio, the radio wouldn't do anything because it needed the security code. Through surprising foresight, I actually had the code, and after putting the code in I found that the radio just gave me static. Oops, I forgot to connect the antennas to the radio. That was easy to fix, since I conveniently noticed before tightening up the security fasteners. With all the wires in place, I tried again and the radio seems to work as well as ever. It's always nice when one of my crazy projects actually works.

Update: no radio happiness

Unfortunately the radio quit working again after a couple days. I don't know if it has some deeper problem that killed the new capacitor too, or if the gunk from the old capacitor damaged something, but looks like it's time for a new radio. Oh well, I'll file this under less-successful-projects.

Getting the (literal) bugs out of a driveway gate controller

My driveway has a gate that automatically opens when you drive up, and then closes. Recently it stopped working and this blog post describes how I got the bugs out of the controller, reverse-engineered it, and got it working again.

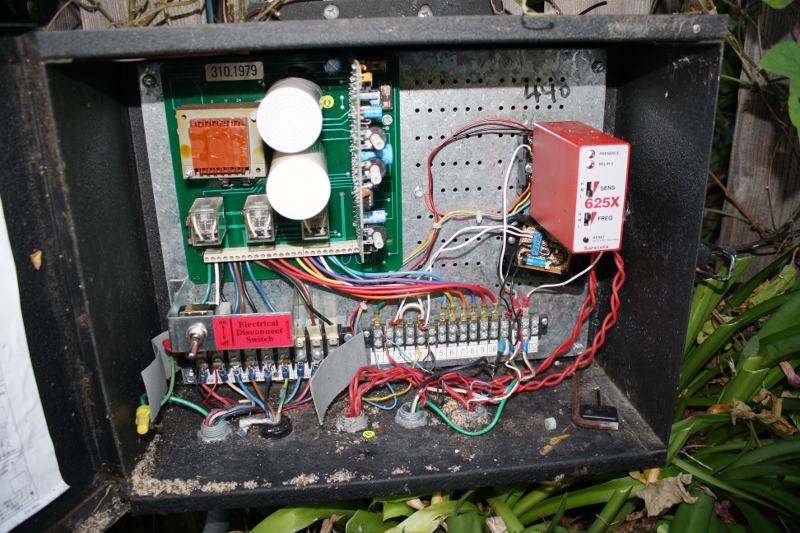
The gate is controlled by a Stanley 24600 gate controller, which has the fairly simple task of running the motors to open the gate and close the gate as appropriate. Everything worked fine for years, until one recent day it just stopped working, which was rather inconvenient. When I opened up the controller box, I noticed a couple potential problems.
Gate controller box infested with ants
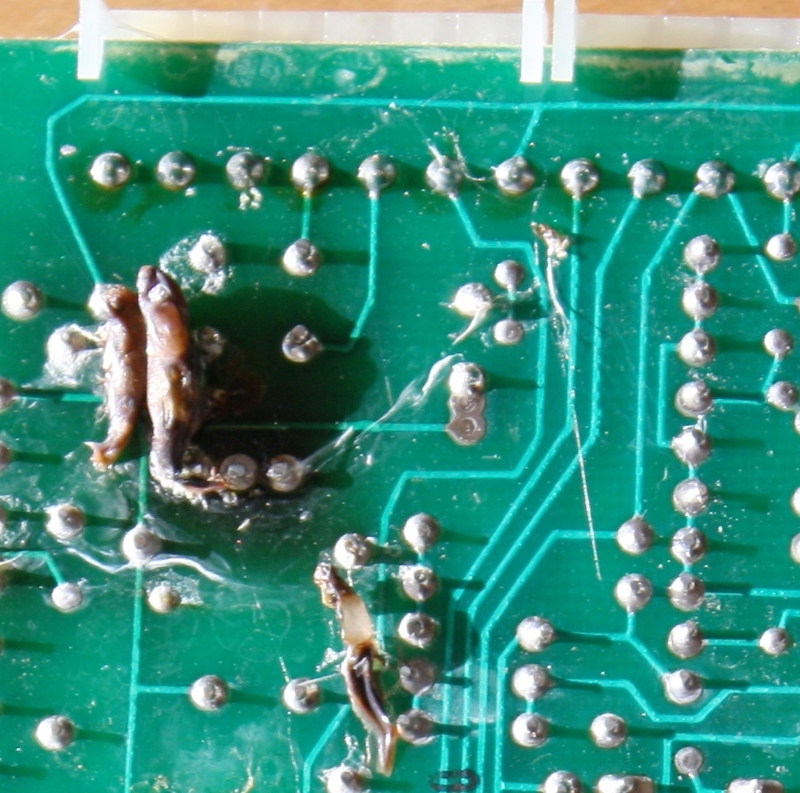
First, the circuit board had some disgusting cocoons on it, which were apparently shorting out the board and preventing it from working. I don't know what sort of insect made the cocoons, and I didn't want to wait around to find out.
Gate controller board infested with cocoons
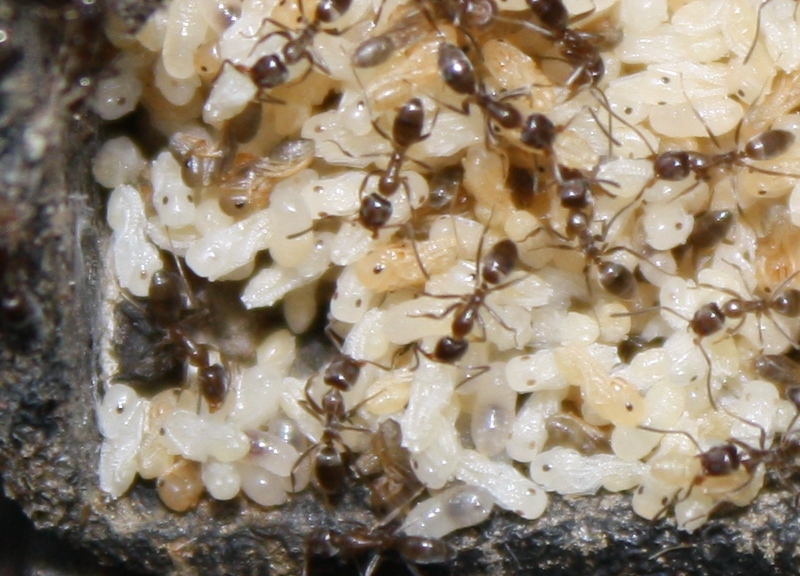
In addition, see those light brown piles at the bottom of the controller box? An ant nest had decided to move in for some reason, and they had brought thousands of eggs with them. I don't think the ants were actually interfering with the function of the controller, but it's hard to debug a circuit when ants keep crawling on you. Here's a closeup of the pile of eggs:
Closeup of ants and eggs in the controller.
Getting rid of the ant nest was easy. Opening up the box scared the ants, and they scurried around and moved out in 15 minutes flat, taking the eggs with them. I replaced the weather stripping around the box to keep them out.

The hideous cocoons on the other hand were a bigger problem. I removed them from the board and scrubbed the circuit board clean with rubbing alcohol. After replacing the circuit board, the gate would start opening but would not stop opening, which was a change but not really an improvement.

Everything else checked out fine (power, fuses, sensors, motors), so I knew the problem had to be in the controller. Unfortunately the controller is obsolete and nobody makes replacements or has documentation, so I figured I better get it fixed. I started poking around the circuit boards to try to figure out how they worked and where the problem might be.

The logic provided by the controller is simple, but not trivial: it can use a signal to open, or can use a signal to both open and close, or can use a signal to reverse, and has a stop signal. It also has a separate board to automatically close after a delay.

The controller is implemented using some CMOS gates and flip flops for the logic, and a couple 555 timers to control how long to run the motors to open and close the gates. Three big relays and two giant capacitors control the motors, while a few small relays provide additional logic. The controller also has a handful of transistors for various functions, and a bunch of resistors, diodes, and capacitors. The board on the right is the main logic board, and the smaller board on the left provides the optional automatic-close function. Note the variable resistors (with long white shafts) to adjust the various timings. There's also an AC-to-DC circuit on the board to power the logic, and a triac to switch low-voltage AC on and off for reasons I never figured out.

Newer controllers, of course, replace all this discrete logic with a microcontroller. They also provide a lot more functionality and options. It's interesting, though, to see how these circuits were implemented in the "olden days".
Gate controller circuit boards

I spent a bunch of time following PCB traces around (both visually and with a continuity tester) trying to figure out how all the pieces work together. It was a slower process than I had expected, since many of the traces go under components and you can't see where they end up. I was getting frustrated and considered building my own controller out of an Arduino, since it would be about 10 lines of code. However, I figured interfacing with the sensors and AC relays would be a pain, and I didn't want to burn out the expensive motors with a programming error. Thus, I continued to analyze the existing controller.

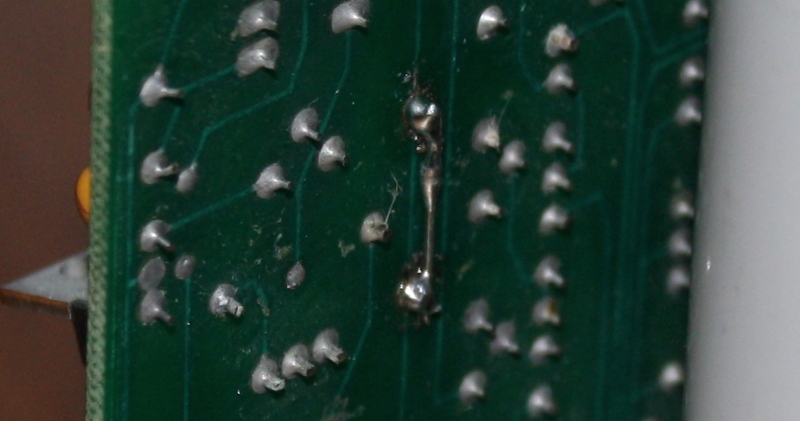
I got most of the logic figured out when I happened to discover a trace that didn't have continuity from one end to the other. Apparently one of the traces that powers some of the transistors had cracked while I was cleaning off the cocoons. I put a jumper across the bad trace, and everything worked perfectly:
Jumper wire to fix controller board

I've had lots of computer problems due to bugs, but this is the first time my problem was real live insect bugs. (Obligatory Grace Hopper bug link.)

Update: Nature still hates my gate

Today, my gate would only close half-way. After some investigation, I discovered that a vine had somehow gotten caught on the gate, and it was strong enough to keep the gate from closing all the way. I was a bit surprised that the gate motors weren't strong enough to rip the vine off, but I guess as a safety feature they don't have a lot of extra force. This problem was a lot easier to fix than the previous, since I just needed to remove the vine.

I conclude, however, that nature hates my gate and is trying to keep it from working, whether it takes insects or plants. What next? Ice storm? Tornado?
A vine attacks my gate

Using Arc to decode Venter's secret DNA watermark

Recently Craig Venter (who decoded the human genome) created a synthetic bacterium. The J. Craig Venter Institute (JCVI) took a bacterium's DNA sequence as a computer file, modified it, made physical DNA from this sequence, and stuck this DNA into a cell, which then reproduced under control of the new DNA to create a new bacterium. This is a really cool result, since it shows you can create the DNA of an organism entirely from scratch. (I wouldn't exactly call it synthetic life though, since it does require an existing cell to get going.) Although this project took 10 years to complete, I'm sure it's only a matter of time before you will be able to send a data file to some company and get the resulting cells sent back to you.

One interesting feature of this synthetic bacterium is it includes four "watermarks", special sequences of DNA that prove this bacterium was created from the data file, and is not natural. However, they didn't reveal how the watermarks were encoded. The DNA sequences were published (GTTCGAATATTT and so on), but how to get the meaning out of this was left a puzzle. For detailed background on the watermarks, see Singularity Hub. I broke the code (as I described earlier) and found the names of the authors, some quotations, and the following hidden web page. This seems like science fiction, but it's true. There's actually a new bacterium that has a web page encoded in its DNA:
DNA web page
I contacted the JCVI using the link and found out I was the 31st person to break the code, which is a bit disappointing. I haven't seen details elsewhere on how the code works, so I'll provide the details. (Spoilers ahead if you want to break the code yourself.) I originally used Python to break the code, but since this is nominally an Arc blog, I'll show how it can be done using the Arc language.

The oversimplified introduction to DNA

DNA double helix Perhaps I should give the crash course in DNA at this point. The genetic instructions for all organisms are contained in very, very long molecules called DNA. For our purposes, DNA can be described as a sequence of four different letters: C, G, A, and T. The human genome is 3 billion base pairs in 23 chromosome pairs, so your DNA can be described as a pair of sequences of 3 billion C's, G's, A's, and T's.
Watson and Crick won the Nobel Prize for figuring out the structure of DNA and how it encodes genes. Your body is made up of important things such as enzymes, which are made up of carefully-constructed proteins, which are made up of special sequences of 18 different amino acids. Your genes, which are parts of the DNA, specify these amino acid sequences. Each three DNA bases specify a particular amino acid in the sequence. For instance, the DNA sequence CTATGG specifies the amino acids leucine and tryptophan because CTA indicates leucine, and TGG indicates tryptophan. Crick and Watson and Rosalind Franklin discovered the genetic code that associates a particular amino acid with each of the 64 possible DNA triples. I'm omitting lots of interesting details here, but the key point is that each three DNA symbols specifies one amino acid.

Encoding text in DNA

Now, the puzzle is to figure out how JCVI encoded text in the synthetic bacterium's DNA. The obvious extension is instead of assigning an amino acid to each of the 64 DNA triples, assign a character to it. (I should admit that this was only obvious to me in retrospect, as I explained in my earlier blog posting.) Thus if the DNA sequence is GTTCGA, then GTT will be one letter and CGA will be another, and so on. Now we just need to figure out what letter goes with each DNA triple.

If we know some text and the DNA that goes with it, it is straightforward to crack the code that maps between the characters and the DNA triples. For instance, if we happen to know that the text "LIFE" corresponds to the DNA "AAC CTG GGC TAA", then we can conclude that AAA goes to L, CTG goes to I, GGC goes to F, and TAA goes to E. But how do we get started?

Conveniently, the Singularity Hub article gives the quotes that appear in the DNA, as reported by JCVI:

"TO LIVE, TO ERR, TO FALL, TO TRIUMPH, TO RECREATE LIFE OUT OF LIFE."
"SEE THINGS NOT AS THEY ARE, BUT AS THEY MIGHT BE."
"WHAT I CANNOT BUILD, I CANNOT UNDERSTAND."
We can try matching the quotes against each position in the DNA and see if there is any position that works. A match can fail in two ways. First, if the same DNA triple corresponds to two different letters, something must be wrong. For instance, if we try to match "LIFE" against "AAC CTG GGC AAC", we would conclude that AAC means both L and E. Second, if the same letter corresponds to two DNA triples, we can reject it. For instance, if we try to match "ERR" against "TAA CTA GTC", then both CTA and GTC would mean R. (Interestingly, the real genetic code has this second type of ambiguity. Because there are only 18 amino acids and 64 DNA triples, many DNA triples indicate the same amino acid.)

Using Arc to break the code

To break the code, first download the DNA sequences of the four watermarks and assign them to variables w1, w2, w3, w4. (Download full code here.)
(= w1 "GTTCGAATATTTCTATAGCTGTACA...")
(= w2 "CAACTGGCAGCATAAAACATATAGA...")
(= w3 "TTTAACCATATTTAAATATCATCCT...")
(= w4 "TTTCATTGCTGATCACTGTAGATAT...")
Next, lets break the four watermarks into triples by first converting to a list and then taking triples of length 3, which we call t1 through t4:
(def strtolist (s) (accum accfn (each x s (accfn (string x)))))
(def tripleize (s) (map string (tuples (strtolist s) 3)))

(= t1 (tripleize w1))
(= t2 (tripleize w2))
(= t3 (tripleize w3))
(= t4 (tripleize w4))
The next function is the most important. It takes triples and text, matches the triples against the text, and generates a table that maps from each triple to the corresponding characters. If it runs into a problem (either two characters assigned to the same triple, or the same character assigned to two triples) then it fails. Otherwise it returns the code table. It uses tail recursion to scan through the triples and input text together.
; Match the characters in text against the triples.
; codetable is a table mapping triples to characters.
; offset is the offset into text
; Return codetable or nil if no match.
(def matchtext (triples text (o codetable (table)) (o offset 0))
  (if (>= offset (len text)) codetable ; success
      (with (trip (car triples) ch (text offset))
  ; if ch is assigned to something else in the table
  ; then not a match
  (if (and (mem ch (vals codetable))
           (isnt (codetable trip) ch))
        nil
             (empty (codetable trip))
        (do (= (codetable trip) ch) ; new char
           (matchtext (cdr triples) text codetable (+ 1 offset)))
             (isnt (codetable trip) ch)
        nil ; mismatch
      (matchtext (cdr triples) text codetable (+ 1 offset))))))
Finally, the function findtext finds a match anywhere in the triple list. In other words, the previous function matchtext assumes the start of the triples corresponds to the start of the text. But findtext tries to find a match at any point in the triples. It calls matchtext, and if there's no match then it drops the first triple (using cdr) and calls itself recursively, until it runs out of triples.
(def findtext (triples text)
  (if (< (len triples) (len text)) nil
    (let result (matchtext triples text)
      (if result result
        (findtext (cdr triples) text)))))
The Singularity Hub article said that the DNA contains the quote:
"TO LIVE, TO ERR, TO FALL, TO TRIUMPH, TO RECREATE LIFE OUT OF LIFE." - JAMES JOYCE 
Let's start by just looking for "LIFE OUT OF LIFE", since we're unlikely to get LIFE to match twice just by chance:
arc> (findtext t1 "LIFE OUT OF LIFE")
nil
No match in the first watermark, so let's try the second.
arc> (findtext t2 "LIFE OUT OF LIFE")
#hash(("CGT" . #\O) ("TGA" . #\T) ("CTG" . #\I) ("ATA" . #\space) ("TAA" . #\E) ("AAC" . #\L) ("TCC" . #\U) ("GGC" . #\F))
How about that! Looks like a match in watermark 2, with DNA "AAC" corresponding to L, "CGT" corresponding to "I", "GGC" corresponding to "F", and so on. (The Arc format for hash tables is pretty ugly, but hopefully you can see that in the output.) Let's try matching the full quote and store the table in code2:
arc> (= code2 (findtext t2 "TO LIVE, TO ERR, TO FALL, TO TRIUMPH, TO RECREATE LIFE OUT OF LIFE."))
#hash(("TCC" . #\U) ("TCA" . #\H) ("TTG" . #\V) ("CTG" . #\I) ("ACA" . #\P) ("CTA" . #\R) ("CGA" . #\.) ("ATA" . #\space) ("CGT" . #\O) ("TTT" . #\C) ("TGA" . #\T) ("TAA" . #\E) ("AAC" . #\L) ("CAA" . #\M) ("GTG" . #\,) ("TAG" . #\A) ("GGC" . #\F))
Likewise, we can try matching the other quotes:
arc> (= code3 (findtext t3 "SEE THINGS NOT AS THEY ARE, BUT AS THEY MIGHT BE."))
#hash(("CTA" . #\R) ("TCA" . #\H) ("CTG" . #\I) ("GCT" . #\S) ("CGA" . #\.) ("ATA" . #\space) ("CAT" . #\Y) ("CGT" . #\O) ("TCC" . #\U) ("AGT" . #\B) ("TGA" . #\T) ("TAA" . #\E) ("TGC" . #\N) ("TAC" . #\G) ("CAA" . #\M) ("GTG" . #\,) ("TAG" . #\A))
arc> (= code4 (findtext t4 "WHAT I CANNOT BUILD, I CANNOT UNDERSTAND"))
#hash(("TCC" . #\U) ("TCA" . #\H) ("ATT" . #\D) ("CTG" . #\I) ("GCT" . #\S) ("TTT" . #\C) ("ATA" . #\space) ("TAA" . #\E) ("CGT" . #\O) ("CTA" . #\R) ("TGA" . #\T) ("AGT" . #\B) ("AAC" . #\L) ("TGC" . #\N) ("GTG" . #\,) ("TAG" . #\A) ("GTC" . #\W))
Happily, they all decode the same triples to the same letters, or else we would have a problem. We can merge these three decode tables into one:
arc> (= code (listtab (join (tablist code2) (tablist code3) (tablist code4))))#hash(("TCC" . #\U) ("TCA" . #\H) ("CTA" . #\R) ("CGT" . #\O) ("TGA" . #\T) ("CGA" . #\.) ("TAA" . #\E) ("AAC" . #\L) ("TAC" . #\G) ("TAG" . #\A) ("GGC" . #\F) ("ACA" . #\P) ("ATT" . #\D) ("TTG" . #\V) ("CTG" . #\I) ("GCT" . #\S) ("TTT" . #\C) ("CAT" . #\Y) ("ATA" . #\space) ("AGT" . #\B) ("GTG" . #\,) ("TGC" . #\N) ("CAA" . #\M) ("GTC" . #\W))
Now, let's make a decode function that will apply the string to the unknown DNA and see what we get. (We'll leave unknown triples unconverted.)
(def decode (decodemap triples)
  (string (accum accfn (each triple triples (accfn
      (if (decodemap triple)
        (decodemap triple)
        (string "(" triple ")" )))))))
arc> (decode code t1)
"(GTT). CRAIG VENTER INSTITUTE (ACT)(TCT)(TCT)(GTA)(GGG)ABCDEFGHI(GTT)(GCA)LMNOP(TTA)RSTUVW(GGT)Y(TGG)(GGG) (TCT)(CTT)(ACT)(AAT)(AGA)(GCG)(GCC)(TAT)(CGC)(GTA)(TTC)(TCG)(CCG)(GAC)(CCC)(CCT)(CTC)(CCA)(CAC)(CAG)(CGG)(TGT)(AGC)(ATC)(ACC)(AAG)(AAA)(ATG)(AGG)(GGA)(ACG)(GAT)(GAG)(GAA).,(GGG)SYNTHETIC GENOMICS, INC.(GGG)(CGG)(GAG)DOCTYPE HTML(AGC)(CGG)HTML(AGC)(CGG)HEAD(AGC)(CGG)TITLE(AGC)GENOME TEAM(CGG)(CAC)TITLE(AGC)(CGG)(CAC)HEAD(AGC)(CGG)BODY(AGC)(CGG)A HREF(CCA)(GGA)HTTP(CAG)(CAC)(CAC)WWW.(GTT)CVI.ORG(CAC)(GGA)(AGC)THE (GTT)CVI(CGG)(CAC)A(AGC)(CGG)P(AGC)PROVE YOU(GAA)VE DECODED THIS WATERMAR(GCA) BY EMAILING US (CGG)A HREF(CCA)(GGA)MAILTO(CAG)MRO(TTA)STI(TGG)(TCG)(GTT)CVI.ORG(GGA)(AGC)HERE(GAG)(CGG)(CAC)A(AGC)(CGG)(CAC)P(AGC)(CGG)(CAC)BODY(AGC)(CGG)(CAC)HTML(AGC)"
It looks like we're doing pretty well with the decoding, as there's a lot of recognizable text and some HTML in there. There's also conveniently the entire alphabet as a decoding aid. From this, we can fill in a lot of the gaps, e.g. GTT is J and GCA is K. From the HTML tags we can figure out angle brackets, quotes, and slash. We can guess that there are numbers in there and figure out that ACT TCT TCT GTA is 2009. These deductions can be added manually to the decode table:
arc> (= (code "GTT") #\J)
arc> (= (code "GCA") #\K)
arc> (= (code "ACT") #\2)
...
After a couple cycles of adding missing characters and looking at the decodings, we get the almost-complete decodings of the four watermarks:

The contents of the watermarks

J. CRAIG VENTER INSTITUTE 2009
ABCDEFGHIJKLMNOPQRSTUVWXYZ 0123456789(TTC)@(CCG)(GAC)-(CCT)(CTC)=/:<(TGT)>(ATC)(ACC)(AAG)(AAA)(ATG)(AGG)"(ACG)(GAT)!'.,
SYNTHETIC GENOMICS, INC.
<!DOCTYPE HTML><HTML><HEAD><TITLE>GENOME TEAM</TITLE></HEAD><BODY><A HREF="HTTP://WWW.JCVI.ORG/">THE JCVI</A><P>PROVE YOU'VE DECODED THIS WATERMARK BY EMAILING US <A HREF="MAILTO:[email protected]">HERE!</A></P></BODY></HTML>

MIKKEL ALGIRE, MICHAEL MONTAGUE, SANJAY VASHEE, CAROLE LARTIGUE, CHUCK MERRYMAN, NINA ALPEROVICH, NACYRA ASSAD-GARCIA, GWYN BENDERS, RAY-YUAN CHUANG, EVGENIA DENISOVA, DANIEL GIBSON, JOHN GLASS, ZHI-QING QI.
"TO LIVE, TO ERR, TO FALL, TO TRIUMPH, TO RECREATE LIFE OUT OF LIFE." - JAMES JOYCE

CLYDE HUTCHISON, ADRIANA JIGA, RADHA KRISHNAKUMAR, JAN MOY, MONZIA MOODIE, MARVIN FRAZIER, HOLLY BADEN-TILSON, JASON MITCHELL, DANA BUSAM, JUSTIN JOHNSON, LAKSHMI DEVI VISWANATHAN, JESSICA HOSTETLER, ROBERT FRIEDMAN, VLADIMIR NOSKOV, JAYSHREE ZAVERI.
"SEE THINGS NOT AS THEY ARE, BUT AS THEY MIGHT BE."

CYNTHIA ANDREWS-PFANNKOCH, QUANG PHAN, LI MA, HAMILTON SMITH, ADI RAMON, CHRISTIAN TAGWERKER, J CRAIG VENTER, EULA WILTURNER, LEI YOUNG, SHIBU YOOSEPH, PRABHA IYER, TIM STOCKWELL, DIANA RADUNE, BRIDGET SZCZYPINSKI, SCOTT DURKIN, NADIA FEDOROVA, JAVIER QUINONES, HANNA TEKLEAB.
"WHAT I CANNOT BUILD, I CANNOT UNDERSTAND." - RICHARD FEYNMAN

The first watermark consists of a copyright-like statement, a list of all the characters, and the hidden HTML page (which I showed above.) The second, third, and fourth watermarks consist of a list of the authors and three quotations.

Note that there are 14 undecoded triples that only appear once in the list of characters. They aren't in ASCII order, keyboard order, or any other order I can figure out, so I can't determine what they are, but I assume they are missing punctuation and special characters.

The DNA decoding table

The following table summarizes the 'secret' DNA to character code:
AAA ? AAC L AAG ? AAT 3
ACA P ACC ? ACG ? ACT 2
AGA 4 AGC > AGG ? AGT B
ATA space ATC ? ATG ? ATT D
CAA M CAC / CAG : CAT Y
CCA = CCC - CCG ? CCT ?
CGA . CGC 8 CGG < CGT O
CTA R CTC ? CTG I CTT 1
GAA ' GAC ? GAG ! GAT ?
GCA K GCC 6 GCG 5 GCT S
GGA " GGC F GGG newline GGT X
GTA 9 GTC W GTG , GTT J
TAA E TAC G TAG A TAT 7
TCA H TCC U TCG @ TCT 0
TGA T TGC N TGG Z TGT ?
TTA Q TTC ? TTG V TTT C
As far as I can tell, this table is in random order. I analyzed it a bunch of ways, from character frequency and DNA frequency to ASCII order and keyboard order, and couldn't figure out any rhyme or reason to it. I was hoping to find either some structure or another coded message, but I couldn't find anything.

More on breaking the code

It was convenient that the JCVI said in advance what quotations were in the DNA, making it easier to break the code. But could the code still be broken if they hadn't?

One way to break the code is to look at statistics of how often different triples appear. We count the triples, convert the table to a list, and then sort the list. In the sort we use a special comparison function that compares the counts, to sort on the counts, not on the triples.

arc> (sort
  (fn ((k1 v1) (k2 v2)) (> v1 v2))
  (tablist (counts t2)))
(("ATA" 41) ("TAG" 27) ("TAA" 25) ("CTG" 18) ("TGC" 16) ("GTG" 16) ("CTA" 15) ("CGT" 14) ("AAC" 13) ("TGA" 10) ("TTT" 10) ("GCT" 10) ("TAC" 10) ("TCA" 8) ("CAA" 7) ("CAT" 7) ("TCC" 7) ("TTG" 5) ("GGC" 4) ("GTT" 4) ("ATT" 4) ("CCC" 4) ("GCA" 3) ("AGT" 2) ("TTA" 2) ("ACA" 2) ("CGA" 2) ("GGA" 2) ("GTC" 1) ("TGG" 1) ("GGG" 1))
This tells us that ATA appears 41 times in the second watermark, TAG 27 times, and so on. If we assume that this encodes English text, then the most common characters will be space, E, T, A, O, and so on. Then it's a matter of trial-and-error trying the high-frequency letters for the high-frequency triples until we find a combination that yields real words. (It's just like solving a newspaper cryptogram.) You'll notice that the high-frequency triples do turn out to match high-frequency letters, but not in the exact order. (I've written before on simple cryptanalysis with Arc.)

Another possible method is to guess that a phrase such as "CRAIG VENTER" appears in the solution, and try to match that against the triples. This turns out to be the case. It doesn't give a lot of letters to work on, but it's a start.

Arc: still bad for exploratory programming

A couple years ago I wrote that Arc is bad for exploratory programming, which turned out to be hugely controversial. I did this DNA exploration using both Python and Arc, and found Python to be much better for most of the reasons I described in my earlier article.
  • Libraries: Matching DNA triples was trivial in Python because I could use regular expressions. Arc doesn't have regular expressions (unless you use a nonstandard variant such as Anarki). Another issue was when I wanted to do graphical display of watermark contents; Arc has no graphics support.
  • Performance: for the sorts of exploratory programming I do, performance is important. For instance, one thing I did when trying to figure out the code was match all substrings of one watermark against another, to see if there were commonalities. This is O(N^3) and was tolerably fast in Python, but Arc would be too painful.
  • Ease of and speed of programming. A lot of the programming speed benefit is that I have more familiarity with Python, but while programming in Arc I would constantly get derailed by cryptic error messages, or trying to figure out how to do simple things like breaking a string into triples. It doesn't help that most of the Arc documentation I wrote myself.
To summarize, I started off in Arc, switched to Python when I realized it would take me way too long to figure out the DNA code using Arc, and then went back to Arc for this writeup after I figured out what I wanted to do. In other words, Python was much better for the exploratory part.

Thoughts on the DNA coding technique

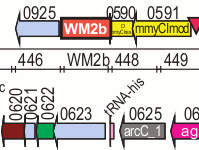
Part of the gene map.  Watermark 2b is shown in the DNA, with an arc gene below it I see some potential ways that the DNA coding technique could be improved and extended. Since the the full details of the DNA coding technique haven't been published by the JCVI yet, they may have already considered these ideas.

Being able to embed text in the DNA of a living organism is extremely cool. However, I'm not sure how practical it is. The data density in DNA is very high, maybe 500 times that of a hard drive (ref), but most of the DNA is devoted to keeping the bacterium alive and only about 1K of text is stored in the watermarks.

I received email from JCVI that said the coding mechanism also supports Java, math (LaTeX?), and Perl as well as HTML. Embedding Perl code in a living organism seems even more crazy than text or HTML.

If encoding text in DNA catches on, I'd expect that error correction would be necessary to handle mutations. An error-correction code like Reed-Solomon won't really work because DNA can suffer deletions and insertions as well as mutations, so you'd need some sort of generalized deletion/insertion correcting code.

I just know that a 6-bit code isn't going to be enough. Sooner or later people will want lower-case, accented character, Japanese, etc. So you might as well come up with a way to put Unicode into DNA, probably as UTF-8. And people will want arbitrary byte data. My approach would be to use four DNA base pairs instead of three, and encode bytes. Simply assign A=00, C=01, G=10, and T=11 (for instance), and encode your bytes.

If I were writing an RFC for data storage in DNA, I'd suggest that most of the time you'd want to store the actual data on the web, and just store a link in the DNA. (Similar to how a QR code or tinyurl can link to a website.) The encoded link could be surrounded by a special DNA sequence that indicates a tiny DNA link code. This sequence could also be used to find the link code by using PCR, so you don't need to do a genome sequence on the entire organism to find the watermark. (The existing watermarks are in fact surrounded by fixed sequences, which may be for that purpose.)

I think there should also be some way to tag and structure data that is stored DNA, to indicate what is identification, description, copyright, HTML, owners, and so forth. XML seems like an obvious choice, but embedding XML in living organisms makes me queasy.

Conclusions

Being able to fabricate a living organism from a DNA computer file is an amazing accomplishment of Craig Venter and the JCVI. Embedding the text of a web page in a living organism seems like science fiction, but it's actually happened. Of course the bacterium doesn't actually serve the web page... yet.

Sources

Decoding the secret DNA code in Venter's synthetic bacterium

Craig Venter recently created a synthetic bacterium with a secret message encoded in the DNA. This is described in more detail at singularityhub. (My article will make much more sense if you read the singularityhub article.)

I tried unsuccessfully to decode the secret message yesterday. I realized the problem was that I was thinking like a computer scientist, not a biologist. Once I started thinking like a biologist, the solution was obvious.

I won't spoil your fun by giving away the full answer (at least for now), but I'll mention a few things. [Update: I've written up the details here.] There are four watermarks. The first contains HTML. (That's right! They put actual HTML - complete with DOCTYPE - into the DNA of a living creature. That's just crazy!)
The HTML in the genome
I sent email to the link, and they told me I was the 31st person to break the code. I guess I'll need to be faster next time.

The second, third, and fourth watermarks each contain co-authors and an interesting scientific quote. The first watermark also contains the full character set in order, to help verify the decoding, although I was unable to decode a few of the special characters because they only appear once.

I found the following quotes (which match the quotes given by JCVI and in the singularityhub article):
"TO LIVE, TO ERR, TO FALL, TO TRIUMPH, TO RECREATE LIFE OUT OF LIFE." - JAMES JOYCE
"SEE THINGS NOT AS THEY ARE, BUT AS THEY MIGHT BE."
WHAT I CANNOT BUILD, I CANNOT UNDERSTAND." - RICHARD FEYNMAN
Note that the quotes are one per watermark, not all in the fourth watermark as the singularityhub article claims.

If you want to try decoding the code, the DNA of the watermarks is at Science Magazine. The complete genome is a NCBI, in case you want it.

My loyal readers will be disappointed that I didn't use the Arc language to decode this, unlike my previous cryptanalysis and genome adventures. I started out with Arc, but my existing Arc cryptanalysis tools didn't do the job. I switched to Python since I'm faster in Python and I wanted to do some heavy-duty graphical analysis.

I tried a bunch of things that didn't work for analysis. I tried autocorrelation to try to determine the length of each code element, but didn't get much of a signal. I tried looking for common substrings between the watermarks both visually and symbolically, and I found some substantial strings that appeared multiple times, but that didn't really help. I discovered that the sequence "CGAT" never appears in the watermarks, but that was entirely useless. I tried applying the standard genetic code (mapping DNA triples to amino acids), since apparently Craig Venter used that in the past, but didn't come up with anything. I tried to make various estimates of how many bits of data were in the watermarks and how many bits of data would be required using various encodings. I briefly considered the possibility that the DNA encoded vectors that would draw out the answers (I think a Pickover book suggested analyzing DNA in this way), or that the DNA drew out text as a raster, but decided the bit density would be too low and didn't actually try this.

Then I asked myself: "How would I, myself, encode text in DNA?" I figured Unicode would be overkill, so probably it would be best to use either ASCII or a 6-bit encoding (maybe base-64). Then each pair of bits could be encoded with one of C, G, A, and T. Based on the singularityhub article I assumed the word "TRIUMPH" appeared, so I took "riumph" (to avoid possible capitalization issues with the first letter), encoded it as 6-bits or 8-bits, with any possible starting value for 'a', and the 24 possibilities for mapping C/G/A/T to 2-bits, and then tried big-endian and little-endian, to yield 15360 possible DNA encodings for the word. I was certain that one of them would have to appear. However, a brute force search found that none of them were in the DNA. At that point, I started trying even more implausible encodings, with no success, and started to worry that maybe the data was zipped first, which would would make decoding almost impossible. I started to think about variable-length encodings (such as Huffman encodings), and then gave up for the night. I was wondering if it would be worth a blog post on things that don't work for decrypting the code or if I should quit in silence.

In the middle of the night it occurred to me that the designers of the code were biologists, so I should think like a biologist not a computer scientist to figure out the code. With this perspective, it was obvious how to extend the genetic code to handle a larger character set. The problem was there were 64! possibilities. Or maybe 64^26 or 26 choose 64 or something like that; the exact number doesn't matter, but it's way too many to brute force like I did earlier. However, based on the quotes in the singularityhub article, I assumed that the substring " OUT O" appeared in the string, made a regular expression, and boom, it actually matched the watermark, confirming my theory. Then it was a quick matter of extending the technique to decode the full watermarks. As far as I can tell, the encoding used was arbitrary, and does not have any fundamental meaning. As I mentioned earlier, I'm leaving out the details for now, since I don't want to ruin anyone else's fun in decoding the message.

In conclusion, decoding the secret message was a fun challenge.

Your relationship: mathematically doomed or not?

I came across an interesting paper that uses a mathematical model of relationships to show that relationships are likely to fall apart unless you put more energy into them than you'd expect. To prove this, the paper, A Mathematical Model of Sentimental Dynamics Accounting for Marital Dissolution by José-Manuel Rey, uses optimal control theory to find the amount of effort to put into a relationship to maximize lifetime happiness. Unfortunately, due to a mathematical error, the most interesting conclusions of the paper are faulty. (Yes, this is wildly off topic for my blog.)

To briefly summarize the paper, it considers the feeling level of the relationship to be a function of time: x(t). The success of the relationship depends on the effort you put into the relationship, which is also a function of time: c(t). In the absence of effort, the feelings in the relationship will decay, but effort will boost the relationship. This is described with the catchphrase "The second thermodynamic law for sentimental interaction", which claims relationships deteriorate unless energy is added.

Next, your overall happiness (i.e. utility) is based on two more functions. The first function U(x) indicates how much happiness you get out of the relationship. The better the relationship, the happier you are, but to a limit. The second function D(c) indicates how much it bothers you to work hard on the relationship. All else being equal, you want to put some amount of effort c* into the relationship. Putting more effort than that into the relationship drains you, and putting a lot more effort drains you a lot more.

To summarize the model so far, you need to put effort into the relationship or it will deteriorate. If you put more effort into the relationship, you'll be happier because the relationship is better, but unhappier because you're working so hard, so there's a tradeoff.

The heavy-duty mathematics comes into play now. You sum up your happiness over your entire life to obtain a single well-being number W. (A discount rate is used so what happens in the short term affects W more than what happens many years in the future.) Your total happiness is given by this equation:
Equation W
Your goal is to figure out how much effort to put into the relationship at every point in the future, to obtain the biggest value of W. (I.e. determine the function c(t).) By using optimal control theory, the "best" effort function will be a solution to the paper's Equation 2:
Equation 2
From this, you can compute how much effort to put into the relationship at every point in the future, and what the final destiny of the relationship will be. The paper determines that there is an optimal equilibrium point E for the relationship, and you should adjust the effort you put into the relationship in order to reach this point.

However the paper has one major flaw at this point. It assumes that all trajectories satisfy Equation 2, not just the optimal one. (As the paper puts it, "The stable manifold is the only curve supporting trajectories leading to equilibrium.") From this, the paper reaches the erroneous conclusion that relationship dynamics are unstable, so a small perturbation will send the relationship spiraling off in another direction. In fact, a small perturbation will cause a small change in the relationship. The paper's second erroneous conclusion is that "effort inattentions" (small decreases in the effort put into the relationship) will cause the relationship to diverge down to zero and relationship breakup. In fact, the paper's model predicts that small decreases in the effort will cause small decreases in the relationship.

To make this clearer, I have annotated Figure 3 from the paper. My annotations are the "yellow notes":
Annotated Figure 3
The trajectories that the model obtains according to Equation 2 are mostly nonsensical, and exclude sensible trajectories, as I will explain.

Black line A' shows what happens if you start off putting "too much" effort into the relationship. You end up putting more and more effort into the relationship (upper-right), which will yield worse and worse well-being (W), turning the relationship into an obsession. Obviously this is neither sensible or optimal.

The model claims that Black line A'' is explains relationship breakups, where the relationship effort drops to 0, followed by the collapse of the relationship below xmin. Again, this is a nonsensical result obtained by using Equation 2 where it does not apply. According to the model, effort c* is the easiest level of relationship effort to provide. Thus, a trajectory that drops below c* is mathematically forced to worsen well-being function W, and doesn't make sense according to the model of the paper.

The paper poses the "failure paradox", that relationships often fail even though people don't expect them to. This is explained as a consequence of "effort inattention", which drops your relationship from a good (equilibrium) trajectory to a deteriorating trajectory such as A''. I show above (in orange) two alternate trajectories that recover the relationship, rather than causing breakup. The horizontal orange line assumes that after some decline, you keep the relationship effort fixed, causing the relationship to reach the stable orange dot above Wu. The diagonal orange line shows that even if your relationship is on a downwards trajectory, you can reverse this by increasing the effort and reach the "best" point E. Note that both of these trajectories satisfy the basic model of the paper, and the trajectories achieve much higher wellbeing than trajectory A''. This proves that A'' is not an optimal trajectory. (I believe the optimal trajectory would actually be to jump back up to the yellow-green line as soon as possible and proceed to E.)

Another erroneous conclusion of the paper is that E is the unique equilibrium point and is an unstable equilibrium. In fact, any point along the upwards dotted diagonal line is a stable equilibrium point. Along this line, the effort c is the exact amount to preserve the relationship feeling level x at its current value. Any perturbation in the relationship feeling x will be exponentially damped out according to Equation 1. In other words, if the feeling level in the relationship gets shifted for some reason (and the effort is unchanged), it will move back to its original path. Alternatively, if the effort level changes by a small amount, it will cause a correspondingly small (but permanent) shift in the relationship feeling, moving along the diagonal line. The relationship will not suddenly shift to line A' or A'' and go crazy.

To summarize, the paper makes the faulty assumption that all relationship trajectories (and not just the optimal one) will follow Equation 2. As a result, the paper yields nonsensical conclusions: relationships can surge up to infinity (line A') or down to 0 (line A''). The paper also reaches the mistaken conclusions that relationships have a single equilibrium point, this equilibrium point is unstable, and temporary inattention can cause relationships to break up. These conclusions are all erroneous. According to the paper's model followed correctly, relationships are stable to a rather boring degree.

Overall, I found the mathematics much more convincing in Gottman's The Mathematics of Marriage: Dynamic Nonlinear Models which applies catastrophe theory (the hot math trend of the 70s) to marriage. To vastly oversimplify, once your relationship is in an unhappy state, it takes a great deal of effort to flip it back to a happy state. This is pretty much the exact opposite of the linear model that Rey uses.

Disclaimer: My original posting was rather hand-waving; I've significantly edited this article to fill in some of the mathematical details.

Credits: I came across this article via Andrew Sullivan. ("Hat tip" is just too precious a term for me to use.)